Switch global illumination engines:
Before beginning this lesson, you will first
disable Radiosity and use the mental ray renderer to simulate global
illumination. It will speed up rendering in this case because it’s
not necessary to recalculate the solution every time you make a
change.
- From
the Rendering menu, choose Advanced Lighting > Radiosity.
- From
the Select Advanced Lighting drop-down menu, choose <no lighting
plug-in>. Click Yes to dismiss the warning that displays.
- Open
the Common tab. On the Assign Renderer rollout, click the button
next to Production.
- Choose
the mental ray Renderer, and then click OK.
- Open
the Indirect Illumination panel.
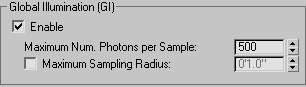
- On
the Caustics And Global Illumination rollout, in the Global Illumination
group, turn on the Enable checkbox. Leave all other parameters at
their default settings.
- Render
the Camera01 viewport to test the results.
Saving
scene states:
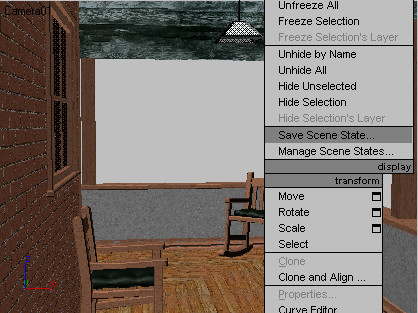
- Right-click
in the Camera viewport.
- From
the quad menu that displays, choose Save Scene State.
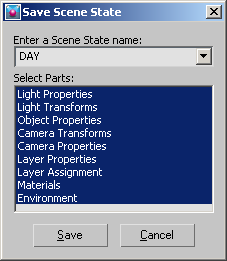
- In
the Save Scene State dialog, select all the scene parts so that cameras,
environment, layers, lights, materials and object properties will be
saved with the scene state.
- Name
the scene state DAY.
- Click
Save to exit the dialog.
Changing
scene parameters:
-
 Go to
the Display panel.
Go to
the Display panel. - On
the Hide by Category rollout, turn off Lights.
Three lights appear in the scene: one that simulates
the sun (Sun01), one that simulates global ambient lighting (Sky01),
and a simple bulb (FPoint01).
- In
the Top viewport, select the Sun01 object.
TipIt may be easier to select
Sun01
by
pressing H to open the
Select Objects dialog.
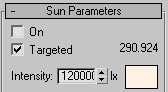
- On
the Modify panel, in the Sun Parameters rollout, turn the light
off.
- Press H to open the Select Objects dialog.
- Double-click
the object named FPoint01 to select it.
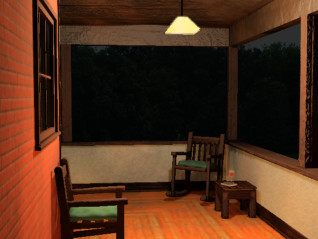
This represents the bulb that will light the
scene at night.
- On
the Modify panel, in the General Parameters rollout, turn the FPoint01 light
on.
NoteYou
do not need to change the state of the IES Sky object since skylight
objects are not recognized by the Mental Ray Renderer.
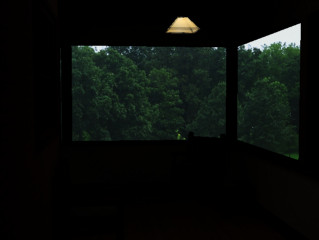
- Render
the Camera viewport.
The scene is very dark, and the background still
displays daytime lighting.
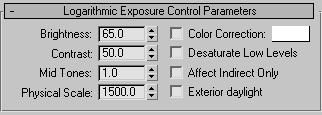
- From
the Rendering menu, choose Environment. In the Logarithmic Exposure
Control Parameters rollout, turn off the Exterior Daylight option.
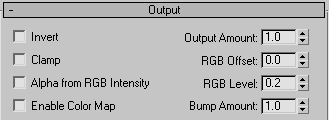
- Press M to open the Material Editor. Locate
the material named Background, and select it.
- At
the bottom of the Material Editor, expand the Output rollout. Set
the RGB Level value to 0.2.
This will make the background image much darker
to simulate a scene at night.
- Render
the Camera viewport again and notice the changes.
- Right-click
in the Camera viewport. From the quad menu, choose Save Scene State.
- In
the Save Scene State dialog, select all the scene parts.
- Name
the scene state NIGHT.
- Click
Save to exit the dialog.
Restore
scene states to render:
- Right-click
in the Camera viewport, and choose Restore Scene State from the
quad menu.
Notice the cascading menu lists the two scene
states you previously saved.
- Choose
DAY to restore the daytime scene.
Notice in the Top viewport that the point light
is displayed in black, which means it's inactive. Sunlight is displayed
in yellow, which means it is enabled.
- Render
the Camera viewport to see that all scene parts such as light effects
and environment backgrounds have been restored to their original states.