Previous Next


Inventory > Purchasing > Vendors Screen

Vendors Screen
The Vendors screen is accessible from the Vendor Selection screen, when you:
Click New to create a new vendor, or
The Vendors screen is organized into five tabs, which are described below.
Vendors Screen – General Info Tab
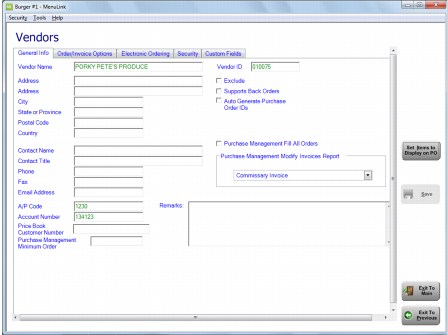
The General Info tab is where you define basic information about the vendor. At a minimum, you must define the Vendor Name and Vendor ID. We recommend filling out as much information as possible since it is viewable in many areas of the MenuLink Client. The following items have specific meaning in MenuLink Client.
Exclude — Select this field to exclude the vendor from being viewed in MenuLink Client.
Supports Back Orders — Select this field to enable back orders to be created for this vendor when product is temporarily unavailable.
Auto Generate Purchase Order ID — Select this field to have MenuLink Client automatically create Purchase Order IDs for this vendor.
Purchase Management Fill All Orders — Do Not Use. This requires a licensed instance on MenuLink Purchase Management.
Purchase Management Modify Invoices Report — Do Not Use. This requires a licensed instance on MenuLink Purchase Management.
Vendors Screen – Order/Invoice Options Tab
In the “Item Lookup Restrictions” section, there are two options that control whether a user is able to manage items for this vendor.
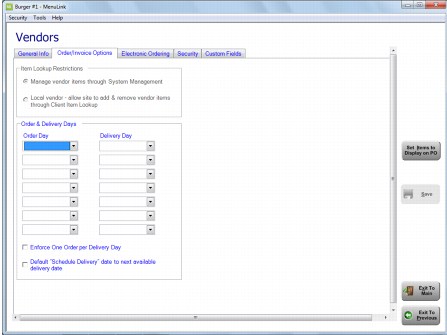
Manage vendor items through System Management – selecting this option restricts vendor item changes to system administrators using MenuLink System Management.
Local vendor – selecting this option allows users at the site to add and remove items for this vendor using Item Lookup in the MenuLink Client
In the “Order and Delivery Days” section, enter the days that you normally order from this vendor as well as the day that the order is normally received.
Enforce One Order per Delivery Day. This function is used in MenuLink Client to limit the number of orders for this vendor to one per day. This feature is usually managed by administration users only. Contact your system administrator for more information.
Default “Schedule Delivery” date to next available delivery date. Use this function to automatically cause MenuLink to use the next available delivery date as the scheduled delivery date.
Vendors Screen – Electronic Ordering Tab
Certain vendors can receive orders electronically directly from MenuLink Client rather than having to phone or fax in the order. If you can send orders electronically to this vendor, select the EO Type from the drop-down list. Choose the correct EO format for your vendor, and fill in the other fields that appear after you make your selection. Contact your system administrator for more information.
Vendors Screen – Security Tab
The Security tab defines the security privileges for the Vendors feature, including establishing who has permission to view the Vendor screen, and to make modification on the ‘Order/Invoice Options’ tab. Contact your system administrator for more information.
Vendors Screen – Custom Fields Tab
The Custom Fields tab is where you can add user-defined fields to vendor Records. These fields are exported to the MenuLink Data Mart. Contact your system administrator for more information.
 
Set Items to Display on PO
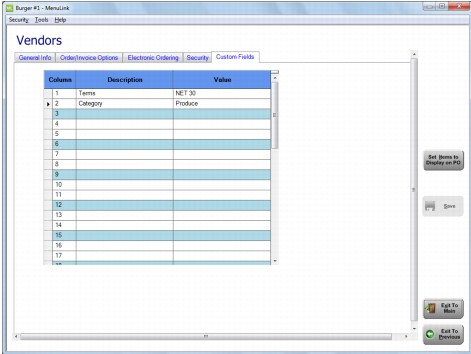
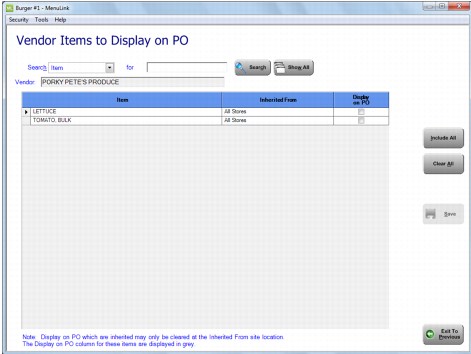
Click the Set Items to Display on PO, in the Vendors screen, to access the Vendor Items to Display on PO screen. Use this screen to review or set which vendor items will display on the Purchase Order.
The Vendor Items to Display on PO screen is where you can select the items you purchase from this vendor. The ‘Display on PO’ checkbox is used to identify the primary items that are purchased from that vendor. This configuration is critical when you have the same vendor listed more than once for the same item because you can purchase the item in different units from the same vendor.

MenuLink Online Help
Copyright © 2012 Radiant Systems, Inc. All rights reserved.