This describes how to configure the GEIUA/GOIUA. When the BM and TC are configured in the same subrack, you need to add a GEIUA/GOIUA to the GMPS/GEPS and configure its attributes. The GEIUA and GOIUA are responsible for the E1/T1 transmission and STM-1 transmission on the A interface respectively.
| Scenario | BSC initial configuration and BSC capacity expansion |
| Mandatory/Optional | Mandatory |
Prerequisite
The GMPS/GEPS has empty slots to hold the GEIUA/GOIUA.
Preparation
Parameter |
Example |
Source |
|---|---|---|
Board Type |
GEIUA |
BSC internal planning |
WorkMode |
E1 |
BSC internal planning |
Active/Standby Mode |
Selected |
BSC internal planning |
Load Key |
Server |
BSC internal planning |
Frame Format |
DOUBLE_FRAME |
Negotiation with the peer |
Parameter |
Example |
Source |
|---|---|---|
Board Type |
GOIUA |
BSC internal planning |
WorkMode |
E1 |
BSC internal planning |
Active/Standby Mode |
Selected |
BSC internal planning |
Load Key |
Server |
BSC internal planning |
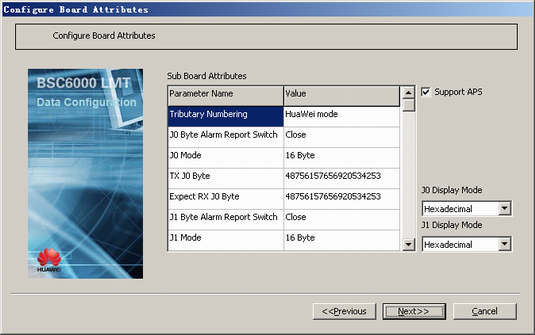
Tributary Numbering |
HuaWei mode |
Negotiation with the peer |
TX J0 Byte |
MGW SDH DEFAULT (character string) |
Negotiation with the peer |
Expect RX J0 Byte |
MGW SDH DEFAULT (character string) |
Negotiation with the peer |
TX J1 Byte |
MGW SDH DEFAULT (character string) |
Negotiation with the peer |
Expect RX J1 Byte |
MGW SDH DEFAULT (character string) |
Negotiation with the peer |
TX J2 Byte |
MGW SDH DEFAULT (character string) |
Negotiation with the peer |
Expect RX J2 Byte |
MGW SDH DEFAULT (character string) |
Negotiation with the peer |
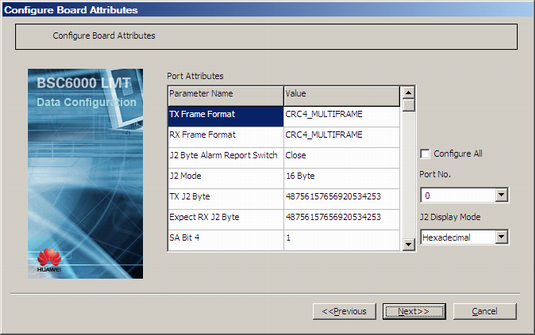
TX Frame Format |
CRC4_MULTIFRAME |
Negotiation with the peer |
RX Frame Format |
CRC4_MULTIFRAME |
Negotiation with the peer |
The procedures for configuring the GEIUA and GOIUA are the same. The following procedure takes how to add a pair of active/standby GOIUAs in the GMPS as an example.
Procedure
- On the BSC6000 Local Maintenance Terminal, click the BSC Device Panel tab. Select a cabinet number from the Current Cabinet drop-down list.
- Right-click an empty slot among slots 18-25 in the GMPS, and then choose Add Board from the shortcut menu. A dialog box is displayed, as shown in Figure 1.
- Set FuncType to A interface board, and set Board Type to GOIUA. Set other parameters by referring to Table 1.
- Click Finish. The addition of a pair of GOIUAs is complete.
- Right-click GOIUA, and then choose Configure Board Attributes from the shortcut menu. A dialog box is displayed, as shown in Figure 2.
- Set Load Key, and then click Next. A dialog box is displayed, as shown in Figure 3.
- Set the attributes of the sub-board of the GOIUA by referring to Table 1.
 NOTE:
NOTE: When the parameter Optical Interface Standard is set to SONET, you must configure the following parameters: High Order Path 1 TX J1 Byte, High Order Path 1 Expect RX J1 Byte, High Order Path 2 TX J1 Byte, High Order Path 2 Expect RX J1 Byte, High Order Path 3 TX J1 Byte, and High Order Path 3 Expect RX J1 Byte.
- Click Next. A dialog box is displayed, as shown in Figure 4.
NOTE:
TX Frame Format and RX Frame Format should be negotiated with the peer. For other parameters, use the default settings.
By default, J2 Byte Alarm Report Switch is set to Close. You can modify it according to actual requirements. The BSC recognizes only the J2 byte alarms in the format suggested in the SDH. If J2 Byte Alarm Report Switch is set to Open, Huawei recommends that the peer expected RX J2 byte be set in the format suggested in the SDH.
- Set the attributes of the port on the GOIUA by referring to Table 1.
- Click Next. A dialog box is displayed, as shown in Figure 5.
NOTE:
Protect mode, Switch mode, and recover mode should be negotiated with the peer. For other parameters, use the default settings.
- Click Finish. The configuration of the GOIUA is complete.