Create a new Windows Form.
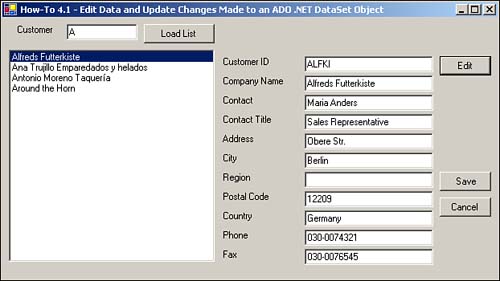
Add the following controls, setting the properties as listed in Table 4.2.
Table 4.2. Controls Property Settings
Object
Property
Setting
Label
Name
Caption
Label1
Customer
TextBox
Name
Text
txtCustLimit
A
Button
Name
Caption
btnLoadList
Load List
ListBox
Name
lstCustomers
Label
Caption
Customer ID
Label
Caption
Company Name
Label
Caption
Contact
Label
Caption
Contact Title
Label
Caption
Address
Label
Caption
City
Label
Caption
Region
Label
Caption
Country
Label
Caption
Phone
Label
Caption
Fax
TextBox
Name
txtCustomerID
TextBox
Name
txtCompanyName
TextBox
Name
txtContact
TextBox
Name
txtContactTitle
TextBox
Name
txtAddress
TextBox
Name
txtCity
TextBox
Name
txtRegion
TextBox
Name
txtPostalCode
TextBox
Name
txtCountry
TextBox
Name
txtPhone
TextBox
Name
txtFax
Button
Name
Caption
btnEdit
&Edit
Button
Name
Caption
btnSave
&Save
Button
Name
Caption
btnCancel
&Cancel
Note

Notice that the Text property of the text boxes is not being set at design time. In Chapter 1, "Developing Windows Forms Using Bound Controls," they were set to columns of a dataset that was included on the form. In this How-To, they will be set at run-time.
In the class module for the form, add the following three Private declarations just below the line of code that reads Windows Form Designer generated code. These three objects will be used throughout the form.
Dim mdsCustIndiv As New DataSet()
Dim modaCustIndiv As OleDb.OleDbDataAdapter
Dim mdrCustIndiv As DataRow
Enter the following code as the Click event for btnLoadList:
Private Sub btnLoadList_Click(ByVal sender As System.Object, _
              ByVal e As System.EventArgs) Handles btnLoadList.Click

        '-- Move the loading of the list to a subroutine for
        '   additional(calls)
        LoadList()

    End Sub
Create the LoadList routine by entering the following code into the form you created for this How-To. This code creates and fills a data table using a data adapter. The string that the data adapter uses creates a Select statement by using the txtCustLimit text box. The DataSource, DisplayMember, and ValueMember properties of the list box are then bound. Last, the LoadIndividual routine is called, which is described in the next step.
Private Sub LoadList()

        Dim odaCustList As OleDb.OleDbDataAdapter
        Dim dtCustList As DataTable = New DataTable()

        Dim strSQL As String

        '-- Create the SQL String
        strSQL = "Select CustomerID, CompanyName " & _
                    From Customers Where CustomerID Like '" & _
                    Me.txtCustLimit.Text & "%'"


        '-- Set up the exception catch
        Try

            '-- Create an instance of the data adapter; then fill the data
table
            odaCustList = New OleDb.OleDbDataAdapter(strSQL, _
                    BuildCnnStr("(local)", "Northwind"))
            odaCustList.Fill(dtCustList)

            '-- Bind the data to the list box
            lstCustomers.DataSource = dtCustList
            lstCustomers.DisplayMember = "CompanyName"
            lstCustomers.ValueMember = "CustomerID"

        LoadIndividual()
        Catch oexpData As OleDb.OleDbException
            MsgBox(oexpData.Message)
        End Try

    End Sub
table
odaCustList = New OleDb.OleDbDataAdapter(strSQL, _
BuildCnnStr("(local)", "Northwind"))
odaCustList.Fill(dtCustList)
'-- Bind the data to the list box
lstCustomers.DataSource = dtCustList
lstCustomers.DisplayMember = "CompanyName"
lstCustomers.ValueMember = "CustomerID"
LoadIndividual()
Catch oexpData As OleDb.OleDbException
MsgBox(oexpData.Message)
End Try
End Sub
Create the LoadIndividual routine by entering the following code in the form you created for this How-To. Taking the SelectedItem from the list box, a data adapter is created, and a dataset is filled. Next, the individual DataRow is created. Last, each of the TextBox controls is loaded with the value from the column with the corresponding name. Notice the use of the Try-Catch-End-Try to ignore controls that don't have a like column in the DataRow.
Private Sub LoadIndividual()

        Dim strSQL As String
        Dim strName As String
        Dim oCtl As Object

        mdsCustIndiv.Clear()

        If Me.lstCustomers.SelectedIndex <> -1 Then

            Try
                '-- Load the individual record into the dataset
                strSQL = "Select * from Customers Where CustomerID = '" &
                                  Me.lstCustomers.SelectedItem(0) & "'"
                modaCustIndiv = New OleDb.OleDbDataAdapter(strSQL, _
                                  BuildCnnStr("(local)", "Northwind"))

                '-- Fill the dataset
                modaCustIndiv.Fill(mdsCustIndiv, "Customers")

                '-- Grab the individual data row
                mdrCustIndiv = mdsCustIndiv.Tables("Customers").Rows(0)

            Catch oexpData As OleDb.OleDbException

                MessageBox.Show("Error loading individual data: " _
                                   & oexpData.Message)
                Exit Sub

            End Try

            '-- Run through the text boxes on the form, and
            '-- if they match up with a field from the record,
             '  load them.

            For Each oCtl In Me.Controls

                If TypeOf oCtl Is TextBox Then

                    strName = Mid(oCtl.Name, 4)

                    '-- By trapping the exception this way, errors are ignored.
                    Try
                        oCtl.text = mdrCustIndiv(strName).ToString
                    Catch oexp As Exception
                    End Try

                End If

            Next

        End If
    End Sub
Enter the following code to the Click event for lstCustomers:
Private Sub lstCustomers_Click(ByVal sender As Object,
                ByVal e As System.EventArgs) Handles lstCustomers.Click

        '-- Fill the current list item's individual dataset
        LoadIndividual()

End Sub
Enter the following code to the Click event for btnEdit:
Private Sub btnEdit_Click(ByVal sender As System.Object,
                      ByVal e As System.EventArgs) Handles btnEdit.Click

        '-- Enable the editing of the form
        ActivateEditing(True)

End Sub
Create the ActivateEditing routine by entering the following code in the form you created for this How-To. Introduced in Chapter 1, this code goes through each of controls on the form, looking for text boxes, then setting the BorderStyle and BackColor properties based on whether the controls are to be enabled or disabled. The Enabled property of each control is then set as well.
Private Sub ActivateEditing(ByVal bEnable As Boolean)


        Dim oCurr As Object

        '-- Loop through each of the controls on the form
        For Each oCurr In Me.Controls()

            '-- Check to see if the control is a text box
            If TypeOf oCurr Is TextBox And oCurr.Name <> "txtCustLimit" Then

                '-- If so, toggle the properties
                If bEnable Then

                    oCurr.BorderStyle() = _
                            System.Windows.Forms.BorderStyle.Fixed3D

                    oCurr.BackColor() = System.Drawing.Color.White

                Else

                    oCurr.BorderStyle() = _
                            System.Windows.Forms.BorderStyle.FixedSingle

                    oCurr.BackColor() = Me.BackColor


                End If

                oCurr.Enabled = bEnable

            End If
        Next

End Sub
Enter the following code to the Click event btnSave:
Private Sub btnSave_Click(ByVal sender As System.Object, _
                      ByVal e As System.EventArgs) Handles btnSave.Click

        '-- Save the information
        SaveRecord()

        '-- Disable the text boxes
        ActivateEditing(False)

    End Sub
Create the SaveRecord routine by entering the following code in the form that you created for this How-To. Using a DataRow object, the BeginEdit method is called, and then each of the controls is stored back into the columns of the same names, if they exist. The EndEdit method is then called to complete the editing of the DataRow. A CommandBuilder object is created to create the Update command for the DataAdapter object. The DataAdapter Update method is called to update the dataset with the data changed and then the AcceptChanges of the DataSet object. This accepts all the changes for all the objects and posts the data back to the server. Finally, the connection is closed for the UpdateCommand of the DataAdapter object.
Private Sub SaveRecord()

        Dim oCtl As Object
        Dim strName As String

        '-- Start the editing in the datarow.
        mdrCustIndiv.BeginEdit()

        '-- Run through the text boxes on the form, and
        '-- if they match up with a field from the record,
        '-- place the value back in the record.
        For Each oCtl In Me.Controls

            If TypeOf oCtl Is TextBox Then

                strName = Mid(oCtl.Name, 4)

                '-- By trapping the exception this way, errors are ignored.
                Try
                    mdrCustIndiv(strName) = oCtl.text
                Catch oexp As Exception
                End Try

            End If

        Next

        '-- Finish the editing of the data row
        mdrCustIndiv.EndEdit()

        Try

            '-- Create an instance of the command builder
            Dim ocbCustIndiv As OleDb.OleDbCommandBuilder
            ocbCustIndiv = New OleDb.OleDbCommandBuilder(modaCustIndiv)

            '-- Have the command builder create an update SQL command
            modaCustIndiv.UpdateCommand = ocbCustIndiv.GetUpdateCommand

            '-- Perform the update SQL command; then close the connection
            modaCustIndiv.Update(mdsCustIndiv, "Customers")
            mdsCustIndiv.Tables("Customers").AcceptChanges()
            modaCustIndiv.UpdateCommand.Connection.Close()


        Catch excData As Exception

        End Try

    End Sub
Enter the following code to the Click event btnCancel:
Private Sub btnCancel_Click(ByVal sender As System.Object, _
                   ByVal e As System.EventArgs) Handles btnCancel.Click

        '-- Use the BindingContext class to cancel the current editing.
    LoadIndividual()
     ActivateEditing(False)

End Sub