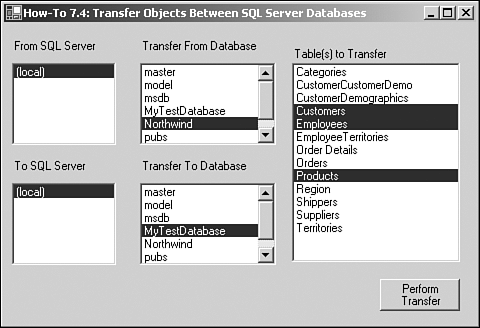
Figure 7.9. Transferring tables between SQL Server databases.

Users sometimes need to transfer (copy) tables between SQL Server databases. This How-To shows how to allow the user to choose multiple tables and copy them from one database to another as well as tables from two different databases on two different SQL servers.
One of the tasks your clients have you perform for them using the Enterprise Manager is to transfer objects, such as tables, between SQL Server databases. How do you create a dialog box that would allow the user to transfer databases between two SQL Server databases?
Unlike the earlier How-Tos in this chapter, you will be using the SQL-DTS object model in addition to SQL-DMO. You can see the objects, properties, and methods that will be used from SQL-DTS in Table 7.7.
|
Object |
Property/Method |
|---|---|
|
Package |
Steps.New |
|
Tasks.New |
|
|
Steps.Add |
|
|
Tasks.Add |
|
|
Execute |
|
|
Step |
TaskName |
|
Name |
|
|
Task |
CustomTask |
|
CustomTask |
Name |
|
SourceServer |
|
|
SourceUseTrustedConnection |
|
|
SourceDatabase |
|
|
DestinationServer DestinationUseTrustedConnection |
DestinationDatabase |
|
CopyAllObjects |
|
|
IncludeDependencies |
|
|
IncludeLogins |
|
|
IncludeUsers |
|
|
DropDestinationObjectsFirst |
|
|
CopySchema |
|
|
CopyData |
|
|
AddObjectForTransfer |
Using the items just listed, you will create a form with options to transfer tables between two SQL databases.
Open and run the VB.NET -Chapter 7 solution. From the main Windows form, click on the command button with the caption How-To 7.4. You will then see a form allowing you to pick SQL Servers on the network to transfer from and to. After you have chosen these, you can then select which databases you want to transfer from and to. After choosing from the database to transfer from, you are then presented with a list of tables to transfer from. You can then highlight multiple tables, as shown in Figure 7.9.

Tip
One of the options included as a property of the CustomTask object is IncludeDependencies. This option specifies whether to have DTS transfer related tables as well as the selected table(s). This could be put as an option on the form as well. For this example, I have it set to True. |
Create a Windows Form. Then place the controls shown in Figure 7.9, with the following properties set as in Table 7.8.
|
Object |
Property |
Setting |
|---|---|---|
|
Label |
Name |
Label1 |
|
Text |
From SQL Servers |
|
|
ListBox |
Name |
lstFromSQLServer |
|
Label |
Name |
Label2 |
|
Text |
To SQL Servers |
|
|
ListBox |
Name |
lstToSQLServer |
|
Label |
Name |
Label3 |
|
Text |
Transfer from Database |
|
|
ListBox |
Name |
lstFromDB |
|
Label |
Name |
Label4 |
|
Text |
Transfer to Database |
|
|
ListBox |
Name |
lstToDB |
|
Label |
Name |
Label5 |
|
Text |
Table(s) to Transfer |
|
|
ListBox |
Name |
lstTables |
|
SelectionMode |
MultiSimple |
|
|
Command Button |
Name |
btnTransfer |
|
Text |
&Perform Transfer |
On the form, add the code in Listing 7.18 to the Load event. This will look familiar from How-To 7.1. For an examination of the LoadSQLServers routine, check out step 4 in that How-To. Different from the other How-Tos in this chapter thus far, however, is the fact that the LoadSQLServers routine is called twice: once for the lstFromSQLServer, and a second time for the lstToSQLServer.
Private Sub frmHowTo7_4_Load(ByVal sender As System.Object,
ByVal e As System.EventArgs) Handles MyBase.Load

        LoadSQLServers(Me.lstFromSQLServer)
        LoadSQLServers(Me.lstToSQLServer)

End Sub
On the lstFromSQLServer and lstToSQLServer list boxes, add the code in Listing 7.19 to the SelectedIndexChanged event of each, as appropriate. These routines call GetSQLDatabases, described in step 6 of How-To 7.1.
Private Sub lstFromSQLServer_SelectedIndexChanged(ByVal sender As System.Object,
ByVal e As System.EventArgs) Handles lstFromSQLServer.SelectedIndexChanged

        GetSQLDatabases(Me.lstFromSQLServer.SelectedItem, Me.lstFromDB)

    End Sub

Private Sub lstToSQLServer_SelectedIndexChanged(ByVal sender As System.Object, _
            ByVal e As System.EventArgs) _
           Handles lstToSQLServer.SelectedIndexChanged

        GetSQLDatabases(Me.lstToSQLServer.SelectedItem, Me.lstToDB)

End Sub
On the lstFromTables list box, add the code in Listing 7.20 to the SelectedIndexChanged event. This routine starts off by logging onto the server that is selected in the lstFromSQLServer list box, and then creates a reference to the database that is selected in the lstFromDB list box. After clearing the lstTables list box, the routine iterates through each of the tables in the database and adds the names of those that are user tables to the lstTables items.
Private Sub lstFromDB_SelectedIndexChanged(ByVal sender As System.Object,
ByVal e As System.EventArgs) Handles lstFromDB.SelectedIndexChanged

        '-- Create the connection and specify the stored procedure to use.
        Dim odb As SQLDMO.Database
        Dim otbl As SQLDMO.Table
        Dim oapp As New SQLDMO.Application()
        Dim osvr As New SQLDMO.SQLServer()

        Try

            osvr.LoginSecure = True
            osvr.Connect(Me.lstFromSQLServer.SelectedItem)
            odb = osvr.Databases.Item(Me.lstFromDB.SelectedItem)

            Me.lstTables.Items.Clear()

            For Each otbl In odb.Tables
                If otbl.TypeOf = _
                  SQLDMO.SQLDMO_OBJECT_TYPE.SQLDMOObj_UserTable Then
                    Me.lstTables.Items.Add(otbl.Name)
                End If
            Next

        Catch excpData As Exception
            MessageBox.Show("Error Occurred: " & excpData.Message)

        End Try


    End Sub
Tip
You could really make this a flexible and powerful utility by including different objects to transfer other than just user tables. Some examples could be stored procedures or views. |
On the lstTables list box, add the code in Listing 7.21 to the SelectedIndexChanged event. This routine enables the btnTransfer button.
Private Sub lstTables_SelectedIndexChanged(ByVal sender As System.Object,
ByVal e As System.EventArgs) Handles lstTables.SelectedIndexChanged
        Me.btnTransfer.Enabled = True
End Sub
Add the code in Listing 7.22 to the Click event of btnTransfer. This routine begins by declaring all the objects to be used, and then creates new Step and Task objects, with the type of task being specified. In this case, the task is of type DTSTransferObjectsTask. Next, the various necessary properties are set on the Task object. For each of the tables to be transferred, the AddObjectForTransfer method is executed, with the name of the table being passed to the method. After the name of the task is added to the step, both objects are added to their collections in the Package object. The Execute method of the Package object is then called.
Private Sub btnTransfer_Click(ByVal sender As System.Object, _
                    ByVal e As System.EventArgs) Handles btnTransfer.Click

        Dim oPackage As New DTS.Package()
        Dim oStep As DTS.Step
        Dim oTask As DTS.Task
        Dim oXferObj As DTS.TransferObjectsTask
        Dim intCurrTable As Integer

        Try
            '-- Create step and task

            oStep = oPackage.Steps.New
            oTask = oPackage.Tasks.New("DTSTransferObjectsTask")
            oXferObj = oTask.CustomTask

            '-- Configure transfer objects task

            With oXferObj

                .Name = "XferObjTask"
                .SourceServer = Me.lstFromSQLServer.SelectedItem
                .SourceUseTrustedConnection = True
                .SourceDatabase = Me.lstFromDB.SelectedItem
                .DestinationServer = Me.lstToSQLServer.SelectedItem
                .DestinationUseTrustedConnection = True
                .DestinationDatabase = Me.lstToDB.SelectedItem
                .CopyAllObjects = False
                .IncludeDependencies = True
                .IncludeLogins = False
                .IncludeUsers = False
                .DropDestinationObjectsFirst = False
                .CopySchema = True
                .CopyData = DTS.DTSTransfer_CopyDataOption.DTSTransfer_AppendData

                For intCurrTable = 0 To Me.lstTables.SelectedItems.Count - 1

                    .AddObjectForTransfer( _
                            Me.lstTables.SelectedItems.Item(intCurrTable), "dbo",
                            DTS.DTSSQLObjectType.DTSSQLObj_UserTable)

                Next

            End With

            '-- Link step to task
            oStep.TaskName = oXferObj.Name
            oStep.Name = "XferObjStep"
            oPackage.Steps.Add(oStep)
            oPackage.Tasks.Add(oTask)

            oPackage.Execute()

        Catch excp As Exception

            MessageBox.Show(excp.Message, "Error Occurred")
            Exit Sub

        End Try

        MessageBox.Show("Tables Transferred")

End Sub
Add the code in Listing 7.23 to the Click event of btnClose.
Private Sub btnClose_Click(ByVal sender As System.Object, _
                    ByVal e As System.EventArgs) Handles btnClose.Click

        Me.Close()

End Sub
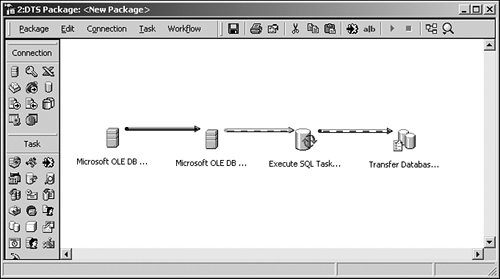
Using the Data Transformation Services API requires a bit more work than just using SQL-DMO. To use SQL-DTS, you need to also have a concept of using workflow. Workflow allows you to specify steps in a package and assign tasks to those steps. Task objects that are not assigned to steps can be included in the package, but they will not be executed. You can see an example of multiple tasks being performed by the arrows in the package in Enterprise Manager (see Figure 7.10).

This example is simple in that it has only one step and task. For more information on using workflow and DTS packages, check out SQL Server's Books On-Line, and look up "workflow."
As you create each of the tasks, you will have to set the various properties that are necessary to perform the tasks. The source and destination servers and databases are examples of this.
As mentioned, using DTS takes a bit more work to understand than DMO, but after you understand what needs to be done, there is little you can't perform using it.