In this example, we attempt to simplify the developer’s task further by encapsulating the previous example into an ActiveX control, with a number of buttons providing load, save, execute, and print functionality.
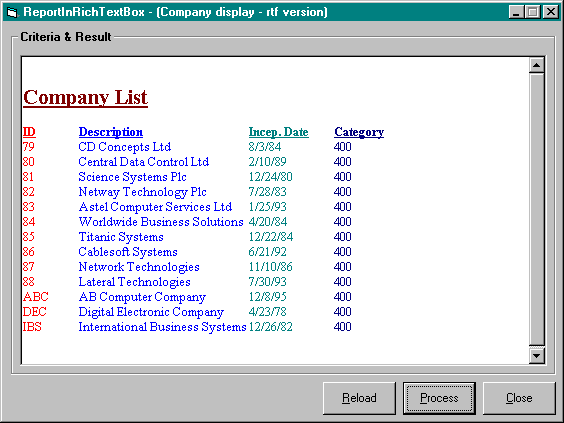
Figure 3-11 Report result after execution
| Folder: | CHAP03\ReportInOCXControl |
| Dependencies: | CompanyStock.exe Microsoft Rich TextBox Control 5.0 Microsoft Common Dialog Control 5.0 Microsoft Windows Common Controls 5.0 Microsoft Windows Common Controls-2 5.0 Microsoft Picture Clip Control 5.0 Microsoft FlexGrid Control 5.0 VBCommonMethodsAndProperties class |
| Project Name: | ReportInOcxControl.vbg |
| Instructions: | Ensure that CompanyStock.exe has been registered in the Registry. Load Visual Basic 5, and open the ReportInOcxControl.vbp file. Press Ctrl+F5 to run. |
Before developing ActiveX controls, you must be sure you know the content and functionality of each control you plan to use. The easiest way to test an ActiveX control is by setting up a group project with the control and test code in separate projects, as shown in Figure 3-12 on the following page. It’s a different story when a control has already been released to other developers in OCX format. Every subsequent iteration of the control will require a developer to rereference a project to the latest version of the control by adding the new control into the control’s component bar. (See Figure 3-12.)
Note When a control OCX is modified, the associated CLSID Registry key changes. As a result, the reference in the Visual Basic project to the control becomes invalid; so the next time you try to open the project, you receive a “Cannot load…” error message. The control is then converted to a picture box on the form, and you have to manually add the new version of the control back into the project and onto the form. To avoid these problems, any time you modify a control, it’s a good idea to increment the control’s version number and store the control under a separate directory while leaving the previous version of the control intact. By doing this, your Visual Basic project can continue to reference the previous version until you’re ready to change the reference to the new version, thus saving yourself the problems of error messages and picture boxes.
The project group ReportInOcxControl.vbg consists of two projects: VBActiveXControl.vbp and ReportInOcxControl.vbp. The VBActiveXControl project creates the ActiveX control, and the ReportInOcxControl project tests the control in design mode.
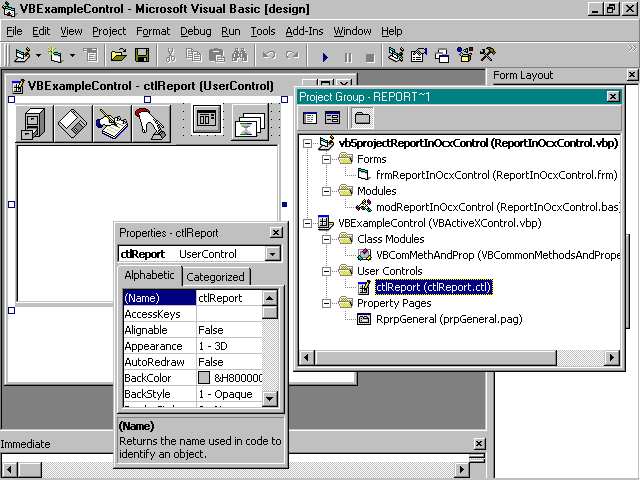
Figure 3-12 ActiveX control under development
The VBActiveXControl project consists of three objects: a user control, ctlReport, which contains the previous example wrapped up with an improved interface and enriched functionality; a class module, VBComMethAndProp (Visual Basic Common Methods and Properties), the same module used in the previous example; and a property page, RprpGeneral, which holds the default template. You’ll notice that there’s no normal module: we don’t need one because a user control requires no start-up object.
Only a few pieces of code in this example were not covered in the previous example. One of these is the UserControl_Resize event. A developer might want to size the control according to the form used, so it is necessary to ensure that the rich text box embedded inside the user control is kept in proportion to the size of the control. The following code ensures this:
' Set the toolbar (tbr) to the top of the form.
tbr.Top = 1

' Set the control to sit below the toolbar.
rtfDisplay.Top = tbr.Height

' Size the height and width of the control to the form.
rtfDisplay.Width = UserControl.Width
rtfDisplay.Height = UserControl.Height - tbr.Height
It is useful to call this code from the UserControl_Initialize event of the user control to ensure that the control appears in the correct format when first viewed on a form. The Declarations section includes a public variable that provides a link to the property page:
Public DefaultTemplate As StringThis variable is referenced in the UserControl_Initialize event with the following line of code:
rtfDisplay.filename = DefaultTemplateThe property page includes code to monitor whether the value has changed. This information is trapped in the text field holding the default template value and in the two events PropertyPage_ApplyChanges and PropertyPage_SelectionChanged:
Private Sub txtDefaultTemplate_Change()
    Changed = True
End Sub

Private Sub PropertyPage_ApplyChanges()
    SelectedControls(0).DefaultTemplate = _
        txtDefaultTemplate.Text
End Sub

Private Sub PropertyPage_SelectionChanged()
    txtDefaultTemplate.Text = _
        SelectedControls(0).DefaultTemplate
End Sub
The ReportInOcxControl project consists of two objects: a form, named frmReportInOcxControl, which contains the ActiveX control; and a module, modReportInOcxControl, which includes the Sub Main() routine that displays the form. The only lines of code required in this example load and unload the form:
Sub main()
    frmReportInOcxControl.Show
End Sub

Private Sub cmdClose_Click()
    Unload frmReportInOcxControl
End Sub
All the rest is handled internally by the ActiveX control, which provides a tremendous benefit for the developer, who can now reuse the control in a range of projects without needing to know the detail behind it. Figure 3-13 shows the ActiveX control in use.
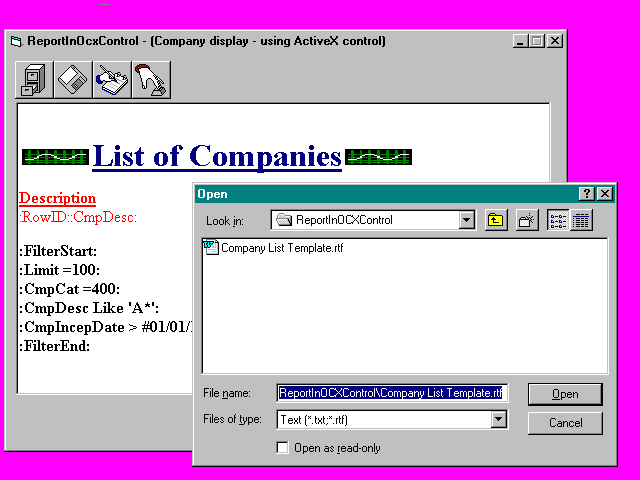
Figure 3-13 ActiveX control embedded in a Visual Basic form