Microsoft Corporation
The setting: the Software Development 94 conference in San Jose. The assignment: given a list of features, write an application that implements as many as you can. Time allotted: one hour.
It's the C++ Super Bowl, where compiler vendors send a pair of their best developers—and a copy of their product—to compete. The developers work on an auditorium stage, while their every move is projected on giant screens for the audience to follow along. It's the ultimate pressure cooker of programming.
It's also a useful situation for discovering what features should go into a development environment. Something that's a minor inconvenience during ordinary development can become a major handicap in a situation where every second counts, while a nice shortcut can become a lifesaver.
Representing Microsoft® Visual C++® at the 1994 Super Bowl were Scott Randell and Greg DeMichillie, two of our best Microsoft Foundation Class Library (MFC) developers. When they saw the list of features that were required, they realized that many of them were already implemented by the sample programs shipped with Visual C++. While hundreds of spectators watched their every keystroke and roared at every compilation error, Scott and Greg frantically extracted individual features from the samples and incorporated them into their application.
Scott and Greg won. Greg later described the experience as, "The most stressful hour of my life. But more than that, the experience was an object lesson in the importance of reuse (no pun intended)."
Later that year, the Visual C++ team gathered for an offsite retreat to brainstorm about the next version of the product. One of the our primary concerns was, "how could we help our customers achieve code reuse?" Everyone knows that the code you need has often already been written; the problem is that it's not in a form that's easy to reuse.
Then one person brought up the Super Bowl: there was a situation in which reuse had saved the day. What we needed was a way to provide the same advantage to our customers as we had to our team.
Simply including more sample code in the product wouldn't be enough. It wasn't always easy extracting a given feature from a given sample, especially if you weren't familiar with the sample application's structure. A single feature might easily require code in many parts of an application, meaning you would have to comb all the files to find the functions you were looking for, and it'd be easy to overlook a needed #include statement.
What would be really helpful would be for the product to offer an assortment of free-floating features, a collection that you could browse through. If you saw a feature that you wanted, you could select it and—quickly and cleanly—insert it into your own program. This wouldn't merely help win contests; this would be something you could use in every project.
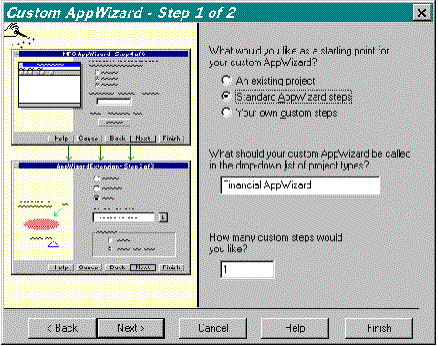
Custom AppWizards allow you to create wizards that generate skeletal applications according to your requirements (Figure 1). For example, if you work in a company where employees commonly need to view information in a database, you can create a custom AppWizard to generate generic dialog box–based front ends to a database; you can even ensure that the dialog box is always embellished with a company logo. Simply take an existing project that contains the code you want to use as boilerplate and use it as the starting point for your own AppWizard.

Figure 1. Creating a Custom AppWizard
Or, if the default app generated by the existing AppWizard has a lot, but not all, of what you need, you can use that as a starting point and make modifications from there. Suppose you're selling a library of classes that's compatible with MFC but provides specialized functionality. You can create a custom AppWizard to generate applications that are essentially regular AppWizard applications, with the addition of #include statements for your library's header files, calls to initialization, and cleanup functions, and the appropriate options in the makefiles.
The OLE Controls technology defines a binary standard for components, so you can use the same controls used by developers who use Microsoft Visual Basic®, Microsoft Visual FoxPro™, or other tools. This interoperability creates an enormous market for any OLE Control, which is the reason that hundreds of third-party vendors now offer OLE Controls. These controls range from new buttons for your dialogs to mini-applications that you can embed within your own larger applications.
Visual C++ version 4.0, in combination with MFC, provides coverage for every aspect of OLE Control development. To create a control container, simply select the Control Container option when running AppWizard. To insert an existing OLE Control into your container, choose a control from the Component Gallery. To write your own OLE Control, use ControlWizard to generate the starter files you need.
The Component Gallery is an automated catalog of features; you simply select a feature you want your application to have, and the component adds the necessary code to your source files (Figure 2). The Gallery doesn't just add files to your project; it can also insert resources, define new functions in existing classes, and even make changes to individual functions.
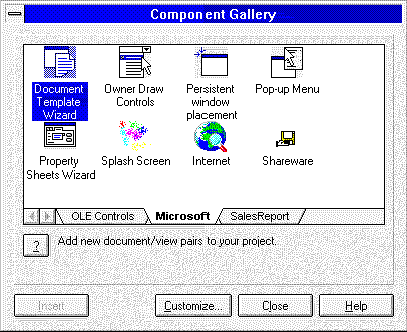
Figure 2. Choosing prebuilt components in component gallery
A wide variety of components are supplied with Visual C++ 4.0, and other vendors will be offering components of their own. You can also reuse your own code, because classes from your previous AppWizard-generated projects are available from the Component Gallery. And if you need to share code with other developers on a project, you can export a component into a standalone file, encapsulating both an .H file and a .CPP file, that you can pass around.
Visual C++ 4.0 includes version 4.0 of MFC, the most successful example of reusable C++ source code in the industry. This version adds the following features:
These are examples of MFC continually expanding coverage for the latest additions to the Windows environment. Yet MFC 4.0 remains compatible with previous versions to preserve your investment. And to maximize customers' ability to reuse our class library, Microsoft has also licensed MFC to other compiler vendors, including Symantec and Watcom.
Visual C++ 4.0 fully supports the newest additions to the C++ language: C++ namespaces and Run-Time Type Information (RTTI). Namespaces prevent collisions between global names, enabling you to use different vendors' class libraries in the same application. RTTI provides a standard way to determine the class of an object, avoiding problems that could arise by using incompatible, vendor-specific techniques of providing that information. Along with support for templates and exception handling, these features bring Visual C++ 4.0 to the forefront of ANSI compliance.
In response to customer requests, Visual C++ 4.0 also includes the Hewlett-Packard Standard Template Library (STL). Visual C++ implementation of templates is so complete and robust that the copy of STL included is identical to Hewlett-Packard's, with none of the modifications that other compiler vendors have needed to make in order to compile it.
Visual C++ 4.0 offers ClassView, a class-oriented view of your project. It provides a list of the classes in your project (plus any global declarations), and you can expand any class to view a list of its member functions and data. If you want to edit a particular function, simply double-click on its name from within ClassView, and the function definition appears in a source window. If you want to move from one function to another, you don't have to scroll up and down through a source file; ClassView shows you a bird's-eye view of your class, allowing you to jump directly to the function you want (Figure 3).
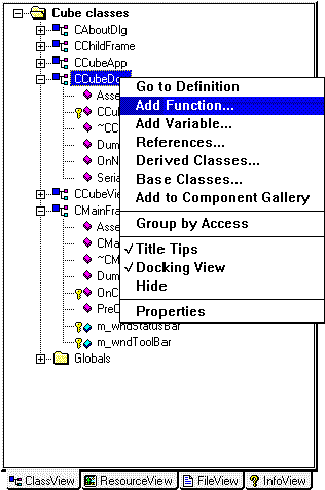
Figure 3. Adding a member function with ClassView
And if you want to add a new member to a class, ClassView lets you add both declaration and definition in one step: click the right mouse button on the class name from within ClassView and choose the Add Function command. All you do is type in the prototype and the access specifier for the new function; Visual C++ adds a declaration to the .H file and takes you to an empty definition in the .CPP file so that you can start entering code.
Visual C++ 4.0 introduces WizardBar, a toolbar located at the top of your source window that gives you easy access to the message-mapping intelligence of ClassWizard. Like ClassView, it lets you jump directly to a specific function in your class, this time based on the message the function handles (Figure 4). Want to go to your handler for WM_LBUTTONDOWN? Just pull down the Messages drop-down list and choose that message. Want to add a new handler? You do it the same way: choose the message you want, and WizardBar adds a declaration to header file, an entry to the message map, and a skeletal definition to your source file.
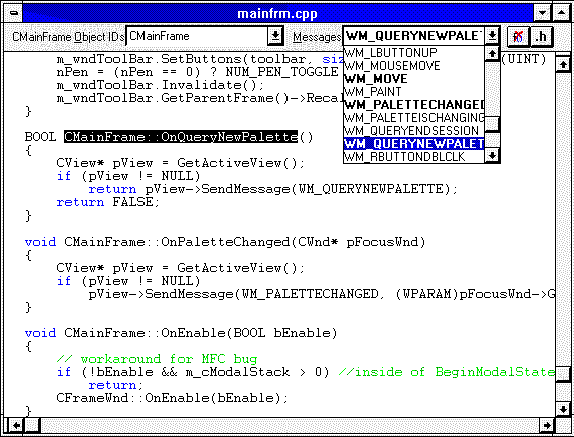
Figure 4. Navigating with the WizardBar
Visual C++ 4.0 introduces Developer Studio, a common environment for Visual C++, Fortran PowerStation, Visual Test, and the Microsoft Developer Network (MSDN). If you install any combination of these products on the same machine, you'll be able to use all of them from the same environment. Now you can compile (in both C++ and Fortran), edit resources, debug, run automated tests, and get complete documentation without ever task-switching.
If you're part of a development team, one tool you use is a source-code control system. To further remove the need for task switching, Microsoft Developer Studio is compatible with a variety of source-code control systems, including Microsoft SourceSafe® (Figure 5). When you have a source-code control system installed, you can place a project under source-code control, check files in or out, or see the status of a given file, all from within the Developer Studio environment.
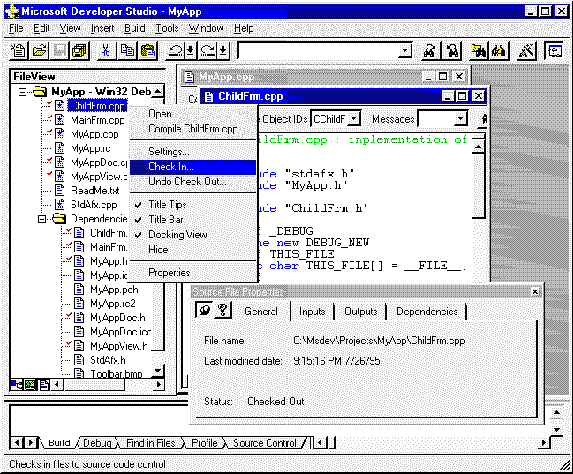
Figure 5. Checking project files into Microsoft SourceSafe
With Visual C++ 4.0, you can define subprojects that are dependencies of your main project. For example, an application consisting of an .EXE file and a .DLL file could be built by defining the .DLL as a subproject of the .EXE project. Then, whenever you rebuild the .EXE, the project system checks to see if the .DLL is out-of-date, and if so, rebuilds the .DLL too. Similarly, you can define complex projects having many .EXEs and .DLLs and multiple levels of dependency.
You can also define custom build rules for file types other than C++ source files; simply specify the commands you want executed, and the project build system will take it from there. And as with previous versions of Visual C++, you can define multiple configurations (for example, Debug/Release or Unicode/ANSI) within a single workspace.
Visual C++ 4.0 introduces minimal rebuild, a technique for recompiling only what needs to be recompiled. Using information about C++ syntax, the compiler constructs a finer-grained dependency tree than the one described by a makefile. If a class isn't referenced by a file, changing that class's declaration won't cause the file to be recompiled, even if the file includes the header for that class.
For large, mature projects, Visual C++ 4.0 also offers incremental compilation. Traditionally, if you made any change to a source file, the entire file would have to be recompiled. With incremental compilation, the compiler will recompile only the changed functions (and any functions affected by a change) within an individual source file.
Visual C++ 4.0 also includes a new version of Microsoft's acclaimed incremental linker. The incremental linker relinks just those portions of your application that have changed, rather than the entire application. To improve on the previous version of the incremental linker, the Visual C++ 4.0 team identified the most common reasons that the Visual C++ 2.0 incremental linker resorted to a full link, and rewrote the linker to handle these top cases incrementally.
When we thought about how we could improve our debugger, our goal was to simplify the most commonly performed tasks. And what's the single most common task you perform while debugging? For most developers, it's checking the value of variables. That's why you're always switching to a watch window and typing in a variable name.
We wondered, what's the easiest possible way to find the current value of a variable? Ideally, you shouldn't even have the distraction of typing the name of the variable. After all, the variable name is already there on the screen. You should just be able to point at it and say, "What's its value?"
For debugging, Visual C++ 4.0 introduces DataTips (Figure 6), a feature inspired by the ToolTips popularized by Microsoft's Office products. When your mouse pointer lingers over a variable name in your source code for half a second, a pop-up window appears displaying the current value of that variable. You can even select an expression; the pop-up window evaluates it and displays its value. It's an intuitive, direct-manipulation approach to debugging.

Figure 6. Showing a DataTip while debugging with Developer Studio
Another way Visual C++ 4.0 automates the display of variable values is with the Variables window, featuring the Auto tab (Figure 7). The Auto tab shows you the values of the variables you're most interested in: those on the last line that was executed and those on the line that's just about to be executed. This pane automatically tracks the instruction pointer, displaying different variables as you move through the code. It even highlights variables when they change value, further clarifying what's happening in your code.
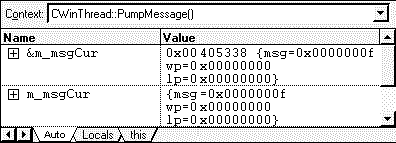
Figure 7. Variables window