Microsoft Corporation
December 2, 1996
Introduction
Object Model Changes
Overview of Object Model
Text on Slides
Shape Formatting
Transition and Animation
Slide Master Setup
Slide Shows
File Conversion Issues
The purpose of this white paper is to identify changes in the Microsoft PowerPoint® 97 object model that may affect custom automation solutions created for use with PowerPoint 95.
One of the most significant programming changes is that the PowerPoint 97 presentation graphics program now fully supports Microsoft Visual Basic®, Applications Edition (VBA). Development no longer needs to be done from an outside environment such as the Microsoft Visual Basic programming system or Microsoft Excel. PowerPoint's Visual Basic Editor conforms to the Office 97 standards found in all other Office products. Developers can create forms, modules, classes, and command bars to automate presentation construction and slide shows completely.
Existing automation solutions can be modified to conform to the new object model or migrated into a PowerPoint template or presentation. Migrating applications directly into VBA in PowerPoint has some distinct advantages. Fewer resources are necessary because only one application, PowerPoint, is used to run the application—no additional resources are used by Visual Basic, Microsoft Excel, or another programming environment. Because all transactions are performed within PowerPoint, the application will run significantly faster. The use of custom input forms for slide or presentation data is more straightforward. Forms behave the same as PowerPoint dialog boxes, leading to more consistent user-interface and dialog box behavior.
The Visual Basic Editor provides clear organization of all project elements: modules, classes, and forms. When migrating existing applications to VBA in PowerPoint, Visual Basic modules and classes can be imported directly into the PowerPoint Visual Basic Editor. Visual Basic version 4.0 forms, however, cannot be imported and must be re-created from within the PowerPoint Visual Basic Editor.
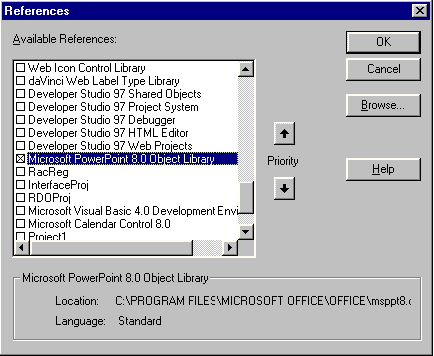
Of course, you can still create automated solutions using Visual Basic or another programming language just as before. However, when setting the reference to the PowerPoint object library, be aware the name of the object library has changed from Powerpnt.tlb to Msppt8.olb.
Figure 1. Setting the PowerPoint 97 reference
Several items within the PowerPoint object model have been changed in order to achieve consistency with other Office applications and new Office 97 common objects, such as the CommandBar object. Other objects have been removed and their functionality encompassed into new object classes. In addition, several components have been exposed to allow for more flexible and robust programming. As a result, solutions created for use with the PowerPoint 95 object model will most likely need to be revised to work with the PowerPoint 97 model.
The PowerPoint object model still contains top level objects such as Application, Presentation, and Slide, but some of the subobjects have been renamed, removed, or replaced.
Some individual objects have been replaced by classes of a similar type. For example, the separate views in PowerPoint 95 (MasterView, SlideView, OutlineView, and so on) are contained in a single View object. When a View object is returned from the DocumentWindow object, the ViewType property denotes which view was returned.
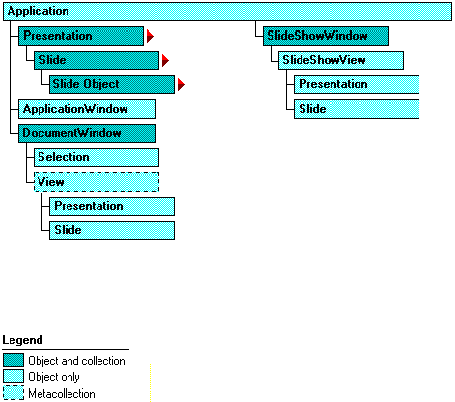
Figure 2. PowerPoint 95 object model hierarchy
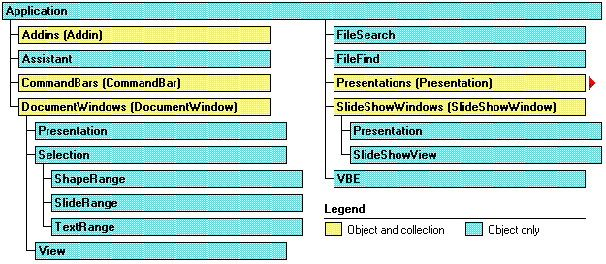
Figure 3. PowerPoint 97 object model hierarchy
The following items are a few of the most significant object model changes:
The Shapes object and collection in PowerPoint 97 takes the place of the SlideObjects object and collection in PowerPoint 95. A Shapes collection can include such diverse objects as pictures, bitmaps, rectangles, lines, text boxes, WordArt, and even controls. With the exception of controls, most shapes are created and manipulated from the end user's point of view by the Drawing toolbar. (Note that each Office application implements specific additions to the basic model for its own purposes).
In PowerPoint 95, to add text to a slide, you use the AddTextFrame method, which returns a SlideObject. From the SlideObject, the Text object allows access to properties and methods used to set text formatting. In PowerPoint 97, the TextFrame object represents the text frame within a Shape object. The TextFrame object contains the text in the text frame as well as the properties and methods that control the alignment and anchoring of the text frame.
A selection object can return a SlideRange, ShapeRange, or TextRange object. These objects can either be returned based on user selections or created through code. These objects are useful for manipulating many objects as a group or for iterating through a group of related objects.
Instead of having to access the GraphicFormat object to set physical attributes for objects, these attributes can now be accessed directly from the original object itself. The FillFormat, LineFormat, and the ShadowFormat objects are now returned by the Fill, Line, and Shadow properties of a Shape object. For example, in PowerPoint 95, to set the fill color of a rectangle, you have to return the GraphicFormat object and then return the FillFormat object using the Fill property of the GraphicFormat object, as shown in the following example:
Set objRectangle = ActivePresentation.Slides(1).Objects._
    AddShape(ppShapeRect, 100, 3000, 6000, 1000)
objRectangle.GraphicFormat.Fill.ForeColor.RGB = RGB(255, 0, 0)
In PowerPoint 97, the GraphicFormat object is eliminated and the FillFormat object is returned using the Fill property of the Shape object, as shown in the following example:
Set objRectangle = ActivePresentation.Slide(1).Shapes._
    AddShape(msoShapeRectangle, 144, 144, 72, 72)
objRectangle.Fill.ForeColor.RGB = RGB(255, 0, 0)
In PowerPoint 95, the AddTextFrame method returns a SlideObject and the Text property is used to add the text, as shown in the following example:
Set objText = ActiveWindow.View.Slide.Objects.AddTextFrame(1500, 3250, 5000)
objText.Text = "Sample Text"
In PowerPoint 97, all text is accessed and manipulated via the TextFrame object, which is returned from a Shape object, as shown in the following example:
Set objText = ActivePresentation.Selection.SlideRange.Shapes_
    .AddTextbox(msoTextOrientationHorizontal, 100, 100, 200, 50)
objText.TextFrame.TextRange = "Sample Text"
From the TextFrame object, the Ruler object and the TextRange objects can be returned to format the text. The Ruler object controls layout options, such as indent levels and tab stops. The TextRange object contains the Font object, which is used to control the physical appearance of the text, including the font type and color, and the ParagraphFormat object, which is used to control alignment, line spacing, and word wrap options.
One other item of note for conversion purposes: most of the properties that were formally entered as twips (1/1440 inch) are now measured in points (1/72 inch).
All text is contained within a TextFrame object within a shape. The functionality of the TextFrame object replaces the FitText object in PowerPoint 95. The TextFrame object has properties that allow you to set the layout of text within a shape. One change that has been made in PowerPoint 97 is the way you set the margins for the TextFrame. The FitText object has only two margin properties: MarginWidth and MarginHeight. These properties are measured in twips. The following example shows how to set the text anchors and margins using the FitText object in PowerPoint 95:
'/ Set vertical anchor, and internal margins for the text box.
With ActivePresentation.Slides(1).Objects(1).FitText
    .VerticalAnchor = ppAnchorTop
    .HorizontalAnchor = ppAnchorCenter
    .MarginWidth = 1440 * 0.05  '/ Convert to twips
    .MarginHeight = 1440 * 0.05
End With
The TextFrame object allows you to set all four margins independently using the MarginTop, MarginBottom, MarginLeft, and MarginRight properties. These properties are set in points rather than in twips. The following example shows how to set margins and text anchor properties using the TextFrame object in PowerPoint 97. Note the difference in the naming of the constants used for the anchor settings. This was done to add to consistency to all Office applications.
'/ Set text anchors, and margins for the selected text box.
With ActiveWindow.Selection.ShapeRange.TextFrame
    .VerticalAnchor = msoAnchorMiddle
    .HorizontalAnchor = msoAnchorCenter
    .MarginTop = 6    '/ Margins are measured in points
    .MarginBottom = 6
    .MarginLeft = 6
    .MarginRight = 6
    .WordWrap = msoTrue
End With
As in PowerPoint 95, the Ruler object contains the RulerLevels collection, which allows you to set the indent margins for each level, and the TabStops collection, which allows you to set tabs on the ruler. Although the methods to set the indent margin properties and the tab properties are the same, the unit of measurement is now points instead of twips. There is still a maximum of five indent levels that can be set. The following example sets the indent margins in PowerPoint 95:
With robjPPTObject.Text.Ruler.
    '/ Margins are measured in Twips which are 1/1440 inch.
    With .Levels(1)
        .FirstMargin = 720     '/ 0.5"
        .LeftMargin = 1080     '/ 0.75"
    End With

    With .Levels(2)
        .FirstMargin = 2160    '/ 1.5"
        .LeftMargin = 2520     '/ 1.75"
    End With

    With .Levels(3)
        .FirstMargin = 3600    '/ 2.5"
        .LeftMargin = 3960     '/ 2.75"
    End With
End With
The following example shows how to set the indent level margins in PowerPoint 97:
With ActiveWindow.Selection.ShapeRange.TextFrame.Ruler
    '/ Margins are measured in Points that are 1/72 inch.
    With .Levels(1)
        .FirstMargin = 36     '/ 0.5"
        .LeftMargin = 54      '/ 0.75"
    End With

    With .Levels(2)
        .FirstMargin = 108    '/ 1.5"
        .LeftMargin = 126     '/ 1.75"
    End With

    With .Levels(3)
        .FirstMargin = 180    '/ 2.5"
        .LeftMargin = 198     '/ 2.75"
    End With
End With
In PowerPoint 97, you can return all the text in a text frame or in a selection using the TextRange property of the TextFrame or Selection object. In PowerPoint 95, the TextRange object could only be returned through the use of a method such as Characters, Paragraphs or Words. These methods are still available to manipulate specific pieces of text, but with direct access to the TextRange object, it is now easier to apply formatting to all text contained in a text frame. The TextRange object also includes several new methods such as Find, Replace, InsertBefore, and InsertAfter, which give you even more ways to manipulate text.
The CharFormat object from PowerPoint 95 has been renamed to Font for Office 97 consistency. The Font property of the CharFormat object has been replaced by the Name property of the Font object. In addition, Size is now entered as points instead of twips. The following example shows how to format text using the CharFormat object in the PowerPoint 95 object model:
'/ Format text
With objPPTObject.Text.Words(1, 2).CharFormat
    .Font = "Arial"
    .Size = 18 * 20    '/ Font size is measured in twips (1/20 point)
    .Bold = True
    .Italic = True
    .Underline = True
    .Shadow = False
    .Color.RGB = RGB(255, 0, 0)
End With
The following example produces the same results using the Font object in the PowerPoint 97 object model:
'/Use the Font object to format the text
With ActiveWindow.Selection.ShapeRange.TextFrame.TextRange.Font
    .Name = "Arial"
    .Size = 18     '/ Font size is measured in points (no conversion)
    .Bold = True
    .Italic = True
    .Underline = True
    .Shadow = False
    .Color.RGB = RGB(255, 0, 0)
End With
The ParaFormat object has been renamed to ParagraphFormat in PowerPoint 97. One significant difference is the removal of the LineSpacingSet and LineSpacingSet objects. The functionality of these objects has been replaced by the SpaceBefore, SpaceAfter, and SpaceWithin properties of the ParagraphFormat object (formally the Before, After, and Within properties of the LineSpacingSet object). The unit of measure for line spacing in PowerPoint can be either lines or points. In PowerPoint 95, you have to include either the Points or Lines property to indicate which measurement to use, as shown in the following example:
Set objPPTParaFormat = objPPTObject.Text.Paragraphs.ParaFormat
With objPPTParaFormat.LineSpacing
    .Before.Points = 6
    .After.Points = 6
    .Within.Lines = 2
End With
PowerPoint 97 assumes lines as the default unit of measure. To use points, you must set the appropriate line rule property to False. There are three line rule properties: LineRuleAfter, LineRuleBefore, and LineRuleWithin. The default value for each of these is True, meaning the default unit for spacing is lines. If any are set to False, the corresponding space property is entered as points.
With ActiveWindow.Selection.ShapeRange.TextFrame.TextRange
    With .ParagraphFormat
        .LineRuleAfter = msoFalse    '/ Measure in points
        .SpaceAfter = 6              '/ Space after to 6 points

        .LineRuleBefore = msoFalse   '/ Measure in points
        .SpaceBefore = 6             '/ Space before to 6 points

        .LineRuleWithin = msoTrue    '/ Measure in lines
        .SpaceWithin = 2             '/ Space within to 2 lines
    End With
End With
With respect to formatting objects, the most significant difference between PowerPoint 95 and PowerPoint 97 is that the GraphicFormat object has been removed. All formatting objects under the GraphicFormat are now directly accessible from the Shape object.
The HasPresetTexture property has been removed. The Type property identifies the kind of fill, if any. PresetShade has also been removed. Most of the enumerated constants have been renamed to comply with Office 97 standards.
Other changes:
The following example shows how to add fill to a shape in PowerPoint 95:
With ActivePresentation.Slides(1).Objects(1).GraphicFormat.Fill
    .PresetShaded ppShadeFromCorner, 1, ppPresetShadeChrome
End With
The following example produces the same results in PowerPoint 97:
With ActivePresentation.Slides(1).Shapes(1).Fill
    .PresetGradient msoGradientFromCorner, 1, msoGradientChrome
End With
The LineFormat object has acquired several new properties in the PowerPoint 97 object model that allows for even more control over the look of a line. Most of the new properties have to do with the arrowhead style. The PowerPoint 95 LineFormat object has only one property to set the arrowhead style (the ArrowheadStyle property). The PowerPoint 97 LineFormat object has six arrowhead properties that can be set (BeginArrowheadLength, BeginArrowheadStyle, BeginArrowheadWidth, EndArrowheadLength, EndArrowheadStyle, and EndArrowheadWidth). In addition, the Weight property has been added for more direct control over line thickness.
Another change is in the way the line objects are created. In PowerPoint 95, the syntax to add a line to a slide is as follows:
expression.AddLine(Left, Top, Width, Height)
where the Left, Top, Width, and Height values, which are entered in twips, creates a bounding rectangle for the line. The width and height of the line are essentially offsets of the left and top properties.
The following example adds a line in PowerPoint 95:
Set objLine = ActivePresentation.Slides(1).Objects.AddLine(2000, 6000, 7000, 1)
With objLine.GraphicFormat.Line
    .Type = ppLineSolid
    .Style = ppLineStyleOnePoint
    .DashStyle = ppLineDashNone
    .ArrowheadStyle = ppArrowheadSmallAtStart
    .BackColor.RGB = RGB(255, 0, 255)
    .ForeColor.RGB = RGB(255, 255, 0)
End With
In PowerPoint 97, the syntax to add a line is a little more straightforward:
expression.AddLine(BeginX, BeginY, EndX, EndY)
The EndX and EndY coordinate is simply the ending point on the slide. Also, the BeginX, BeginY, EndX, and EndY values are entered as points.
The following example adds a line in PowerPoint 97:
Set objLine = ActivePresentation.Slides(1).Shapes.AddLine(100, 300, 350, 300)
'/ Set Line formats.
With objLine.Line
    .DashStyle = msoLineSolid
    .Style = msoLineSingle
    .Weight = 2
    .BeginArrowheadLength = msoArrowheadLong
    .BeginArrowheadStyle = msoArrowheadOval
    .BeginArrowheadWidth = msoArrowheadWide
    .EndArrowheadLength = msoArrowheadLong
    .EndArrowheadStyle = msoArrowheadTriangle
    .EndArrowheadWidth = msoArrowheadWide
    .ForeColor.RGB = RGB(255, 0, 255)
    .BackColor.RGB = RGB(255, 255, 0)
End With
Although the AddPicture method still exists in PowerPoint 97, the syntax is slightly different and it returns a Shape object instead of a SlideObject object. The picture is embedded into and saved with the presentation. In PowerPoint 97, you can specify whether to link or embed a picture in a slide. In other words, you may either add a reference to a picture that is saved in a separate file, or you may insert an independent copy of the picture that is saved with the presentation.
In PowerPoint 95, the syntax to add a picture to a slide is as follows:
expression.AddPicture(fileName, Left, Top, Width, Height)
where fileName is the name of the picture, and Left, Top, Width, and Height, all measured in twips, indicate the position of the picture on the slide. This method creates a copy of the picture, which is saved with the presentation.
The following example adds a picture to a slide in PowerPoint 95:
Set objSlide = ActivePresentation.Slides(1)
objSlide.Objects.AddPicture "c:\msoffice\clipart\music.bmp",_
  1000, 1000, 700, 700
In PowerPoint 97, the syntax to add a picture is as follows:
expression.AddPicture(FileName, LinkToFile, SaveWithDocument, Left, Top, Width, Height)
where LinkToFile is a required Boolean parameter which, if set to True, means that a link is created to the picture file. If it is False, an independent copy of the picture is added to the slide. SaveWithDocument is also a required Boolean parameter. If this is set to True, the linked picture is saved with the presentation, otherwise only the link information is saved. If LinkToFile is False, SaveWithDocument must be True.
The Left, Top, Width, and Height parameters still indicate the position of the picture on the slide, but they are now measured in points instead of twips.
The following example adds a picture to a slide in PowerPoint 97:
Set objSlide = ActivePresentation.Slides(1)
objSlide.Shapes.AddPicture "c:\msoffice\clipart\music.bmp",_
  True, True, 100, 100, 70, 70
A new PictureFormat object in PowerPoint 97 provides additional options to modify the look of a picture. Properties such as CropTop, CropBottom, CropLeft, and CropRight still exist but they work a bit differently. In PowerPoint 95 these options are accessible directly from the SlideObject object. They are entered as a value between 0 and 1 that represents the fraction of the total dimension (height or width) that is to be cropped (top or bottom, left or right).
The following example demonstrates how to crop 20 percent off the top of a specific picture in PowerPoint 95:
Set pictObj = ActivePresentation.Slides(1).Objects(1)
pictObj.CropTop = 0.2
In PowerPoint 97, cropping properties, in addition to several new properties, are accessed through the PictureFormat object. To access the PictureFormat object, the specified Shape object must be either a picture or an OLE object. To crop a picture you must enter the number of points to be cropped off of the specified side of the picture. (Cropping is calculated relative to the original, unscaled size of the picture.) The following example demonstrates how to crop 20 points off the top of a picture on a slide:
Set pictObj = ActivePresentation.Slides(1).Shapes(1)
pictObj.PictureFormat.CropTop = 20
There are now more shadow presets to choose from, 20 in all. All of the ShadowType constants have been changed. The Height and Width properties of the ShadowFormat object have been renamed to OffsetY and OffsetX.
The following example adds a shadow to an object in PowerPoint 95:
With ActivePresentation.Slides(1).Objects(1).GraphicFormat.Shadow
    .Type = ppShadowSolid
    .Height = 180    '/ 1/8 inch
    .Width = 180     '/ 1/8 inch
    .ForeColor.RGB = RGB(0, 0, 0)
    .Transparency = 0.75
End With
The following example produces the same results in PowerPoint 97:
With ActiveWindow.Selection.ShapeRange.Shadow
    .Type = msoShadow8
    .OffsetX = 5
    .OffsetY = -3
    .ForeColor.RGB = RGB(0, 0, 0)
    .Transparency = 0.75
End With
The Color object in PowerPoint 95 has been renamed to the ColorFormat object in order to be consistent with other Office 97 applications. A couple of properties from the Color object have also been modified. The IsRGB property and IsScheme properties have been replaced by the Type property, which returns msoColorTypeMixed, msoColorTypeRGB, or msoColorTypeScheme for a given object.
In PowerPoint 97 the BuildEffects object has been renamed to AnimationSettings. Most of the properties found in the BuildEffects object have also been renamed and several new properties have been added. In addition, the AnimationSettings object contains a new PlaySettings object which allows you to play movie files. The following example animates a bullet chart in PowerPoint 95:
With ActivePresentation.Slides(1).Objects(1).BuildEffects
    .Type = ppBuildTypeSecondLevel
    .Effect = ppEffectFlyFromLeft
    .StartAfterPrevious = True
    .AfterEffect = ppAfterEffectDim
    .DimColor.RGB = RGB(100, 120, 100)
    .Reverse = True
End With
The following example applies the same options in PowerPoint 97 with the new object and property names:
With ActivePresentation.Slides(1).Shapes(1).AnimationSettings
    .TextLevelEffect = ppAnimateByFirstLevel
    .EntryEffect = ppEffectFlyFromLeft
    .AnimationOrder = 2
    .AfterEffect = ppAfterEffectDim
    .DimColor.RGB = RGB(100, 120, 100)
    .AnimateTextInReverse = True
End With
The SlideShowEffects object in PowerPoint 95 is now called the SlideShowTransition object in PowerPoint 97, and some of the properties have been renamed or replaced by other properties.
The following example creates a slide transition in PowerPoint 95:
With ActivePresentation.Slides(1).SlideShowEffects
    .Sound.FromFile "c:\sounds\turn.wav"
    .EntryEffect = ppEffectStripsDownLeft
    .EntryTime = 1.5
    .AdvanceEvent = ppAdvanceOnTime
    .AdvanceTime = 5
End With
The following example produces the same result in PowerPoint 97:
With ActivePresentation.Slides(1).SlideShowTransition
    .SoundEffect.ImportFromFile "c:\sounds\turn.wav"
    .EntryEffect = ppEffectStripsDownLeft
    .Speed = ppTransitionSpeedFast
    .AdvanceOnTime = True
    .AdvanceOnClick = False
    .AdvanceTime = 5
End With
PowerPoint 95 treats master slides as Slide objects. The SlideMaster, NotesMaster, and HandoutMaster properties of the Presentation object each return a Slide object. PowerPoint 97 adds a specific object for master slides. The SlideMaster, NotesMaster, HandoutMaster, and TitleMaster properties now return a Master object, which is also accessible through the Master property of the Slide or SlideRange object.
The new Master object has the TextStyles property which allows you to specify format options for the TextStyle objects for the specified master. In PowerPoint 95, TextStyles is a property of the Presentation object. In PowerPoint 97, TextStyles is a property of the Master object. This, in effect, lets you have multiple TextStyle objects in a presentation.
In PowerPoint 97, there are three different types of text styles: Body text, Title text and Default text. (A fourth style found in PowerPoint 95, Notes text, has been removed.) Each of these is represented by an object in the TextStyles collection, which is accessed through the Master object. The TextStyleLevel object contains character and formatting information for outline levels for each TextStyle object.
The only significant difference between PowerPoint 95 and 97 is the objects that are returned from the TextStyleLevel object. In PowerPoint 95, the CharFormat and ParaFormat objects are returned to set physical appearance and layout for text levels. Because those objects have been renamed in PowerPoint 97, the TextStyleLevel object returns either the Font or ParagraphFormat object. For more information, see the "Font object" and "ParagraphFormat object" sections earlier in this article.
The following example sets text style levels in PowerPoint 95:
With ActivePresentation.TextStyles(ppBodyStyle)
    With .Levels(1)
        .CharFormat.Font = "Arial"
        .CharFormat.Points = 36
        With .ParaFormat.Bullet
            .Exists = True
            .Font = "Symbol"
            .Character = 183
            .Size = 1.25
            .Color.RGB = RGB(255, 255, 0)
        End With
    End With
    With .Levels(2)
        .CharFormat.Font = "Arial"
        .CharFormat.Points = 32
        With .ParaFormat.Bullet
            .Exists = True
            .Font = "Symbol"
            .Character = 184
            .Size = 1.25
            .Color.RGB = RGB(255, 255, 0)
        End With
    End With
End With
The following example sets the same options in PowerPoint 97:
With ActivePresentation.SlideMaster.TextStyles(ppBodyStyle)
    With .Levels(1)
        With .Font
            .Name = "Arial"
            .Size = 36
        End With
        With .ParagraphFormat.Bullet
            .Visible = True
            .Font.Name = "Symbol"
            .Character = 183
            .RelativeSize = 1.25
            .Font.Color = RGB(255, 0, 255)
        End With
    End With
    With .Levels(2)
        With .Font
            .Name = "Arial"
            .Size = 32
        End With
        With .ParagraphFormat.Bullet
            .Visible = True
            .Font.Name = "Symbol"
            .Character = 184
            .RelativeSize = 1.25
            .Font.Color = RGB(255, 0, 255)
        End With
    End With
End With
The SlideShowSettings object replaces the SlideShow object. The SlideShowSettings object contains several new properties that allow for more flexibility. It also takes advantage of some other new features, such as NamedSlideShow objects.
Other changes of note: the RunContinuously property has been renamed to LoopUntilStopped and the Run method no longer requires a slide show type parameter. The type of slide show is designated through the ShowType property. In addition, the RangeType property allows you to display only selected slides in the presentation.
The following example runs a slide show in PowerPoint 95:
With ActivePresentation.SlideShow
    .AdvanceMode = ppSlideShowUseSlideTimings
    .RunContinuously = True
    .Run ppSlideShowFullScreen
End With
The following example produces the same results in PowerPoint 97:
With ActivePresentation.SlideShowSettings
    .AdvanceMode = ppSlideShowUseSlideTimings
    .LoopUntilStopped = True
    .RangeType = ppShowAll
    .ShowType = ppShowTypeSpeaker
    .Run
End With
There are only a few minor differences with the SlideShowWindow object in PowerPoint 95 and PowerPoint 97. The Next and Prev methods from PowerPoint 95 have been removed and the enumerated constants for IsFullScreen have been changed to conform to Office 97 standards. The Activate method has been added to allow you to display a specific slide show window.
The following example displays a specific slide show window In PowerPoint 97:
SlideShowWindows(1).Activate
There are no significant presentation conversion issues. PowerPoint 4.0 and PowerPoint 95 files can be opened in and saved as PowerPoint 97 presentations. All shapes and objects convert completely.