Microsoft Corporation
May 1997
Abstract
Introduction
Overview of Technology and Terminology
A New Corporate User Explores the Desktop
A User's Desktop Computer Fails
A User Experiences the Mobile Features of the Windows NT Server
An Administrator Distributes a New Business Application to All Users
Conclusion
For More Information
The Zero Administration initiative for Microsoft® Windows® is part of an overall effort by Microsoft to reduce the total cost of ownership (TCO) associated with using personal computers in a corporate environment. The Zero Administration initiative for Windows is a collection of features designed to greatly reduce the administrative costs of managing users, software, hardware, and the state of individual computers within an organization. Use of the Zero Administration features in the Microsoft Windows NT® Server version 5.0 operating system will eliminate the need for an administrator to touch individual desktops, and will radically reduce overall TCO. In addition, Zero Administration technology can be combined with Microsoft's new corporate devices—the Net PC and the Windows-based Terminal—to further reduce TCO.
This paper provides an overview of the technology of the Zero Administration initiative for Windows, and the new Windows NT Server distributed services that enable it to work. It then describes common situations where the features of the Zero Administration initiative for Windows would simplify or eliminate administrative tasks—thus saving time and money for enterprise administrative staff and support personnel.
Imagine that you work in an office where there isn't a one-to-one relationship of personal computers to employees. It's your first day at your new job, and you report to work on time and eager to get started. You've worked with computers before, and you expect to spend the day installing applications and configuring the workstation so that you can do your job. You pick an available workstation and log on to the network. Although you haven't configured this workstation or installed any software, the desktop is populated with documents and icons for all the applications you will need to do your job.
You see a "Welcome" document on your desktop. You open it. After a short delay, the document opens in Microsoft Word. You receive a new document attached to a Microsoft Outlook™ e-mail message. It appears to be a document type that you have not seen before. You double-click it, and Microsoft Project opens the document. You see the tasks and timeline for your new project. The system seems to be able to open any file type it encounters—without you needing to locate or manually install anything. During your first day, you create and save six new documents. You notice that when you save your documents, they are automatically stored in a My Documents folder on your desktop. At 6 p.m., you log off and go home.
The next day, you arrive at work and notice that someone else has already logged on to the workstation you used the day before. You choose a different workstation and log on. To your surprise, the desktop is identical to the one you closed the day before. You open the My Documents folder on the desktop, and all of the documents you created yesterday are in the folder.
A friend of yours has given you a copy of a new application that you want to try out. You attempt to install it, but you receive an error message stating that "You do not have permission to use this application on corporate resources. Please contact your administrator," and the application setup ends. You find out later that the administrator has restricted the use of this application because it is known to cause problems with network applications. Soon, you learn that installing games is similarly prohibited.
On your third day at the new company, you arrive at work, log on, and watch helplessly as an electrical storm hits the office. Your screen flashes once and goes blank. You attempt to restart your system, and nothing happens. You call your corporation's help desk and ask for an appointment to have a technician look at your computer. Instead, the technician asks if you'd like to walk up to the front desk and get a replacement. You pick up the replacement, plug in five cables, and switch the power on. The new machine boots and asks you to log on. You complete two configuration screens, and your desktop reappears just as it was when you logged off the night before. None of your data or configuration settings have been lost.
These situations demonstrate a small number of the features of the Zero Administration initiative for Microsoft Windows. The Zero Administration initiative is a collection of efforts designed to make personal computers easier to administer and use. It encompasses a set of technologies that will greatly reduce the administrative costs of managing users, software, hardware, and the state of individual computers within an organization. Use of the Zero Administration features in the Microsoft Windows NT Server version 5.0 operating system will eliminate the need for an administrator to touch individual desktops, and will radically reduce the total cost of ownership (TCO) associated with using personal computers in a corporate environment. In addition, Zero Administration technology can be combined with Microsoft's new corporate devices—the Network PC (Net PC) and the Windows-based Terminal—to further reduce TCO.
The Zero Administration initiative for Windows effort includes innovations in the operating system that will result in a dramatic reduction in TCO, while ensuring compatibility with existing hardware and software. Most importantly, the Zero Administration initiative for Windows maintains those benefits that have made personal computers valuable—the current infrastructure, availability of inexpensive hardware and software, product familiarity, and ease of use. Hardware initiatives such as Plug-and-Play, Advanced Configuration and Power Interface (ACPI), On Now, and the Net PC are also designed to simplify administration and reduce TCO. In addition, new enabling technologies in the Windows NT Server operating system—such as the Active Directory, Distributed Security, the Class Store, the Distributed File System, and the Microsoft Management Console (MMC), as well as extended control through Systems Management Server—will result in a flexible, manageable, and resilient end-to-end architecture for corporate networks.
Zero Administration is an initiative that extends beyond a single Microsoft operating system or product on a particular type of personal computer. Rather, it is a collection of efforts designed to increase ease of use, administrative control, and manageability over all Windows-based clients—including laptops, regular personal computers, and Network PCs—by automating tasks and providing tools for central administration of the desktop.
The Zero Administration initiative for Windows has the following specific design goals:
Make systems easier to use—Users and administrators need to be able to perform common tasks easily. This requires an intuitive, predictable user interface, automation of simple tasks, and intelligent software—that is, software that can detect its client environment and auto-configure itself based on a set of rules (for example, software should facilitate administrative policy, provide automated hardware support, and so forth).
Provide remote software and hardware management—An administrator should be able to remotely manage the devices that users are running, as well as the software that runs on these devices. This includes the ability to define a software policy that specifies the applications, data, and desktop environment that a user can access, regardless of which computer the user logs on to. This also includes the ability to automatically update and synchronize applications, resources, and data on a per machine or per user basis. In essence, this makes personal computers truly replaceable; if one computer fails, it should be simple to replace with new hardware and have the user's environment, or state, regenerated automatically.
Provide an evolutionary approach—To prevent unnecessary hardware and training expenses, these new technologies should integrate smoothly with existing business solutions. The Zero Administration initiative will reduce TCO without sacrificing the flexibility and compatibility available in today's distributed personal computer networks.
To meet these goals, Microsoft will include the following Zero Administration initiative for Windows–compliant features in the next version of Windows NT Server (version 5.0):
The next section provides an overview of the technologies that enable these features of the Zero Administration initiative for Windows. The final sections of this document use real-world examples to illustrate how these technologies work, including:
The following sections briefly describe technology and terminology related to the Zero Administration initiative for Windows. These sections provide overview information only; details will be available in subsequent white papers.
Traditionally, directory services have been tools for organizing, managing, and locating objects within a network. To the user or application, a directory is very much like a phone book. The directory stores interesting objects, and the user or application uses the directory to locate interesting things. These things can be users, applications, services, or resources such as printers and networked devices. To the administrator, the directory functions as a place to centrally manage access to these resources.
The Active Directory is the directory service included with Windows NT Server 5.0. The Active Directory is secure, distributed, partitioned, and replicated. It is designed to work well in any size installation, from a single server with a few hundred objects to thousands of servers and millions of objects.
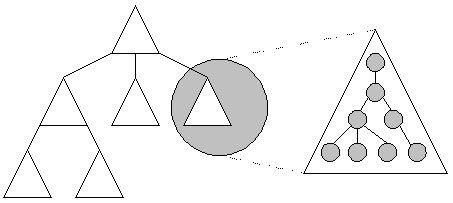
Unlike directory services that consist of a single tree structure and require a complex "top down" partitioning process, the Active Directory provides a simple and intuitive "bottom up" method for building a large tree. In the Active Directory, domains are subdivided into organizational units (OUs) for administrative purposes. This can be seen in Figure 1.
Figure 1. Active Directory uses domain trees and organizational units (OUs) to provide bottom up tree structures.
An administrator for the Active Directory can use organizational units as containers to create a namespace that reflects the organization. The Active Directory provides the fine-grained administrative structure that allows for decentralized administration, without compromising security. Administrative authority to create and manage users or groups can be delegated to different organizational units within the domain. The Active Directory grants privileges to users based on the specific functions they must perform within a given scope. Administrative scope can include an entire domain, a subtree of OUs within a domain, or a single OU.
Fine-grain access control allows the corporation to grant specific access rights to manage object classes (such as users or groups) or individual properties of objects (such as the ability to reset user passwords or manage group membership lists).
The Class Store is a Windows NT Server 5.0 directory-based applications repository intended for enterprise-wide applications deployment. Applications and components published in the Class Store are automatically referenced and downloaded by OLE when needed. The set of packages in a Class Store could be for different platforms or locales (based on group policy templates [GPTs], explained next).
The Class Store can be thought of as a database that, when fed a key, returns a pathname to an application. Each GPT's Class Store can be viewed as a set of records and indexes. Each record contains the pathname to the application advertise script, the friendly name for the product, and the features available when the application described by that script is installed.
A group policy template (GPT) is a set of objects and rules that together define the computer resources available to a given group (a group can be a user, an organizational unit, or an entire enterprise). GPTs define the various facets of the desktop environment that a system administrator needs to control, such as which applications are assigned, who has the option of installing certain other applications, who can change their desktops and who cannot, and so forth.
An administrator can use the group policy editor to define a GPT and assign it to an individual user or computer, but typically an administrator will assign a GPT to an organizational unit containing a group of users and computers. As a user, you can be assigned to one or more GPTs based on who you are, which Active Directory container you are a member of, and the geographical site where you are logged on. Should you change groups, your GPT assignments change automatically when your Active Directory account is moved to another organizational unit.
GPTs are built cumulatively, from the largest grouping (the domain) to the smallest (the individual user or machine). Each subsequent setting overrides the previous setting, and each setting level is more granular than that which precedes it.
GPTs specify the following:
Assigned applications are completely managed by the administrator. An administrator can assign an application to a group, and then upgrade the application, forcing all users who installed the prior version to be upgraded the next time they activate the application. In addition, the administrator can remove an application, causing all accounts assigned to the GPT to have their copy of the application uninstalled.
A published application stores its attributes in the Class Store. By publishing optional applications in the Class Store, an administrator can make a large number of applications available to an entire enterprise.
Published applications can be activated on demand in a number of ways. Users can use the new Add/Remove Programs wizard to browse and select desired applications. Published applications are automatically installed when you attempt to open a file whose file type is unknown to the local system. In this case, the Class Store is queried. If the Class Store knows about the file type, it returns a path to the application's setup program. The application is then installed silently and started immediately thereafter.
Systems administrators can use lockdown policies to selectively disable or enable certain features of an application (provided that the application supports lockdown policies). Supporting lockdown policies will be a requirement in the Designed for Windows Logo Program version 3.0. Note that Lockdown policies are designed to eliminate features that are beyond a user's skill level or the requirements of a given job. Corporations that specify a lockdown policy for certain classes of users can greatly reduce support costs associated with learning a new application.
Those settings and configuration options specific to you, the user—such as installed applications, desktop icons, color options, and so forth—are contained in your roaming user profile. This profile is built in part from policy information (for example, policy definitions—those things that you have access to and those things that you can and cannot change) and in part from permitted, saved changes that you have made to your desktop. This profile is linked to your logon identifier and security, and is accessible to you whenever you log on to the network. In other words, this profile is identified with and travels with you. It is not associated with a specific computer.
Today, in all likelihood your data files are scattered all over your disk drive and network: some files are stored right on your desktop, others are stored five directories deep, and you may have files stored on different remote servers. To make matters worse, each application uses a different default directory for document storage. In this environment, it becomes increasingly difficult to locate documents and keep track of the latest version.
To simplify document management, Windows NT Server 5.0 includes a single visible document container—the My Documents folder—as the primary document storage location on each desktop. The common Open, Save, and Save As menu options will default to the My Documents folder.
For networked computers, the My Documents folder will contain a My Shared Documents subfolder. My Shared Documents allows you to share documents with others on the network. This folder automatically shares documents with read-only privileges. The underlying directory can be local, remote, or defined by the system administrator.
Remote boot provides an organization with the ability to control the distribution and maintenance of the base operating system from a central location. Remote boot ensures that the state of a client computer's operating system is saved on the network server. In the event that a computer fails for any reason, you or your system administrator can simply replace the hardware, switch on the new computer, and it will fully recover. Remote boot also includes a mechanism to roll out specific operating system updates, such as Service Packs and individual hot fixes that are created and distributed on a regular basis.
With the new client-side caching feature, your view of the network is the same whether you use a direct connection, a remote connection, or are completely disconnected from the network. The network files are maintained locally but are presented as though they were accessed through the network. It's like having the network on your computer no matter where you are—at a remote office, on a plane, in a hotel, or at home.
You can browse the network and select folders for offline use. When you log off the network or shut down your computer, files are automatically copied and stored on your local hard drive. While you are disconnected from the network, client-side caching mimics the behavior of the remote file system. You can create, edit, or delete cached files. All changes made to the files are tracked while you work offline. When you reconnect to the network, the cached files and server files are synchronized—thereby keeping your files consistent and up to date.
Microsoft has a number of other products and technologies designed to further simplify the administration of a personal computer network and to reduce the costs associated with administering such a network. These products and technologies include:
Because the Microsoft Systems Management Server and MMC have such an important role in Zero Administration, these technologies will now be described in detail.
The Microsoft Systems Management Server performs software and hardware inventory, handles software distribution, and provides centralized remote control, diagnostics, and troubleshooting facilities for every personal computer on an enterprise network. It scales from small to large networks, using a distributed design to balance its many management functions. Systems Management Server works in most existing environments by supporting the leading client and server operating systems. It provides an open, extensible Open Database Connectivity–based (ODBC-based) architecture, an application programming interface (API) for extended functionality, and can integrate with any simple network management protocol (SNMP) product via SNMP traps.
On the client side, Systems Management Server detects every personal computer on the network, collects inventory, and installs client management agents—all from one location.
Systems Management Server provides features above and beyond the standard Zero Administration initiative for Windows functionality built into the operating system. Zero Administration features of Systems Management Server include:
Microsoft Management Console (MMC) is an extensible, common console framework for management applications. Using MMC, administrators see a similar consistent user interface. MMC itself does not supply any management behavior, but instead provides a common environment for Snap-Ins, which will be written by both Microsoft and independent software vendors (ISVs). Snap-Ins define the actual management behavior; they are administrative components integrated into a common host (MMC). Snap-Ins will be available for all Windows NT Server administrative tools, as well as for management products such as Systems Management Server. The MMC environment provides for seamless integration between Snap-Ins, even those provided by different vendors.
The Microsoft Designed for Windows Logo Program version 3.0 includes new recommendations and requirements to guide software developers in building Zero Administration for Windows features into their desktop applications in preparation for the next releases of the Windows and Windows NT Server operating systems. These guidelines assist developers in creating software that is more compatible, reliable and easier for consumers to install, use, and remove, while making centralized installation and management easier and cheaper for system administrators.
The new guidelines specify the following:
The Logo guidelines can help inform and direct efforts to develop manageable applications, both in-house and retail. For a complete copy of the Logo guidelines or for more information about the Logo program, please refer to the Microsoft Windows Family Website (http://www.microsoft.com/windows/thirdparty/winlogo/).
As you can see, Zero Administration features in Microsoft products and in ISV-produced management and desktop applications will greatly reduce TCO in the enterprise. The next few sections illustrate in greater detail how these features will work.
It's your first day at your new job, and you report to work on time and eager to get started. You work in an office where there isn't a one-to-one relationship of personal computers to employees. You pick an available workspace, and log on to the desktop computer attached to the network. Immediately upon logon, you notice that your desktop is populated with documents and application icons, and the background bitmap displays the company logo.
A user profile is a collection of folders and files that serves as a snapshot of your desktop environment, defining the Start menu, desktop icons, printer connections, window sizes, screen colors, and so on. Your administrator created a roaming user profile for you. This allows you to get the same desktop settings and preferences on any computer that you use to log on to the network. A server holds the master copy of everything—profile information, applications, and user data. During logon, your roaming user profile is downloaded to your local machine from the server. At logoff, all changes to your profile are copied back to the server.
You open your Start menu and notice that it is sprinkled with Microsoft Office applications. You see a "Welcome to AdventureWorks" document on your desktop. You open it. After a short delay, the document opens.
As explained in the previous section, your user account belongs to one or more OUs; all OUs belong to a specific domain. Your administrator associates one of these groupings with one or more policies. Policies are defined in GPTs and contain information about how your desktop looks and behaves.
Your administrator used the group policy editor to create a GPT and assign it to you. The administrator dragged the application's setup program onto the GPT, and generated an advertisement script. During logon, the advertise script for each assigned application is processed, and the application appears installed and available. The script is also responsible for ensuring that any updates made to a GPT are properly processed. For example, if the administrator changes the application-advertise script for Microsoft Word to update a set of users from version 6.0 to 6.0a, that update is replicated in each client account.
An assigned application appears to be installed on a machine, but is not necessarily installed. When the application is activated, if the application is out of date or is not fully installed, it will be installed automatically. Assigned applications are completely managed by the administrator. An administrator can assign an application to a GPT and then upgrade the application, forcing all users who installed the prior version to be upgraded the next time they activate the application. In addition, the administrator can remove the application from the GPT, causing all accounts that point to the GPT to have their copy of the application uninstalled.
An assigned application has the following attributes:
When an assigned application is activated, a check is made to see if the application is installed and if it is the correct administrator-defined version. If the application is installed and is the right version, activation continues. If the application is not installed or is the incorrect version, the application is automatically (and silently) installed.
After the silent installation is completed, the application is launched. All subsequent invocations of the application cause the application to start immediately, without going through the setup process. In the example above, a quick run-from-network installation was performed and, except for the short delay in opening the AdventureWorks document, the installation was completely transparent.
While using Microsoft Word, you notice that it offers a very clean user interface and the menus are somewhat simple. You also happen to notice that the Options menu, where applications typically offer cool but sometimes confusing user-definable options, is unavailable.
The Windows operating system and applications for Windows, such as Word, are written to check for and honor policies established by an administrator. When an operating system feature is used or an application is started, it queries the policy settings to determine what features or behavior should be modified or eliminated. In this case, your administrator created a policy that prevents you from having access to the Options menu.
The Designed for Windows Logo Program 3.0 specifies that applications should be written to fully use the lockdown policy features built into Windows NT Server.
Later in the day, you open Word again and notice that it starts up much more quickly than it did before. Editing your personal documents in the My Documents folder is fast and efficient.
Here, client-side caching is used to dramatically improve performance and minimize network traffic when working with network-based applications and documents. Your administrator created a share and installed run-from-network application images on it. He also set permissions for the share to "Everyone Read Only" and marked the share as "Cachable."
Windows NT Server 5.0-based network shares have an additional property—they are either cachable or not. A cachable share implies that files on the share can be automatically copied and stored in a client-side cache. If you attempt to access a network file and a local copy exists, your request is transparently rerouted to the locally-cached copy of the file. Cachable shares work very well for read-only files (that is, files belonging to run-from-network applications) and for data files owned and edited by a single user (private documents in My Documents).
To preserve file sharing semantics in a workgroup environment where many users may be editing the same document, shares can be marked "non-cachable." This is the default for existing and new shares. In this case, each time a network file is accessed the operation passes through to the file server. Network files on non-cacheable share are not stored in the client-side cache.
Client-side caching uses a write-through caching algorithm. While connected to the network, all file writes are written to the local copy in the cache and to the copy stored of the server.
You receive a new document attached to a Microsoft Outlook e-mail message. It appears to be a document type that you have not seen before. You double-click it, and (after a short delay), Microsoft Project opens the document. You see the tasks and timeline for your new project. You close the application.
When you received the e-mail message, you had no association for the .mpp document type in your local registry. When you attempted to open the document, the shell searched the local registry (HKeyClassesRoot) for a .mpp mapping but no entries were found. Next, the shell turned to the new Class Store. The Class Store is used to resolve OLE registrations for applications and components in much the same way as the local HKeyClassesRoot search does. When you opened the Project document, the network-based Class Store was consulted to support the OLE CoCreateInstance method in the Project implementation. In cases like this, where the application is not assigned to you or installed, the implementation is redirected to the application's setup program. When the setup program is located, the application is installed silently.
In this case, Project is available for use on the network (it is published), but it is not part of your assigned portfolio of applications. For more information, refer to the section "Editing a New File Type."
You decide to delete your "Welcome to AdventureWorks" document and another shortcut called "Monthly Sales Report." The document is deleted, but the shortcut remains. You can't delete it. Each time you attempt the deletion, you receive a "permission denied" message.
The "Monthly Sales Report" document was assigned to you in your policy. You can't delete it. On the Windows NT Server, this document is marked with an Access Control List (ACL) owned by the Domain Administrators. Only Domain Administrators can delete the document or change the assignment.
In the next version of Microsoft Windows the deletion will occur, but the operating system will reinstall the document in the background.
You decide to edit a .gif image of your newborn infant. When you click your image file, Microsoft Internet Explorer displays the image but you can't edit it. You need an application that can edit image files, but such an application was not assigned to you as part of your regular suite of applications. From the Start menu, you click Settings. From the Control Panel, you double-click the new Programs Wizard:
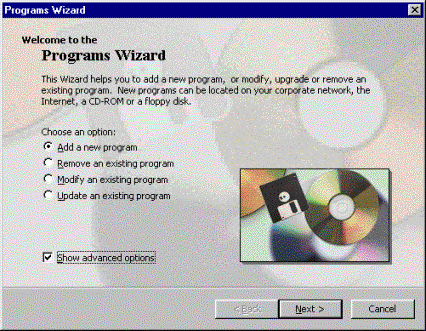
Figure 2. Programs Wizard
You choose Add a new program and click Next. The Select a Program dialog box appears:
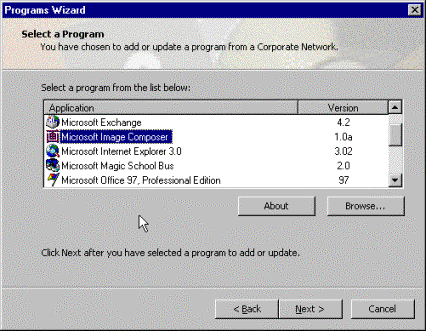
Figure 3. Select a Program list
The applications in the Select a Program list are those that your administrator chose to make available to you. You locate and select Microsoft Image Composer. The Image Composer setup program is invoked, but you are not asked any questions. You begin editing your .gif image.
Your administrator created a Class Store and published a number of applications In it. Unlike assigned applications, these published applications are not partially pre-installed nor are their icons added to your desktop or Start menu. You can view and select from the list of published applications when and if you need them. When you select a published application, the wizard uses the Class Store to locate and launch the appropriate setup program.
Your administrator can add any kind of script or program to the list. It can be a simple batch script to install a home grown expense report program, a silent install script for a major third party graphics program or anything in between. For example, your corporate management information systems (IS) department could write a little application that requests your employee and department numbers for billing purposes before it launches a silent installation of Image Composer.
A published application is an application that is available to any account pointing to the GPT where the application is published. A published application has no attributes present on the client machine; instead, it stores its attributes in a Windows NT Server 5.0 directory. Within that directory, a published application can be located by its Class ID, Program ID (ProgID), file extension, Interface ID(IID), Multipurpose Internet Mail Extension (MIME) type, or GUID.
Once a published application is located, the application's friendly name is available, as well as enough information to assign the application to the user. In effect, the Program Wizard is a tool that assigns published applications to users.
Published applications can be activated by file extension, by GUID, by ProgID, by IID, by TypeLib, or by MIME type. To activate a published application, the shell or OLE attempts to locate the application activation information in the local machine's registry. When the information is not found (because the application is not installed), a Windows NT Server 5.0 directory lookup occurs. If the directory lookup succeeds, the returned information is used to assign the application to the user's profile, and all of the information needed to manage and activate the application becomes part of the user's profile. If the user has a roaming profile, this information roams with the user. If not, the information stays on the machine that triggered the assignment. Now that the application is assigned, activation continues as it would for a normal assigned application as described in previous sections.
One of your buddies sends you a Perl script in the mail that extends the functionality of the DIR command. You save the script into your Utils folder, start an MS-DOS command prompt and enter DIREX.PL to invoke it. Sure enough, the new script displays all of the directory information you ever wanted, including any applied access control lists (ACLs).
As a part of your GPT, the WSH was already installed on your computer, but the Perl ActiveX Scripting Engine was not. Your administrator registered the Perl ActiveX™ Scripting Engine in the Class Store. When the WSH attempts to call ShellEx() for the Perl implementation, OLE queries the local registry and then the Class Store looking for the .PL entry. After it finds .PL in the distributed Class Store, OLE copies the Perl Scripting Engine (an ActiveX control) to the local machine. The control is registered and the Perl script runs exactly as expected.
Microsoft Internet Explorer 3.0 solved the component distribution problem in the Internet and intranet space. ActiveX components are easily downloaded as needed, updates happen automatically, and Authenticode provides security. Similarly, the Class Store solves the problem of application and component distribution in an enterprise network. With the new distributed Class Store, approved ActiveX components can be centrally stored and retrieved as needed by desktop applications throughout the network. Using policies, Microsoft Internet Explorer and other applications can be locked down to use only the centrally approved ActiveX components. Changes to the Class Store are automatically propagated. This mechanism provides an easy way to distribute and manage ActiveX components and OLE Servers.
When you save your picture, you notice that the File menu's Save option defaults to a My Documents folder. In addition, your desktop has a My Documents folder icon that offers quick access to your documents. This is a big change from applications that save user data in any directory they identify as current or in a folder under the application. You realize that the My Documents container will make it simple for you to backup only the data you create; you can easily exclude the other files on your 3 gigabyte (GB) hard disk. You also notice that when you log on to other computers, your My Documents container and its contents seem to follow you around.
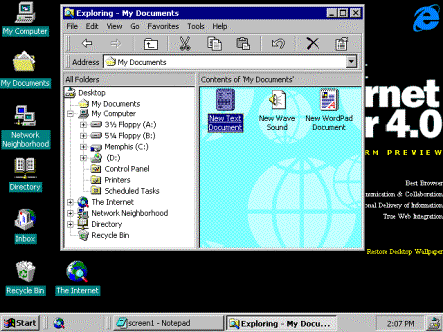
Figure 4. User's desktop with My Documents folder
The My Documents folder on the desktop is a new shell extension. The standard dialog boxes have been changed so that they're aware of this folder. The user profile is extended to contain a \Documents folder and this folder is now a part of the user's roaming profile. On newer versions of Windows, this data is cached on the client. If a roaming user (who has a Windows NT Server 5.0 profile) logs on from an on older client computer, the folder is accessed across the network. An API exists that can locate the folder.
Note Applications that do not comply with the Designed for Windows Logo Program 3.0 may not use the My Documents container as seamlessly as others because they use their own File Save and Save As dialog boxes.
You quickly get completely carried away with using the new My Documents container. You gather your documents from all over the place (or at least those places you can remember). In doing so, you receive an error message telling you that you are attempting to exceed your allocated disk storage quota.
In Windows NT Server 5.0, the Windows NT File System (NTFS) will support per user disk quotas. This will allow administrators to control the amount of data that a user can store on an NTFS volume. User data stored will be defined as the sum of the length (or end of file [EOF]) of all data streams owned by the user. This means that metadata used for directories or file records does not directly affect a user's quota; however, property set streams and resident user data streams will affect the user's quota. Compressing or decompressing files and cluster size will not affect a user's quota usage.
Disk quotas will be tracked and settable on a per user basis. The administrator will be able set default quotas (for new users on the volume) and for a specific user. The administrator will have the option to set both threshold and hard quota limits. If the owner exceeds the threshold quota limit, an event is generated by the file system. If a user attempts a file system operation that exceeds the hard quota limit, the operation will fail and an event will be generated.
A friend of yours tells you about a cool application called Microsoft Network Monitor. Not really knowing any better, you install it from CD. Installation progresses smoothly until you receive an error message stating that "You do not have sufficient permission to use this application on corporate resources. Please contact your administrator." The application setup ends. You later find out that the administrator has specified a policy limiting the use of this application to only all those users on the "Bloodhound team."
Here again, GPTs are in action. Because the Network Monitor offers support for policies, it provides the administrator with a list of application-specific policies that it checks during setup and normal operation. An administrator can use GPTs to modify the application's behavior by setting these policies.
In this case, the application provides a list of policies that state that membership to a given security group is required. When the application starts, it checks the local registry to see if there are any restrictions. (Note that policies control the registry values, as well as other settings.) The administrator restricted use of the application to the Bloodhound team. Since you are not a member of the Bloodhound team, the application issues a polite message and gracefully exits.
Lockdown policies can be used to prevent rogue services from being started and wasting resources on a corporate network. Proactive management of this form is very important to offering "corporate-ready" applications.
Your system administrator delegates a limited set of administrative tasks to you. You now own the task of monitoring (not configuring) the team's three printers and two Web servers. An administrator sends you a monitoring tool attached to an email message. You open the tool, and are prompted to accept two ActiveX download certificates. You accept. A MMC-based tool opens on your desktop. You see two simple Web-like pages that offer information about your three printers and two Web servers, along with the pager numbers of the people to call in case of a problem that you can't fix. You find that what you were asked to do is obvious from the tool layout and wording.
MMC tools are documents, and are thus easy to create and distribute. Each MMC tool contains the Snap-Ins and configuration data needed to accomplish a set of administration tasks. Snap-Ins are management components; each Snap-In provides one unit of management behavior, and multiple Snap-Ins can be combined to build a custom management tool. In this case, the MMC document that was mailed to you contained two Snap-Ins. When ShellEx() invokes the document, MMC is launched. MMC then uses a CoCreateInstance to invoke the Snap-Ins. The class store sets up the Snap-Ins, and after a brief and silent installation, the MMC tool opens.
You are a technical editor in a large data services company, and you are a fairly experienced personal computer user. In the middle of your workday, your computer crashes. You try to restart it. You turn it on and off; you hit it gently, then you hit it harder. You're frustrated and you have a deadline that you aren't going to meet unless your computer is running soon. In despair, you call your corporation's help desk. They ask if you'd like to walk up to the front desk and get a replacement. They promise you that you'll only need to unplug and replug five cables, and then you can logon.
You decide that, given your deadline, you'd better get the new computer. You unplug and replug the five cables. You switch the power on. The new machine boots and asks you to log on. You see a text screen similar to the following.
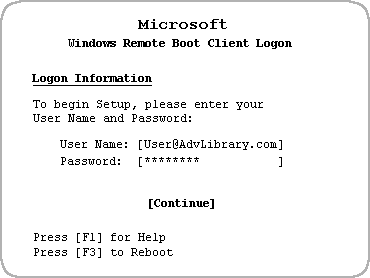
Figure 5. Remote boot client logon
You complete the logon screen. Next, you see a text screen similar to the following:
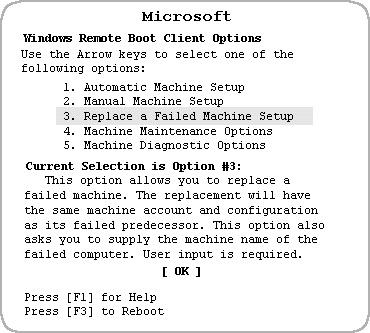
Figure 6. Remote boot client options—replace a failed machine setup
You select the third option to replace the failed machine. You are then prompted for, and enter the machine name of the computer you are replacing. Windows NT Server setup starts, and before long you are logging on to the new computer. Once logged on, you notice that everything is as it was—your desktop colors are the same, your network printers are configured, and all the applications you use are installed. You finish your project before noon and take the rest of the day off.
There are multiple elements involved in this situation—boot read-only memories (ROMs), a remote boot server, Active Directory access, Group Policy, and server-side storage of user and machine data. The next few paragraphs describe this process in detail.
When the new computer first boots, the boot ROM on the network interface card (NIC) starts. It contacts a remote boot server, and requests an Internet Protocol (IP) address (via dynamic host configuration protocol [DHCP]) and the boot image path that it should use. The NIC uses an extension to DHCP called the Boot Information Negotiation Layer (BINL), which was defined in cooperation with Intel and the Network PC vendors. As part of this request, the client passes a GUID for the machine. The boot server uses this identifier to query the Active Directory for an associated machine account. Because this is a new machine, there is no such account. The boot server returns the operating system's Chooser application, which prompts the user to log on.
With the user credentials, the machine's unique ID, and the use of policy, the remote boot server creates a new machine account. The remote boot server also checks the user's OU GPT to determine which operating system to install.
The boot server returns a path to the appropriate boot image. This path, which contains the Windows NT Setup Loader (setupldr) and other files, is transferred to the client. The client then runs the setup program.
In the example, you selected to build the new machine from the old machine state stored on the server. You entered machine name information in the operating system's Chooser application, and these options were passed to the Windows NT Setup Loader. Setup uses the properties of the machine account for the failed computer, as well as other associated files, to set up the new client computer appropriately. Once setup is complete and you reboot the computer, the machine OU and domain machine policy is reapplied. When you log on, your profile is set up and your assigned policy is reapplied. Profiles and policy play a key role in this situation because they reinstall preferences, documents, applications, and lockdown state.
Note that, in the case of a hard drive failure where a help desk person services the device on the spot, the system is able to recover without any user input or intervention. This is because the machine's GUID is stored within the system's complementary metal-oxide semiconductor (CMOS) or basic input/output system (BIOS) and remains the same. The same machine account is used, and the Setup loader simply detects that the client needs its operating system refreshed. A new operating system is installed.
You are a traveling sales person working for the Volcano Coffee Company. You have your own workspace and a desktop computer. You use your desktop for e-mail, contact management, word processing, developing presentations, tracking customer orders, and so forth.
You have a brand new laptop with Windows NT Server 5.0 installed on it. You log on to the laptop for the first time.
You notice that all of your favorite applications appear to be already installed.
Your administrator created a GPT that assigns selected applications to all laptop computers. Unlike applications that are assigned to specific users and OUs which are not actually installed until you attempt to use them, applications assigned to machines are "pushed" down and installed the first time any user logs on. The WinLogon process queries the GPT to determine which applications should be installed and from where on the network to install them. It sequentially launches the setup program for each of the machine-assigned applications.
Because applications on a laptop must work correctly even when disconnected from the corporate network, applications assigned to laptop computers are installed locally.
You see the new My Documents folder on the desktop. When you double-click the folder, Microsoft Windows Explorer starts and shows you the same documents that you have stored in your home directory on the corporate file server. It is the same folder you have been using from your desktop for months.
Although the My Documents folder usually defaults to the local hard drive, a user profile or policy is used to redirect its contents to a network file server. In this example, My Documents points to \\Server\Users\JackB\. The administrator set this up for you when he created your account. It is where you keep all of your personal and private data (personal address book, memos, contact management data, pending sales, and so on). Client-side caching and a network share give you the advantages of both client and server file storage models; you have fast local access and the safety of a duplicate network share.
It is time to hit the road. You prepare your laptop by clicking Suspend on the Start menu. You see a dialog box welcoming you to Offline Folders. The dialog box explains that Offline Folders make it possible to select a folder on a network server, work with its contents while you are disconnected from the network, and then synchronize the folder and its corresponding server folder to make the contents of both identical.
While connected to the network, you can browse the network and select folders and document for offline use. While disconnected, you can view, access and modify these same folders and files in exactly the same way you did while connected. It's like always having the network on your computer no matter where you are—at a remote office, on a plane, in a hotel, or at home.
Shortcuts pointing to network files on your desktop or in your Start menu are automatic candidates for offline use. Items in your My Documents folder and Most Recently Used (MRU) documents are as well. If you want to take additional folder or files, click Add Folders . . . . If you are ready to synchronize, click Synchronize . . . .
Since everything you ever wanted is either in your My Documents folder or on your desktop, you click Synchronize . . . . You see the Synchronizing All Offline Folders progress dialog box, which indicates the time it takes to perform this action. After synchronization is complete, your computer goes into sleep mode. You undock your laptop, put it in the case and head off to see your clients.
Any time the computer is shut down, suspended, or ejected from a docking station, the operating system automatically performs a synchronization of offline folders. This option can easily be disabled. In this case, all of the folders and files in My Documents are copied into the client-side cache. When a file is stored in the cache all of its original file properties (size, last modified date, and so on) are stored in the cache database. This information is used during the synchronization process described in detail below.
You can click Stop to halt the synchronization at any time.
Later you will learn that there are several ways to synchronize your folders. You will find out that it can happen in the background, at logon, our by manual intervention.
You go to a customer's office to take an order and to tell him about a new blend that has just come out. You start Microsoft Excel, and open the New Orders.xls spreadsheet stored in your My Documents folder.
You are accessing files just as you always have while connected to the network. In the absence of a network connection, client-side caching mimics the behavior of the remote file system. When you attempt to access a network file, such as \\server\users\jackb\new, while disconnected, the client-side cache is consulted. If the file is found, it is opened and operated on by the requesting application. The redirection is completely transparent to the application.
Instead of hearing about the new blend, the customer wants to know about this month's specials. At the beginning of each month, your manager puts a new list of specials in the public folder \\server\public\all\specials\. When you try to map to and browse the folder to look for May97.xls, the standard Dial-up Networking dialog box is displayed. You are not entirely sure what all of this means but you know you need the document right now, so you borrow your client's telephone cable, plug it into your computer, and click Yes, Dial. A remote access logon screen (the Auto Dialer) is displayed.
You type your user name, password, and domain name, and click OK. You hear your computer dialing and connecting to your corporate network. After a moment your missing spreadsheet pops up showing you and your customer the specials of the month. "Jungle Heat" is on sale for $6.42 a pound.
During your initial logon, your User Profiles and GPTs were downloaded to your laptop. The administrator created a dial-up modem connection object containing the telephone number of the corporate Remote Access Server (RAS). RAS requires you to provide your user name and password to log on to the corporate network. Once logged on, the spreadsheet is downloaded and shown in Microsoft Excel.
When you get home, you use Microsoft Windows Explorer to create a new subfolder called "Presentations" in the My Documents folder. Next, you create a new Microsoft PowerPoint® presentation on "How to Sell More Coffee," and store it in the new Presentations subfolder. You are impressed that you can create a folder on a network share while disconnected from the network.
You can create, edit, and delete files while working offline. You can also create new folders, but you cannot delete or rename existing folders. New files in an offline folder inherit the offline property and are automatically made available while working offline. The next time you synchronize, the new files and folders are copied to the server.
You become curious to see exactly which files are available to you while working offline. From Windows Explorer, you click Map Network Drive on the tool bar. When the Map Network Drive dialog box appears, it shows you a subset of the servers you normally see when you are connected to the corporate network.
While disconnected, you can view, map and unmap server shares that have offline folders or files within them. You can also use universal naming convention (UNC) paths directly in the File Open and File Save As . . . dialog boxes. If you attempt to map a share that does not have an offline folder, control is passed to the RAS.
The next day, you return to the office, dock your laptop, and reboot. After you log on, you are presented with another dialog box welcoming you back to Offline Folders. This time, the dialog box explains that you have made changes while you where working offline. It tells you what to expect while you are connected (automatic synchronization in the background, icon in the task tray, dialog boxes to resolve conflicts, and so forth). The dialog box goes on to describe how you can use the Offline Folders Wizard and Windows shell extensions to select additional folders.
You dismiss the informational dialog box and begin working normally. After a while, you notice a little icon in the corner of the task tray. When you place your mouse pointer over this icon, a tool tip offers status on the updates happening to your documents. At one point, a question mark appears over the icon. You click the question mark, and a dialog box appears prompting you to reconcile your documents.
In the background, the client-side caching agent periodically polls the selected servers to see if any files on the server have changed. A file is considered changed if its timestamp, size, or any other attribute is different from the last snapshot collected. Files changed on the server need to replace files cached on the client (this is called inward propagation). Inwardly propagated files replace locally cached files only if the locally cached file is closed. Outward propagation copies files from the client to the server. If there are no conflicts (conflicts are changes on either the client or the server), no user intervention is required. Files are transparently copied from one to the other. If there are conflicts, a question mark appears over the icon. The user needs to manually reconcile the conflicts.
While wondering about offline folders and how to use them, you start the Microsoft Windows Explorer, click the Tools menu, and select the Offline Folder Wizard option. The Offline Folders Wizard is an easy-to-use tool that can help you setup offline folders, perform synchronizations, and configure cache settings.
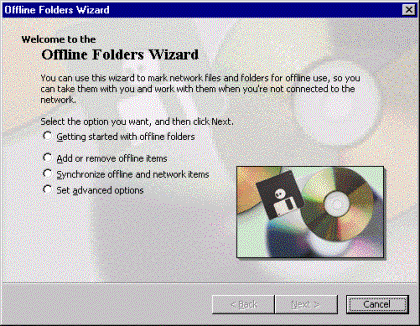
Figure 7: Welcome to the Offline Folders Wizard page
To select additional folders for use offline, you select the Add/Remove option.
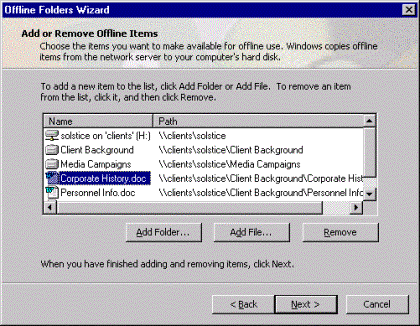
Figure 8. Add/remove offline folders
Next, you click Add . . ., which brings up a dialogbox that allows you to browse the network and select which folders you want to use when working offline. You notice that My Documents and \\server\public\all\specials\ are already displayed in the list.
Figure 9 shows network files being copied to your local hard disk. To stop the synchronization process, click Cancel.
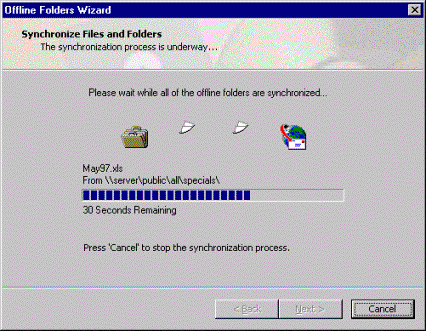
Figure 9. Synchronizing offline folders
The Finish dialog box tells you that all of your offline folders are up to date. It explains that when you are disconnected from the network, you can access your files in exactly the same way you do when you are connected. It also tells you how to use the Microsoft Windows Explorer to synchronize individual folders directly.
You become very interested in the new shell extensions that make selecting and synchronizing Offline Folders simple and easy. You position the mouse pointer over the Client Background folder and click the right mouse button to display the context menu.
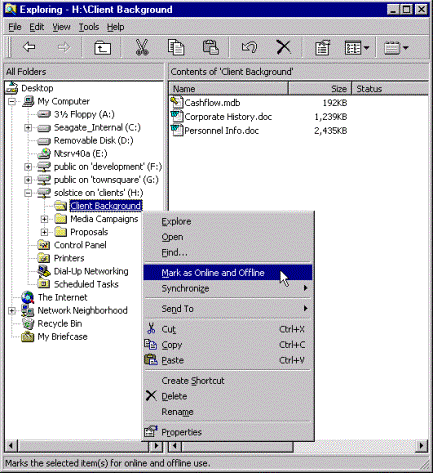
Figure 10. Context menu
There are two ways to synchronize offline folders. You can position the mouse over an offline folder, click the right mouse button, click Synchronize, and then select the All Folders or This Item option. Or, if you use the Tools menu, you can synchronize the currently selected folder (This Folder) or All Folders.
You are the administrator of a large heterogeneous organization. You have users who are connected using many different types of networks. You have users who are on Windows NT Server–based networks and users connected through Novell file servers. You have some users who are in very remote locations on slow links, and some connected through high-speed local area networks (LANs). Some users are running Windows 95, some are running Windows NT Workstation, and some are still running Windows 3.1 operating systems.
You need to send a new business application to all of your users. They will all need this application to do their jobs. You'll need to check to see if each users' personal computer can run the new application successfully. You will distribute the application to each user, confirm that it installed correctly on each personal computer, and fix any problems that might arise.
Before you distribute a new application, you need to know that the personal computers to which you are sending it can accept it and run it successfully. Does each personal computer have enough disk space and memory? Does each have applications already installed that are prerequisites for this new application?
Using Microsoft Systems Management Server, you are able to determine which personal computers have enough memory and disk space to accept and run the new application, and which do not.
Using Systems Management Server, you can inventory all of the machines in your environment, no matter which operating system they are running or what type of network they run on. Using this collection of inventory data, you can generate a query that matches the needs of this business application (for example, the application may need 16 megabytes (MB) of RAM, 40 MB of free disk space, and must have Microsoft Word installed first). You can then run this query against your inventory. Systems Management Server will determine exactly which machines are capable of installing and running the new business application, and can distribute the software to those machines only. You can then order the appropriate extra resources for those machines that are incapable of running the new software.
Systems Management Server allows you to create a query that is as specific as you need.

Figure 11. Building a query with Systems Management Server
You can then run your query to find which machines meet the requirements you specify.
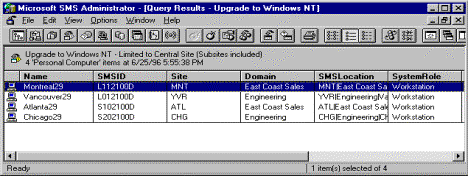
Figure 12. Systems Management Server list of personal computers that meet search criteria
Now that you know which personal computers can accept the new software, you can go ahead and distribute it. You want to use electronic software distribution so that no user involvement is required. Moreover, you want to be able to distribute software to all your users, whether they are working in Novell-based or Windows NT Server–based environments, or whether they have slow or fast links.
Because of the complexities of your network, you decide to use the dry-run facility of Systems Management Server to test the likelihood of your installation being successful. The dry-run yields no errors, so you proceed with the distribution.
The dry-run facility of Systems Management Server uses inventory information to simulate a roll-out across all target machines, without impacting any of them. Systems Management Server reports the results and allows you to make changes that increase the likelihood of a deployment's success.
When you are ready to deploy the software, you create a job (or offer) that includes a Package Definition File (PDF), which is a process that drives a silent installation on a desktop machine. You can use the Installer application of Systems Management Server to create a PDF very easily. The Systems Management Server Installer takes a snapshot of the business application installing on a test machine, and then simply replays this on every personal computer. This PDF can be delivered across a range of networks, including Internetwork Packet Exchange (IPX) and IP; it can use a range of server environments, including Novell and Windows NT Server; and it can run in very slow networks where bandwidth needs to be carefully controlled. It can even run on a machine that has no network connection by driving an installation from a floppy disk or CD.
Systems Management Server allows you to determine exactly how a PDF will be distributed.
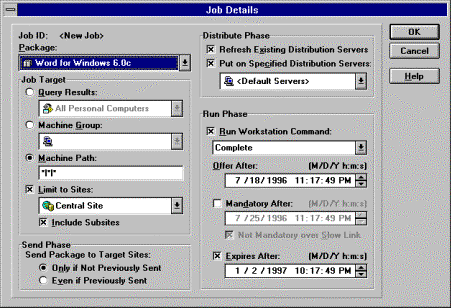
Figure 13. PDF job details
Once the PDF arrives at the user's machine, it can automatically install the software, even if the user isn't logged on. It does this by mimicking the user's actions and answering dialog questions, usually pulling system information such as the user's name and company out of the registry or from system files. If the system needs to be rebooted during this install, Systems Management Server can cause this to happen.
Note that the Systems Management Server Installer extends the background installation service provided in Windows NT Server 5.0. For example, Systems Management Server can schedule the time of an installation so that client and server upgrades (and combinations of clients and servers) can be synchronized. And because Systems Management Server background installation requires no user interaction, upgrades can be deployed during off-hours.
As the administrator, you'll need to know if the installations were successful. Although you performed a dry run to test the installation on the target machines, there could still be a variety of reasons for a failure to occur.
Systems Management Server lets you easily determine which machines had the software installed successfully and which failed. You can even use diagnostic tools to find out why they failed, and take over control of a user's desktop to examine it in more detail. If failures aren't isolated to a few desktops, you can use the roll-back facility to restore the target machines to their condition prior to the deployment.
When Systems Management Server completes an installation, it writes a status file known as a Management Information Format (MIF) file. This file indicates whether the application was successfully installed or not. These results are forwarded to you at the Systems Management Server administrator console so you can find out what went wrong. You can use your collected inventory to try to resolve the reasons for failures, or you can use Systems Management Server diagnostics tools such as memory maps, grahpics device interface (GDI) information, and remote event logs to look at properties on the personal computer.
Systems Management Server reports the results of all jobs—foreground and background. An administrator can determine whether an offer is being adopted, which users are adopting it, and what problems they encountered with the roll-out. If an installation encounters problems unexpectedly, Systems Management Server contains a roll-back facility to undo the damage.
If a problem is particularly difficult, you can use Systems Management Server's ability to take control of the personal computer's screen and keyboard input so that you can remotely view what is happening on that computer and directly resolve the problem.
As these scenarios illustrate, the Zero Administration initiative for Windows technologies provide systems administrators and network operators with extended control over all components in the Windows-based network, including an individual user's ability to alter his or her system configuration. And, unlike other enterprise solutions, the Zero Administration initiative for Windows maintains those benefits that have made personal computers valuable—the current infrastructure, availability of inexpensive hardware and software, product familiarity, and ease-of-use.
Zero Administration innovations in the Microsoft Window NT Server operating system allow a systems administrator to provide network services based on user need, update software automatically, replace hardware without losing client data or desktop preferences, store data centrally so that groups of users can share information or work on files simultaneously, and support the needs of mobile users—including offline access to data and automatic synchronization. And, with the advanced Zero Administration features of Systems Management Server, system administrators can maintain an inventory of hardware and software, predict the effect of a planned software deployment, schedule software upgrades for off-hours, trace the success or failure of a software offering, and perform systems diagnostics.
Zero administration is evolutionary in design. It reduces total cost of ownership while ensuring compatibility with existing hardware and software; it maintains the familiar Windows environment while making systems easier to use; it provides remote software and hardware management; and it integrates smoothly with existing business solutions. Use of the Zero Administration features and enabling technologies in Windows NT Server—in combination with the extended control offered by Systems Management Server—will result in a flexible, manageable, and resilient end-to-end architecture for corporate networks.
Additional information on Microsoft systems administration, including Zero Administration for Windows, is available at the Microsoft Management Web site (http://www.microsoft.com/management/).
Additional information on the Designed for Windows Logo Program is available at the Microsoft Windows Family Web site (http://www.microsoft.com/windows/thirdparty/winlogo/).
To request additional Zero Administration initiative for Windows features, send e-mail to the Microsoft Management Q&A alias (ManageIt@microsoft.com).
The information contained in this document represents the current view of Microsoft Corporation on the issues discussed as of the date of publication. This is a preliminary document and may be changed substantially prior to final commercial release. Because Microsoft must respond to changing market conditions, it should not be interpreted to be a commitment on the part of Microsoft, and Microsoft cannot guarantee the accuracy of any information presented after the date of publication. The entire risk of the use or results of the use of this document remains with the user. Companies, names, and data used in the examples herein are fictitious unless otherwise noted. No part of this document may be reproduced or transmitted in any form or by any means, electronic or mechanical, for any purpose, without the express written permission of Microsoft Corporation.
This White Paper is for informational purposes only. MICROSOFT MAKES NO WARRANTIES, EXPRESS OR IMPLIED, IN THIS DOCUMENT.
Microsoft may have patents, patent applications, trademarks, copyrights, or other intellectual property rights covering subject matter in this document. The furnishing of this document does not give you any license to these patents, trademarks, copyrights, or other intellectual property.