Data recovery for a single mailbox may be necessary in the event of an accidental mailbox or mailbox data deletion. In a centrally supported organization, affiliate offices can mail tapes to an internal recovery center.
Instructions for data recovery for a single mailbox are described in this section. These procedures will enable single mailbox recovery for any server in your organization, regardless of the server name.
Before trying any of the example procedures, note the following.
Caution This procedure should not be performed on a server that is in production. As noted below, this procedure requires restoring data to a server that is not part of your production Microsoft Exchange Server site. The dedicated recovery server is installed using the same site and organization name as the production site; however, it is installed by selecting Create New Site.
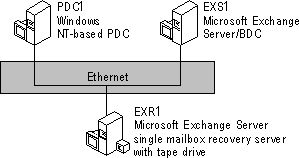
The following components are required to create this example:
Note You must restore the entire information store and then retrieve data from the desired mailbox. You can prepare a server running Windows NT Server and then install Microsoft Exchange Server with the same site and organization name in which the mailbox to be restored resided. Then, restore the information store from a backup tape, log on with Microsoft Exchange Administrator privileges, and assign the Windows NT Administrator ID access to the desired mailbox. Restore mailbox data to a .pst file and then attach the .pst to the desired user profile.
For the fastest recovery, the non-production computer should be running and available for recovery at all times. This computer can be installed as a Windows NT primary domain controller (PDC), backup domain controller (BDC), or member server. The server should also have the appropriate Windows NT Service Pack installed.
Before recovering the data, make sure there is enough disk space for restoring the entire information store from your backup tape. The backup recovery computer should also be equipped with a tape drive that is compatible with the tape drives deployed on production servers. The tape drive should be tested and known to be working at all times.
During the installation of Microsoft Exchange Server, do not join the site. The recovery computer should be a stand-alone computer and should not be joined with your existing production site.
Log on to Windows NT as an administrator and install Microsoft Exchange Server (using the Complete installation option). Use the same site and organization name that was used on the server from which you are restoring the mailbox. Do not join the site. Note that the server name of the restore computer does not matter for the single mailbox restore procedure. This is because you are only restoring the information store, not the directory.
If you have a dedicated recovery server at each location, you can install Microsoft Exchange Server before starting the recovery. If the recovery server will be shared among sites, it is best to keep a copy of the Microsoft Exchange installation code on the hard drive for quick installation, so you can install Microsoft Exchange Server based on the required site and organization. The paths for this Microsoft Exchange Server installation do not need to match the paths of the production Microsoft Exchange Server installation being recovered.
After you complete the preceding steps, you can install the Microsoft Exchange Client on the recovery server.
This procedure assumes that a tape from an online backup is used for the restore. If an offline tape is used, do not choose to start the services after the restore. The following steps describe how to restore the information store from tape.
To restore the information store from tape
Insert the backup tape and log on to the recovery domain as an administrator.
From the Administrative Tools program group, run BACKUP.
From the Operations menu, choose Microsoft Exchange.
Select the tapes icon, and then double-click the tape name.
In the right pane of the Tapes window, choose Org, Site, Server, Information Store.
Choose Restore from the upper part of the Backup menu's main screen.
In the Restore Information window, type the name of the destination server in the Destination Server box.
Select Erase All Existing Data, Private, Public, Verify After Restore, Start Service After Restore, and then choose OK. After you choose OK, the following message appears:
"You are about to restore Microsoft Exchange components. The Microsoft Exchange services on the destination server will be stopped."
Choose OK.
In the Verify Status window, choose OK.
After the restore is completed, start the Directory Service service.
At the command prompt, switch to the Exchsrvr\Bin directory, and type
isinteg –patch
This will run the ISINTEG troubleshooting utility in patch mode. After you run ISINTEG, a message appears stating that the databases have been successfully updated. Now you can start the Microsoft Exchange Server information store and the other services.
In Control Panel, double-click the Services icon, and then verify that the relevant Microsoft Exchange Server services are running.
Follow the steps described below to recover a user's mailbox.
To recover a user's mailbox
Log on to the recovery server using the Windows NT Administrator ID.
In the Administrator window, choose Servers, and then select a server.
From the File menu, choose Properties.
Select the Advanced tab.
Under DS/IS consistency adjustment, select All Inconsistencies.
Choose Adjust.
Select Recipients, and then double-click a user's mailbox name.
Select the General tab, and then select Primary Windows NT Account.
Choose Select An Existing Windows NT Account, and then choose OK.
In the Add User box, select Administrator, and then choose Add.
In the User Property window, choose OK.
In the Microsoft Exchange Client, start the Microsoft Exchange services.
Configure a profile for the appropriate user.
Add a .pst file to the profile.
Restart the Microsoft Exchange Client.
In the left pane, select Mailbox - Username.
Select the first folder or item in the list on the right pane.
From the Edit menu, choose Select All.
From the File menu, choose Copy.
In the Copy dialog box, select the appropriate .pst file, and then choose OK. All data will be copied to this .pst file.
Copy the .pst file to the destination location.
Add this .pst file to the user's profile on the production server or send the .pst file to the user with instructions.
If you have network access, you can copy the recovered .pst file to the appropriate server.
The following figure illustrates the Microsoft Exchange Server single mailbox recovery process.

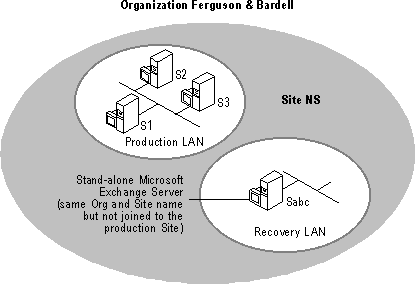
The single mailbox recovery server can be maintained online with production servers because the server name does not need to be the same as the production server running Microsoft Exchange Server. This recovery server, however, should not perform directory service replication with the production servers.
The following figure illustrates a topology for maintaining a spare server for single mailbox recovery. Note that the spare server "Sabc" is not joined to the production site. However, the server was installed using the same site name and organization name as the production site.
