Data recovery includes backing up and restoring three types of files:
Before restoring any of these files, however, read the next section, which describes how to restore databases by using the correct version of Microsoft Exchange Server with the accompanying Service Pack.
When restoring databases, it is important that you run the restored databases under the same Microsoft Exchange Server version that they previously ran under. Therefore, do not start services until all code is up-to-date. For example, if you are using Microsoft Exchange Server Service Pack 2 (SP2), but have the original server compact disc and SP2 code, you should have the SP2 code loaded before running Microsoft Exchange Server with your restored databases from an SP2-level server.
After you have installed the correct Service Pack, you can restore your database files by replacing the new databases that were installed by running the Setup program. When you do so, make sure that you follow the appropriate restore procedures.
Note If you run Setup /R, it will not create the .Dir.edb, Pub.edb, and Priv.edb files. (Normally these files are created with the organization and site name given during setup.) Setup /R, however, copies the Dir.edb from the Microsoft Exchange Server compact disc exactly the way it is. You will not be able to start the directory service with the default Dir.edb.
You also must restore all database files (Dir.edb, Pub.edb, and Priv.edb). If you plan to restore only the information store and not the directory, then do not run SETUP /R.
.Ost files are "slave" replicas of Microsoft Exchange Server folders. If you delete the master, the slave is orphaned. If the original Microsoft Exchange profile was not modified, then you can start the process offline with the old .ost file, and recover the data by copying it to a .pst file. However, if the old profile was deleted or modified (for example, if you used the profile to log on to the new mailbox), the data is lost.
The reason data is lost is due to the way in which security is enforced on .ost files. You cannot perform Windows NT authentication while you're offline. Instead, you have to prove that you can log on to the server-based master before the .ost file will give you local access.
Microsoft Exchange Server does this by creating an encrypted "cookie" from your mailbox's unique entry ID, while you have successfully logged on to the server. This cookie is securely stored in your Microsoft Exchange Server profile. Your profile stores the key for the .ost file. Every time you try to access the .ost file, it checks your profile for the existence of this key.
The exception to making the .ost file non-recoverable occurs if one of the following takes place:
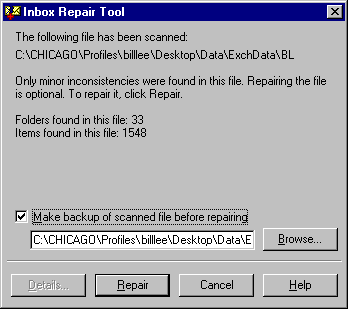
The Inbox Repair Tool repairs.pst and .ost files. This tool is similar to the MMF check capability in Microsoft Mail and is installed in the Microsoft Exchange Client subdirectory.
The Inbox Repair Tool performs eight checks on the selected file. Note that during repair, you can choose to back up the existing file before making the repair. The following figure shows the Inbox Repair Tool after a scan has been performed.
The following figures show a Windows NT Secure Channel in a normal production environment.
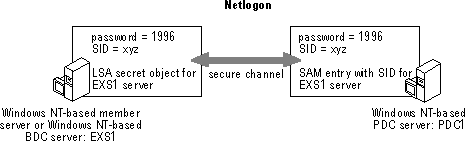
Each Windows NT Server computer has a unique SID that is used for domain authentication. Note that the Windows NT SID for EXS1 is xyz. This SID is used solely for purposes of this example, and is not the actual SID format. To connect to the domain, the Windows NT BDC (member server) must have a matching SID and local security authority (LSA) password that enables authentication to take place. The following figure illustrates a secure channel failure.
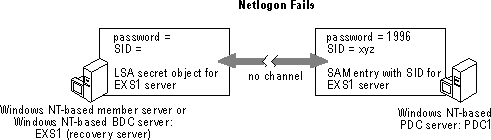
This figure demonstrates what happens if you do not first delete and then re-add the Microsoft Exchange Server computer account before installing a recovery server. If a recovery server is rebuilt by installing Windows NT from scratch, and the same computer name is used, NETLOGON will fail because the old computer account and SID remain in the domain SAM and can only be reset from within the Server Manager program by deleting and re-adding the computer account.
The following figure shows a re-established computer account.
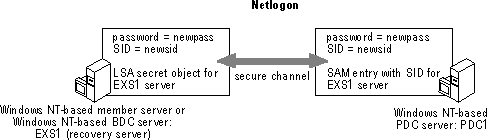
When the old computer account is deleted and then readded to the domain SAM, the SAM entry is first set to an initialize state. When the new server is added, a local LSA secret object is created along with a SID, thus synchronizing the LSA secret object (stored locally on the BDC or member server) with the SAM object for the respective computer. In addition, a password is generated that is used whenever the BDC or member server computer logs on to the domain. This process creates a secure channel between the BDC and the PDC. The secure channel password is changed automatically by NETLOGON to prevent the password from being discovered.
Note that the LSA secret object is created by Setup during the initial installation or when a server joins a domain. The SAM computer account is created by the Server Manager program.