Dropper Remote (DropRm.exe) is a Windows Sockets (WinSock) server application that uses static port allocation (port 1066). The "Run Remote Application" action contains a WinSock client that connects to the specified server and sends a data structure over the WinSock connection. The structure is then decomposed into a command string and several option flags on the remote side, and the application starts. If the application successfully starts and if you have requested the "Wait for completion" flag, DropRm waits until the application has started, and then returns a handshake signal to Dropper by using the active connection. At this point, the Dropper script execution proceeds normally.
The Dropper Run Remote Application command enables you to run an application on a remote computer, instead of running it on a computer where Dropper resides. This command is useful if:
To install Dropper Remote
If you followed the procedures described earlier in "Installing Buddy Dropper," then you have already installed Dropper Remote. If Dropper Remote is already installed, double-click DropRm.exe to start the program. If you have not already installed Dropper Remote, then follow the procedures below:
Copy DropRm.exe to any directory (preferably a directory in the system path).
Copy the following DLLs to the system directory (%systemroot%\system for Windows95 or %systemroot%\system32 for Windows NT):
Start DropRm.exe.
To use the Dropper Run Remote Application command, the remote target computer of a Run Remote Application action must be running the Dropper Remote file (DropRm.exe), and must use Transport Control Protocol/Internet Protocol (TCP/IP) as the communication protocol.
Note The DropRm application does not need to be running on remote servers if you do not plan to use the Run Remote Application action. To maximize the usefulness of Buddy Dropper, however, it is recommended that DropRm be placed in the startup group of all computers where Dropper will run, so that it is always available. The flat/min can be used when running DropRm to cause it to run minimized (for Help on command-line options, type DropRm /? at the command prompt).
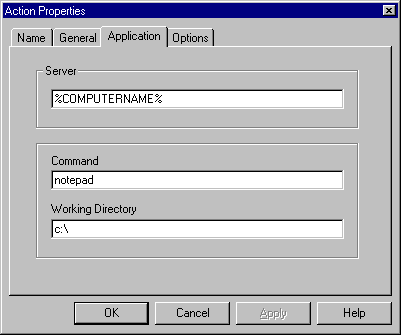
The following figure shows the configuration tab for a Run Remote Application action.
In this example, the Notepad.exe application is started on all servers where the action applies. The working directory is an optional argument. If it is specified, the application's working directory will be set. If it is not specified, the working directory is the system default directory. Note that if the working directory is specified but does not exist, the application will fail to start.
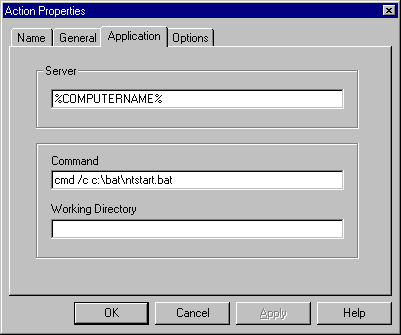
In the following example, Dropper runs a batch file on the remote computer; the application "cmd.exe" (the Windows NT command prompt) starts with the batch file specified as an argument, and no working directory is set. The /c argument causes the command prompt to exit after the batch file is run.
If you need to have an application completed on the remote computer before continuing the Dropper script, select the Wait for application to complete check box. This causes the Dropper script to stop until the remote application has completed (or has failed to execute).
You can, however, stop the Dropper script during this time. A common situation requiring use of the Wait flag is the mapping of a network share to a local drive. In this case, you would do the following:
If drive X: is currently mapped to a network resource, unmap it by typing the following at the command prompt:
net use /d X:
Map drive X to \\<server\share> by typing:
net use X: \\<server\share>
In this case, the steps must be sequential. Step one must be completed before you move to step two. The Wait flag should be specified in step one. Also, because further actions are likely to depend on the drive mapped by step two, it is suggested that you specify the Wait flag for step two as well.
In the following example, Dropper is being used to install and upgrade Microsoft Exchange Server testing topologies consisting of 100 or more computers. Computers within the topology are a mixture of Intel, Alpha, MIPS and PowerPC platforms. Each computer has installed one of a dozen or more languages. Each configuration mandates a different set of installation files and settings. The following figure displays these files and settings.
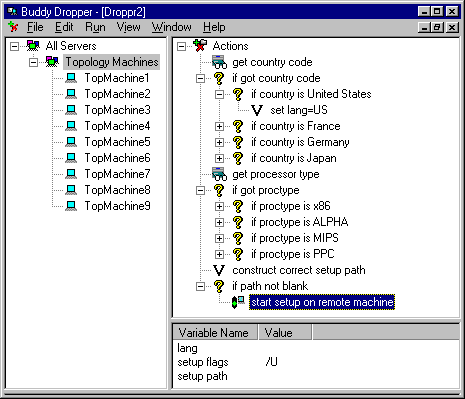
In this example, the following procedures are used:
Obtain the country code for the installed language from the remote computer's registry.
Match the language code to all known languages, and set the lang variable accordingly (lang will then contain the name of a directory based on language type on the install point from which the Setup program is run)
Perform the same procedure for detection of processor type.
Construct the string that indicates the universal naming convention (UNC) path to the appropriate setup.exe for the remote computer's processor type and installed language.
Have the remote computer launch setup.exe from the setup path and with appropriate flags.