PJ204Presented by Johnny JohnsonJohnny Johnson
Mr. Johnson is a technical integration consultant for Micro-Frame Technologies, Inc. He has taught computer science at the U.S. Naval Academy and business management courses at community colleges. He has developed large scale project management and database systems for the FAA, Air Force, Martin Marietta, as well as other government and commercial customers. He is a Microsoft Project Solutions Partner and Trainer.
Phone: (206) 598-5842
Fax: (206) 598-5843
CompuServe: 74415,1237
Internet: silvrsof@interserv.com
Microsoft Project 4.1 can be used to create powerful applications because of the many development tools that are included. Tools such as a Macro Recorder, VBA (Visual Basic for Applications) language, OLE, and customizable views, forms, menus, and toolbars. I will demonstrate each of these functions and how to maximize Microsoft Project functionality.
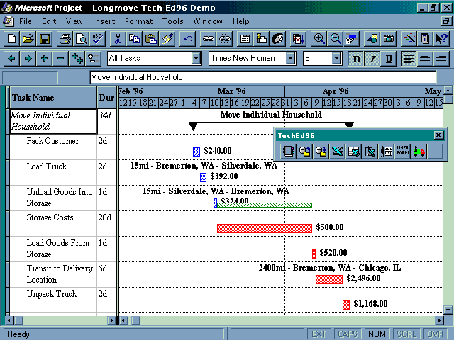
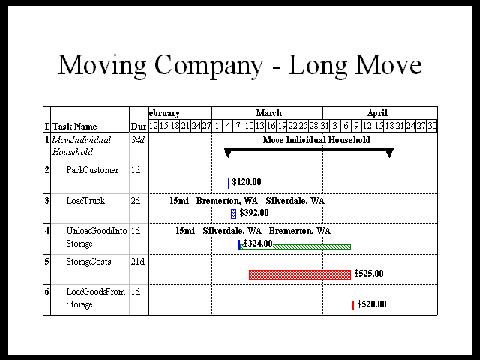
The following application uses Microsoft Project's customizable views, toolbars, reports, and VBA to create a Moving Company Estimation Tool. It can produce a tabular resource cost and a Cost loaded Gantt chart. The Visual Basic routine calculates and displays the cost of each task on the Gantt chart. The model is based on contracted Packing and Delivery dates. In addition it calculates the storage costs for a shipment by creating a variable length task that is equal to the free slack between loading goods into storage and when they have to be removed for delivery.
The finished Gantt view is shown in the picture below:
Moving Company Gantt View
The Visual Basic macro was assigned to a button on the TechEd 95 toolbar, which launches the calculations and updates the Gantt chart. The calculations are based upon the resource sheet labor rates and the values entered into the Moving Company Entry table.
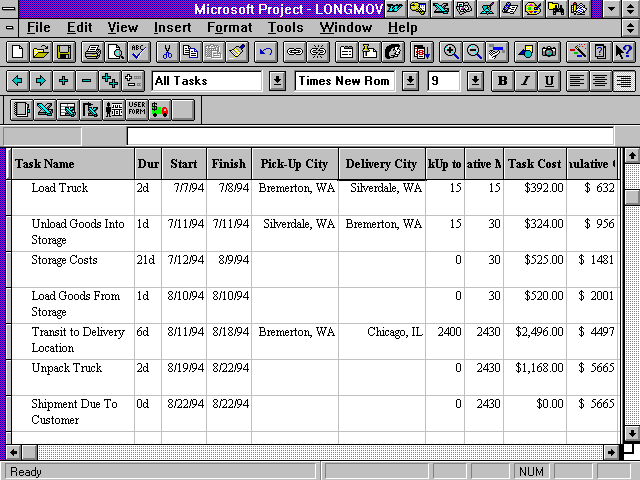
Moving Company Entry Table
The Moving Company Bar Text Macro requires two loops through the model. The first pass sets the variable StorageDuration equal to the free slack, then sets the Storage Cost task duration equal to it. The second pass accumulates cost and formats the bar text.
'Macro MovingCompanyBarText
'Macro Created by Johnny Johnson.
Sub MovingCompanyBarText()
    Dim t, R As Object
    Dim TotalMileage, TotalCost, StorageDuration As Variant
    TotalMileage = 0
    ' Calculate Storage duration as a function of Free Slack
    For Each t In ActiveProject.Tasks
        If t.Name = "Unload Goods Into Storage" Then
            StorageDuration = t.FreeSlack
        End If
        If t.Name = "Storage Costs" Then
            t.Duration = StorageDuration
        End If
    Next t
    For Each t In ActiveProject.Tasks
        t.Cost1 = 0
        TotalMileage = TotalMileage + t.Number1
        t.Number2 = TotalMileage
        ' Accumulate costs for each task and total cost
        For Each R In t.Assignments
            TotalCost = TotalCost + R.Cost
            t.Cost1 = t.Cost1 + R.Cost
        Next R
        t.Text3 = "$ " & Str(TotalCost)
        'Format Start and Stop dates in same text field
        If t.Number1 > 0 Then
            t.Text4 = Str(t.Number1) & "mi - " & t.Text1 & " - "                      & t.Text2
        Else
            If t.Milestone = True Then
                t.Text4 = Str(TotalMileage) & " Total Miles - " &                          t.Text3 & " Total Cost"
            Else
                t.Text4 = ""
            End If
        End If
    Next t
End Sub
The custom Moving Cost Estimate Report is a weekly resource cost report.

Moving Company Cost Estimate
The macro that follows was written entirely in Microsoft Project 4.1's VBA but references Microsoft Excel 7.0's VBA. When building cross-application macros, it is always best to reference the other applications type libraries. To reference another instance VBA you must be in the Macro Edit mode. Go to the Tools pull-down menu, then select "References". Click on the appropriate library.
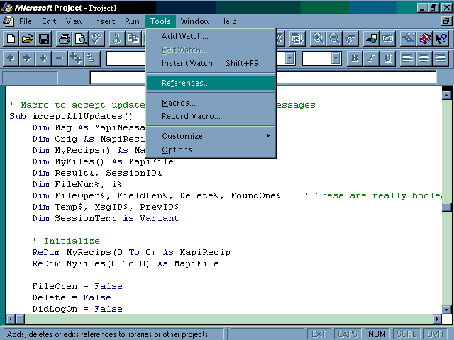
Location of VBA Reference Dialog
As you change your GLOBAL.MPT or load different .MPT files you need to check to ensure that the correct references and paths are correct or your macro may not work and you could get an OLE automation error.
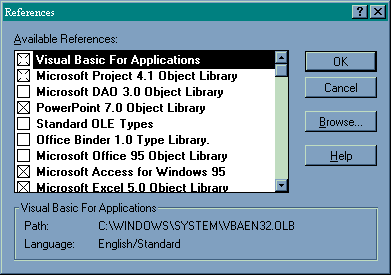
VBA Reference Dialog
An excellent way to get really customized tabular reports is to send tabular data to Microsoft Excel 5.0 via OLE automation, then automate the process using Microsoft Project and Microsoft Excel to create powerful reports.
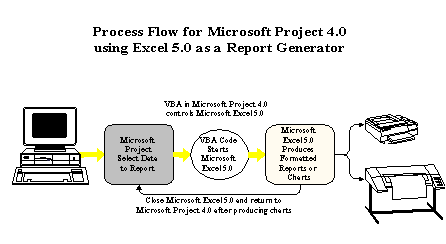
Simple Report Generator Scheme
VBA Code for Project 4.0 sending Resource Assignment information by Task to Excel where it is formatted with a "Pivot Table" for analysis and reporting.
'This Macro gets all of the resources assigned by task and sends 'them to Microsoft Excel 5.0 for formatting into a pivot table. 'NOTE: Ensure that the XLEN50.OLB is referenced in Microsoft Project... While in edit macro mode, go to TOOLS Menu, then select References, then 'check "Microsoft Excel 5.0 Object Library" (XLEN50.OLB)
Sub JJProj2xl5pivot()
Const pjTaskDuration = 29                   'Duration
Const pjTaskFinish = 36                     'Finish
Const pjTaskName = 14                       'Name
Const pjTaskStart = 35                      'Start
Const ROWSTART = 1
Const COLSTART = 1
    Dim xl As Object
    Dim R%, C%
    Dim Tsk, ResAssignment
    Dim TaskFields
    Dim FieldNames
    Dim I%
    'array of constants for GetField method
    TaskFields = Array(pjTaskName,pjTaskDuration,pjTaskStart,
                pjTaskFinish, -1)
    'Column headings
        FieldNames = Array("Task Name","Task Duration","Task Start",
                "Task Finish","Resource ID","Resource Name",
                "Units","Work","Actual Work","Remaining Work","")
        AppExecute "Microsoft Excel", "EXCEL.EXE"
        Set xl = GetObject(class:="Excel.Application")
        xl.Workbooks.Add
    'For each task in current project copy fields over to excel
        R = ROWSTART
        C = COLSTART
    I = 0
    'add column headings
        While FieldNames(I) <> ""
    xl.Cells(R, C + I).value = FieldNames(I)
        I = I + 1
    Wend
    For Each Tsk In ActiveProject.Tasks
        For Each ResAssignment In Tsk.Assignments
            C = COLSTART
            R = R + 1
            'send current task info
            I = 0
            While TaskFields(I) <> -1
                   xl.Cells(R,C).value=
                    Tsk.GetField(FieldID:=TaskFields(I))
                    C = C + 1
                    I = I + 1
            Wend
            'send resource assignment info
            xl.Cells(R, C).value = ResAssignment.ResourceID
            C = C + 1
                xl.Cells(R,C).value = ResAssignment.ResourceName
            C = C + 1
            xl.Cells(R,C).value = ResAssignment.Units
            C = C + 1
            xl.Cells(R,C).value = (ResAssignment.Work/60)
            C = C + 1
            xl.Cells(R,C).value =(ResAssignment.ActualWork/60)
            C = C + 1
            xl.Cells(R,C).value=(ResAssignment.RemainingWork/60)
        Next ResAssignment
    Next Tsk
    'Create and format Excel 5.0 pivot table
    With xl  (application object)
        'Select Range of data for pivot table
        .Range(.Cells(ROWSTART, COLSTART),.Cells(R,C)).Select
        'Create pivot table using Excel pivot table wizard
        .ActiveSheet.PivotTableWizard SourceType:=xlDatabase,                 SourceData:=.Range(.Cells(ROWSTART,COLSTART),                     .Cells(R, C)), TableDestination:="R30C1",                         TableName:="PivotTableRes"
        'Add Row Fields to pivot table
        .ActiveSheet.PivotTables("PivotTableRes").AddFields                     RowFields:=Array("Task Name", "Resource Name")
        'Add data field
        .ActiveSheet.PivotTables("PivotTableRes").
            PivotFields("Work").Orientation = xlDataField
        'Select completed pivot table and autoformat
        .ActiveSheet.PivotTables("PivotTableRes").
            TableRange1.Select
        .Selection.AutoFormat Format:=xlList1, Number:=True,                 Font:=True,Alignment:=True, Border:=True,                         Pattern:=True,Width:=True                                    .Selection.EntireColumn.AutoFit
    End With
End Sub
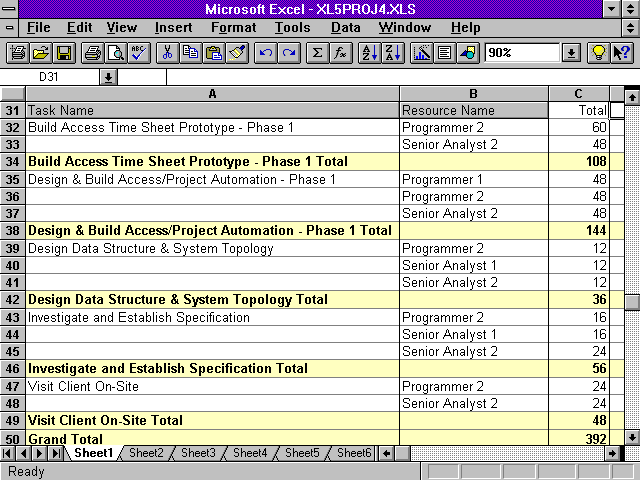
Resulting Excel 7.0 Pivot Table
One of the hardest things to do in Microsoft Project 4.0 is to graph resource load by day and by task. Although you can see, using the resource usage view, the amount of hours assigned to a resource each day, you cannot easily see the breakdown per task. The following VBA macro, prompts the user for a span of dates and the resource name to analyze. This macro also takes a different approach in that it collects the desired data in Microsoft Project 4.1 and creates a custom formatted "CSV" (comma separated value) export file. This is to increase the speed for Excel to load and format the resulting graph. In my experience there are times when this is much faster than OLE automation, especially if you are moving large volumes of data.

Entering Start Date for Resource Spread
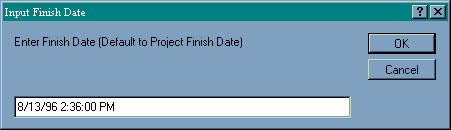
Entering Ending Date for Resource Spread

Entering desired resource ( could have entered Car)

Carpenter Resource Load/Day
The key VBA function that makes this resource assignment spread possible is the TimeScaledData function. This function returns a string like "2h,1h,0h,4h,8h,1h" and the trick to sending this to Excel is to remove the units and leave 2,1,0,4,8,1 so that Excel can process the hours as numbers. In addition to hours, you can get this data in any time units and as work or cost.
TimeScaledData Function Call Reference
'temp = TimeScaledData(t.ID, r.ID, ActiveProject.ProjStart, _
ActiveProject.ProjectFinish, pjWork, pjTimescaleWeeks)
'Macro JJAssignmentsOverTime
'Macro Created 12/12/95 8:45 AM by Johnny Johnson.
Sub JJAssignmentsOverTime()
    Dim t, R, f As Object
    Dim Temp, ResSpread, WhichResource As String
    Dim strpos, TaskCount, ElapsedDays As Integer
    Dim StartDate, EndDate As Variant
    Dim Message, Title, Default, Msg, style
    Dim TransferFile
    On Error GoTo OtherError
    TransferFile = "respread.csv"
    ' Set prompt for Start Date.
    Message = "Enter Starting Date (Default to CurrentDate)"
    Title = "Input Start Date" ' Set title.
    Default = ActiveProject.CurrentDate   ' Set default.
    ' Display message, title, and default value.
    StartDate = InputBox(Message, Title, Default)
    'Validate StartDate for null value
    If StartDate = "" Then GoTo DataError:
    ' Set prompt for Finish Date.
    Message = "Enter Finish Date (Default to Project Finish _                Date)"
    Title = "Input Finish Date" ' Set title.
    Default = ActiveProject.ProjectFinish   ' Set default.
    ' Display message, title, and default value.
    EndDate = InputBox(Message, Title, Default)
    'Validate EndDate for null value
    If EndDate = "" Then GoTo DataError:
    WhichResource = InputBox(Prompt:="Enter Resource to _                    Display...", Title:="Determine Daily Resource _
            Spread", Default:="*")
    ViewApply Name:="Gantt Chart", singlePane:=True
    If WhichResource <> "*" Then
        FilterApply Name:="Select Resource", _                             Value1:=WhichResource
End If
SelectAll
Open TransferFile For Output As #1
'Print First three header lines for Excel...
Print #1, ActiveProject.Name & "," & ActiveProject.ProjectStart _
         & "," &     ActiveProject.ProjectFinish
Print #1, "Resource Spread Dates Start: " & StartDate & _
        "  Finish: " & EndDate
Print #1, "TaskID," & "ResID," & "Resource Name," & "Task _
        Name," & StartDate
TaskCount = 0
'For Each t In ActiveProject.Tasks
For Each t In ActiveSelection.Tasks
    For Each R In t.Resources
        If InStr(R.Name, WhichResource) <> 0 _
            Or WhichResource = "*" Then
            Temp = TimescaledData(t.ID, R.ID, StartDate, _
                    EndDate, pjWork, pjTimescaleDays)
            'This loop takes the "h" out of the string so that                 'Excel can treat it like a number
             strpos = 1
            While strpos <= Len(Temp)
                If Mid(Temp, strpos, 1) <> "h" Then
                    ResSpread = ResSpread & Mid(Temp, strpos, 1)
                 End If
                 strpos = strpos + 1
            Wend
            'Print the data line to the output file
            Print #1, t.ID & "," & R.ID & "," & R.Name & "," _
                & t.Name & "," & ResSpread
            'Reset the ResSrpead string variable to ""
            ResSpread = ""
                TaskCount = TaskCount + 1
        End If
    Next R
Next t
Close #1
'Ensure there is something to look at...
If TaskCount = 0 Then
    MsgBox "There was no Resource Selected"
Else
    'Start Excel in the background
    Set xl = CreateObject(class:="Excel.Sheet.5")
        With xl.Application
            ' Makes XL visible (if left out cannot close XL)
            .Visible = True
            .Workbooks.OpenText FileName:=TransferFile, _
               DataType:=xlDelimited, comma:=True
            .ActiveCell.Offset(2, 0).Rows("1:1").EntireRow.Select
            .Selection.NumberFormat = "m/d/yy"
            .Range("E3").Select
            .Selection.AutoFill Destination:=.Range(.cells(3, 5), _
                .cells(3, ElapsedDays + 5)), Type:=xlFillDefault
            .Range(.cells(3, 5), .cells(3, ElapsedDays + 5)).Select
            .ActiveCell.Offset(1, 0).Rows("1:" & _
            TaskCount).EntireRow.Select
            .Selection.Sort Key1:=.Range("B4"),Order1:=xlAscending, _
                Header:=xlGuess, OrderCustom:=1, MatchCase:=False, _
                Orientation:=xlTopToBottom
            'Create Chart
            .ActiveCell.Offset(-1, 2).Range(.cells(1, 1), _
                .cells(TaskCount + 1, ElapsedDays + 5)).Select
            .ActiveSheet.ChartObjects.Add(484.5, 4.5, 423, _
            219).Select
            .Application.CutCopyMode = True
        .ActiveChart.ChartWizard Source:=.Range(.cells(3, 3), _
                .cells(TaskCount + 1, ElapsedDays + 5)), _
                Gallery:=xlColumn, _
                Format:=3, PlotBy:=xlRows, _
                CategoryLabels:=1, _
                SeriesLabels:=2, HasLegend:=1, _
                Title:="Resource Spread for " & WhichResource, _
                CategoryTitle:="Date", ValueTitle:="Hours/Day", _
                ExtraTitle:=""
            .ActiveChart.Visible
    End With
    xl = Nothing
End If
GoTo EndError:
DataError:
    Msg = "You didn't enter a valid date, Macro halted."
    style = vbOKOnly + vbExclamation   ' Define buttons.
    Title = "Date Validation Warning"  ' Define title.
    ' Display message.
    Response = MsgBox(Msg, style, Title)
OtherError:
    Close #1
EndError:
End Sub
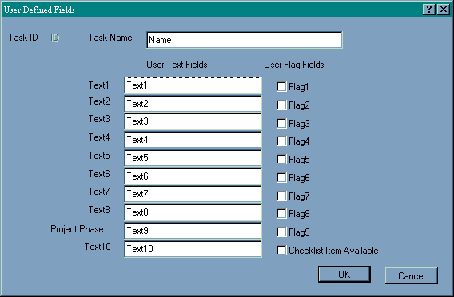
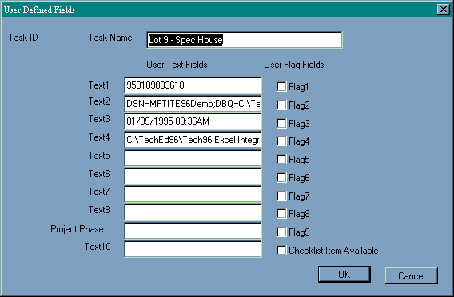
Many times you don't want to clutter your project management schedule with lots of detailed short time tasks, milestones or to-do lists but it would be nice to reference these items to a related task in your schedule. That's the purpose of this mini-application, to maintain a checklist of items in Microsoft Excel that relate to a schedule. The way I designed this, was to have an Excel workbook related to a project and each "tabbed" work sheet corresponds to a project phase, which is identified by the Microsoft Project Text9 field. Flag10 is used to indicate a task that has a corresponding checklist in the Microsoft Excel workbook.
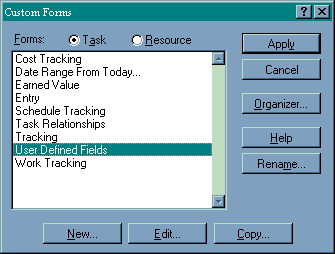
To create a custom dialog form, Select Tools, Customize, Forms to bring up the Custom Form Dialog. Select new and design the form by selecting the fields and text then positioning them on the form.
Custom Form Dialog
Dialog Editor
Finished form created in Microsoft Project to make updating user defined fields easier
In addition to creating a custom form to speed up data entry, you can attach a macro to a button on the toolbar and further customize your application. To add a blank button to a toolbar, hold the Shift key down and click on a blank space on the toolbar. After the blank button appears, holding the Control key down and clicking on the blank button will bring up the Customize Tool Dialog box. Select the function or Macro to assign to the button from the Command list box and enter a Tool Tip, if required. If you want to customize the picture or create a new on, select Edit Button and get creative.
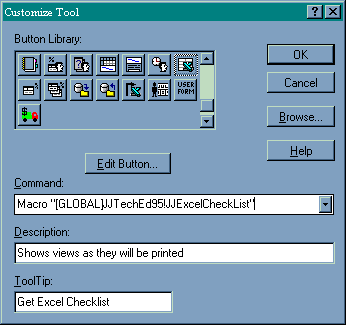
Customize Tool Dialog
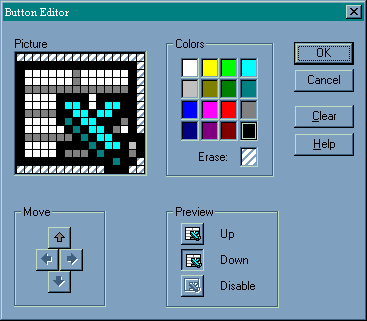
Button Editor Dialog
The first thing you have to do is to create a Workbook and then a Worksheet for each phase of your project. Insert worksheets by "Right-Clicking" on the worksheet tab, then select insert. To name the tabs to match the phase, "double-click" on the tab and enter the Phase name. After you have done that, you can bring in the tasks for each phase, by pasting them into the appropriate worksheet, then label columns B-F to the appropriate dates for updating. You could paste-link the dates in from your Microsoft Project schedule, but for the purposes of this demo, I will update the dates through VBA code. The finished checklist is shown and is called "checklist.xls" for purposes of the demo.
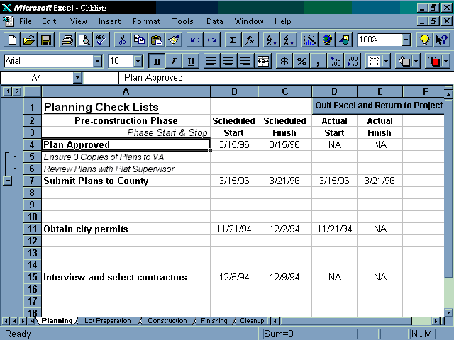
Checklist WorkBook
'Macro JJExcelCheckList Macro Created by Johnny Johnson.
Sub JJExcelCheckList()
    Dim t As Object, xl As Object
    Dim ChkLst As Variant
    Dim TaskStart, TaskFinish As Date,
    Dim ActStart, ActFinish As Variant
    Dim CheckListFilename As String
    CheckListFilename = "c:\teched96\chklists.xls"
    If Not (ActiveSelection.Tasks Is Nothing) Then
        For Each t In ActiveSelection.Tasks
            If t.Flag10 = True Then
                    ChkLst = t.Text9
                    TaskStart = t.Start
                    TaskFinish = t.Finish
                    ActStart = t.ActualStart
                    ActFinish = t.ActualFinish
                    SelectRowStart
                    Set xl = CreateObject _
                        (class:="Excel.Application")
                xl.Workbooks.Open FileName:=CheckListFilename
                 xl.Application.Visible = True
                 'Make XL visible (if left out cannot close XL)
                 xl.Worksheets(ChkLst).Activate
                 xl.Columns("A").Find(t.Name).Activate
                 xl.WindowState = xlMaximized
                 CurrentRow = xl.ActiveCell.Row
                 CurrentColumn = xl.ActiveCell.Column
                 xl.cells(CurrentRow, CurrentColumn + 1). _
                    Value =     TaskStart
                 xl.cells(CurrentRow, CurrentColumn + 2). _
                    Value =     TaskFinish
                 xl.cells(CurrentRow, CurrentColumn + 3). _
                    Value = ActStart
                    xl.cells(CurrentRow, CurrentColumn + 4). _
                    Value =     ActFinish
            Else
                    SelectRowStart
                    Message Message:="The currently selected task                                     has no associated checklist."
                End If
        Next
    End If
End Sub
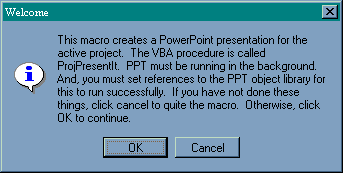
PowerPoint 7.0 allows you to create presentations directly, using VBA and OLE. Suppose you want to create a quick summary presentation from a project. The following macro takes data from summary tasks and sends it to a formatted PowerPoint presentation as follows:
PowerPoint starts in Presentation Mode and displays several slides of summary data from Microsoft Project directly.
The last of three pages of data is an embedded object.
'Macro PowerPointDemoTE96
'Macro Created Mon 5/22/95, Modified 1/5/96.
Global oPPT, oPres, oSlide, oPlace As Object
Global oTask, oChildTask As Task
Global xNum As Integer
Global myStr, myResStr, strFileNamePath As String
Global Const myTemplate = "C:\blue diagonal.pot"

Sub PowerPointDemoTE96()
    Dim Msg, Title, style
    Msg = "This macro creates a PowerPoint presentation for     the     active project. The VBA procedure is called ProjPresentIt.     You must set    references to the PPT object library for    this to     run     successfully. If you have not done these things, click     cancel     to quite the macro. Otherwise, click OK to continue.
    style = vbOKCancel + vbInformation  'Define the buttons
    Title = "Welcome"  'Define the title.
    Response = MsgBox(Msg, style, Title) 'Display message.
    If Response = vbOK Then    ' User chose Yes
        Call ProjPresentIt
    End If
End Sub
Sub GetPowerPoint95()
    On Error GoTo Errorhandler
    Set oPPT = CreateObject("PowerPoint.Application.7")
    Set oPres = oPPT.Presentations.Add
    Exit Sub
Errorhandler:
    RetVal = Shell("c:\apps\office95\powerpnt\powerpnt.exe", 1)
    SendKeys "{ESC}", True
    Set oPPT = CreateObject("PowerPoint.Application.7")
    oPPT.AppWindow.WindowState = ppWindowMixed
    Exit Sub
End Sub
Sub ProjPresentIt()
    Call GetPowerPoint95
    'counter
    xNum = 1
    'Summary data to PowerPoint
    For Each oTask In ActiveProject.OutlineChildren
        Set oSlide = oPres.Slides.Add(xNum, 2)
        oSlide.Objects.Title.Text = oTask.Name
        If Not (oTask.OutlineChildren Is Nothing) Then
                Set oPlace = oSlide.Objects.Placeholders(1)
                oPlace.Text = "Manager: " &                                                         oTask.ResourceNames
                Set paraRange = oPlace.Text.Paragraphs(1)
                paraRange.Append Chr(13) & "Status: " &                                     oTask.PercentComplete & "% Complete"
                paraRange.Append Chr(13) & "Planned Cost: $" &                             Format$(oTask.BaselineCost)
                paraRange.Append Chr(13) & "Actual Cost: $" &                             Format$(oTask.ActualCost)
                paraRange.Append Chr(13) & "Start: " &                                     Format$(oTask.Start, "m/d/yy")
                paraRange.Append Chr(13) & "Finish: " &                                     Format$(oTask.Finish, "m/d/yy")
                For Each oChildTask In oTask.OutlineChildren
                    myResStr = oChildTask.ResourceNames
                    myStr = myResStr & ", " & myStr
                Next oChildTask
                paraRange.Append Chr(13) & "Team: " & Left$(myStr,                         Len(myStr) - 2)
                myStr = ""
        End If
        xNum = xNum + 1
    Next oTask
    'Create a title slide
    Set oSlide = oPres.Slides.Add(1, 1)
    oSlide.Objects.Title.Text = ActiveProject.Title
    Set oPlace = oSlide.Objects.Placeholders(1)
    oPlace.Text = "Manager: " & ActiveProject.Manager & Chr(13) &             Format$(Now, "m/d/yy")
    'get file location of the active file
    strFileNamePath = ActiveProject.FullName
    'strFileNamePath = "c:\project1.mpp"
    'embed a copy of the file onto the last slide
    With oPres.Slides.Add(oPres.Slides.Count + 1, ppLayoutObject)
        With .Objects
            .Title.Text = ActiveProject.Title
            .AddOleObjectFromFile strFileNamePath, boolLink, _
            .Placeholders(1).Left, .Placeholders(1).Top,                                     .Placeholders(1).Width, _
            .Placeholders(1).Height
        End With
    End With
    'display the slide show
    oPres.SlideShow.Run (ppSlideShowFullScreen)
End Sub
As you can see, using the powerful tools included in Microsoft Project 4.1 you can easily integrate project management data into the Microsoft Office environment. As more products include VBA, the potential to make tightly bound applications will be even greater. All of the demos shown are found on the TechEd96 CD-ROM. The files included are: