This chapter describes the requirements for installing Visual FoxPro and then explains how to install and customize it.
This chapter discusses:
Before installing Visual FoxPro, you should check the following:
You can run Visual FoxPro with Windows 95 or later or Windows NT 4.0 or later. The Windows NT documentation outlines the minimum requirements for running Windows NT.
Following are the recommended requirements for running Visual FoxPro with Windows operating systems:
A VGA or higher-resolution monitor is recommended.
The Upsizing Wizards take a Visual FoxPro database and create SQL or Oracle databases on a server with the same table structures, data, and many other attributes of the original Visual FoxPro database. The Upsizing Wizards have the following server, client, and network requirements.
Server You need one of the following products:
Client The client machine must:
Network The client and server machines must be networked with one of the following products:
You can install Visual FoxPro from CD-ROM or a network; 3.5 floppy disks are available by fulfillment only.
Important If you use a virus protection program on your computer, override it or turn it off before you run the Installation Wizard. The Installation Wizard might not run properly with virus protection turned on. After installation, be sure to restart your virus protection program.
You can install Visual FoxPro from CD-ROM.
To install Visual FoxPro from CD-ROM
The samples for Visual FoxPro 6.0 are installed using the MSDN Installation Wizard. Choose the Custom option and select the VFP Product Samples check box. The samples are placed in the common MSDN samples location. You can access this location programmatically by using the _SAMPLES system variable or by executing the HOME(2) command.
Note If you select the Typical option, Visual FoxPro accesses the help files from the MSDN CD instead of your hard disk.
The online documentation for Visual FoxPro 6.0 is installed using the MSDN Installation Wizard. Choose the Custom option and select the VFP Documentation check box.
Note If you select the Typical option, Visual FoxPro accesses the help files from the MSDN CD instead of your hard disk.
The Visual FoxPro Help files (including Foxhelp.chm) are installed at the following location:
drive:\Program Files\Microsoft Visual Studio\Msdn98\98vs\1033
When you ask for Help from within Visual FoxPro by pressing F1, typing HELP in the Command window, or by using the Help menu, the default behavior is for Visual FoxPro to call Msdnvs98.col if MSDN is installed. If this file does not exist, then Foxhelp.chm is used by default. If you are experiencing problems using Msdnvs98.col, you can redirect the Visual FoxPro Help system to use Foxhelp.chm:
To set help to Foxhelp.chm:
On the Tools menu, click Options.
Click the File Locations tab.
Select the Help File file type listed and click Modify.
While keeping the same path, replace Msdnvs98.col with Foxhelp.chm or use the dialog button to locate Foxhelp.chm.
Click OK.
If you want Foxhelp.chm to be your default for future Visual FoxPro sessions, click Set As Default.
Click OK.
After installing Visual FoxPro, you might need to customize your system by adding or removing components of Visual FoxPro, update entries in the Windows registry, install ODBC data sources.
After installing Visual FoxPro, you might want to add components you did not install or remove components that you installed.
To add or remove components of Visual FoxPro
The Windows registry is a file that contains configuration settings for the Windows operating systems, specific applications, and individual users. Installing Visual FoxPro creates new entries under the following keys:
To modify the Windows Registry
Note If you are using Windows NT, use Regedt32.exe to modify the registry.
The application configuration settings that were stored in the Foxpro.ini file in previous versions of Visual FoxPro are now stored in the Windows registry under the HKEY_CURRENT_USER key. The full path to these settings is HKEY_CURRENT_USER\Software\Microsoft\VisualFoxPro\6.0\Options.
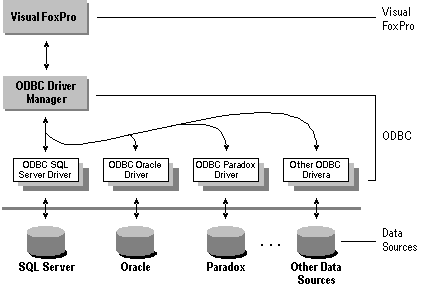
Before you can create remote views or use SQL pass-through, you must install an ODBC driver and set up an ODBC data source.
ODBC drivers supplied with Visual FoxPro allow you to work with the following types of data:
To install the ODBC drivers for these types of data, use the Visual FoxPro Setup program. If you choose the Complete install option, all drivers are installed. To install specific drivers, choose the Custom install option and select the ODBC Support option from the Options list.
Once you’ve chosen a driver, you can use the default data source or add an ODBC data source for it.
To add an ODBC data source
For information on setting up a data source specific to the driver you have chosen, choose the Help button in the ODBC Setup dialog box.
You can get Open Database Connectivity (ODBC) support if you choose the Complete or Custom installation option. With ODBC, you can access a SQL Server data source from Visual FoxPro; however, before you can access the data source, you must define it.
Connecting Visual FoxPro with ODBC data sources

To define a data source
If you can’t run Visual FoxPro and don’t see error messages telling you what’s wrong, the problem might lie in your computer’s ROM BIOS or the video driver you’re using. If you’re using an extended keyboard, be sure that the ROM BIOS is compatible with it. In addition, be sure that you’re using a standard VGA or Super VGA Windows video driver.
If you get a “stack overflow” error message, your video driver is out of date or not designed for your video card. To correct this problem, update the video driver.