The Client/Server sample illustrates some of the features listed below that make Visual FoxPro an ideal front end development tool for client/server applications:
To run the Client/Server sample application
DO (HOME(2) + 'csapp\sample')
-or-
To open the project for the Client/Server sample application in the Project Manager
MODIFY PROJECT (HOME(2) + 'csapp\sample')
Note that if you receive a “Class definition Bizrules.SalaryRule is not found” error when you select the Business Rules section, open the BizRules project in the CSApp folder and rebuild the .exe for the project. Building the .exe registers the class in the Windows registry and prevents this error.
Note Code examples in these topics have been edited to emphasize particular lines. To see the full code, including error checking and verification, open the classes and programs in the project.
Most of the functionality in the Client/Server sample application is built into classes. Objects based on these classes are created in response to user actions.
When you run the application, an object is created in Csmain.prg based on the CSEngine class in csprocs.prg:
oEngine = CREATEOBJECT('csengine')
The CSEngine class provides generic environment setup and cleanup and utility method, as well as methods that manage application functionality.
| Method | Description |
| DropTable | Deletes a table on the back end database. |
| ExecuteTempSPT | Execute SQL pass through commands and manage errors generated by the pass through. |
| ServerStart | Create the business rule object that validates employee salaries. |
| ServerStop | Releases the business rule object. |
| ServerValidateRow | Validates data using the business object. |
For information about these and other methods in the CSEngine class, look at the code in Csprocs.prg.
After creating the oEngine object, code in Csmain.prg creates an object based on the OpenDBC form in Sample.vcx:
oStartForm = CREATEOBJECT('OpenDBC')
The OpenDBC form allows a user to open the sample database, exclusively or shared, to close the database, and to modify the connection to the back end database. You’ll need a connection to a back-end database to upsize the table in this sample and access it as a remote view.
There is also code to create and show this form in the Click event of the Database button on the SampleApp form.
OpenDBC is a modal form. When you choose OK in the OpenDBC form, the following code is executed and program execution is continued.
RELEASE THISFORM
oEngine.Start = .T.
If the OpenDBC form was created in Csmain.prg, the following code executes when OpenDBC is closed, creating an instance of the SampleApp class in Sample.vcx:
IF oEngine.Start
   oCSApp = createobject('SampleApp')
   oCSApp.Show
ENDIF
SampleApp is the main form in the Client/Server sample application. This form contains a page frame with two pages. Controls on the first page allow you to open the table, local view, and remote view; upsize the table; restore the original data in the table; and toggle the views online and offline. Controls on the second page allow you to see and edit data in the selected table or view.
Code in the SampleApp form provides access to more encapsulated functionality by creating two additional objects as needed: Salaryrule and Conflicts.
SalaryRule is a class in an Automation server. The project for the Automation server is Bizrules.pjx and the class is defined in Bizrules.prg:
DEFINE CLASS salaryrule AS Custom OLEPUBLIC
Code associated with the Click event of the chkRules check box makes a call to the StartServer method of CSEngine. Code in the StartServer method creates an instance of the SalaryRule class:
this.oServer = CREATEOBJECT('Bizrules.SalaryRule')
For more information, see Implementing Business Rules in the Client/Server Sample Application later in this section.
The Conflicts form class displays current value, old value and changed values of fields in a record with a data conflict. An instance of the Conflicts class is created in the ResolveConflicts method of the SampleApp form:
frmConflicts = createobject('Conflicts')
frmConflicts.Show
For more information on conflict resolution, see Managing Data Conflicts in the Client/Server Sample Application later in this section.
The database in the Client/Server sample application is small and designed only to show the basics of client/server implementation.
You can select the database for the Client/Server sample in Step 1 in the Open Database dialog box. The sample requires Cs.dbc, installed in the same folder that the other files in the Client/Server sample are installed. If your default folder is the Visual Studio …\Samples\Vf98\Csapp folder, or if this folder is in your path, the database is automatically selected for you.
The CS database contains the following.
| Tables | Description |
| Employee | A table with employee ids, names, addresses, and so on. |
| Emp_init | A back up table for employee. After you change the data in the employee table while trying out the options in the sample, you can restore the original data from this table by choosing the Reset Initial Data button in the SampleApp form. |
| Views | Description |
| Emp_view_local | A local view containing all the fields and records from the employee table. |
| Emp_view_remote | A remote view containing all the fields and records from the employee table |
| Connection | Description |
| Emp_connection | A connection to a data source for the emp_view_remote view. You need to establish this connection before you can open emp_view_remote. |
Step 2 in the Open Database dialog box allows you to open or close the database.
Code associated with the Click event of the Open button opens the database. Before opening the database, the DatabaseIsOpened property of the Engine object is set to true (.T.), assuming that the database will be opened.
OEngine.DatabaseIsOpened = .T.
lcExclusive = IIF(this.parent.chkExclDatabase.value = 1, 'EXCLUSIVE', 'SHARED')
OPEN DATABASE (OEngine.DatabaseFile) &lcExclusive
If the database cannot be opened, the Error event of the Open button is triggered, the DatabaseIsOpened property of the Engine object is set to false (.F.), and an error message is displayed.
Step 3 in the Open Database dialog box allows you to open the Visual FoxPro Connection Designer to set up a remote connection. You’ll need a connection to a back-end database to upsize the table in this sample and access it as a remote view, and you’ll need to modify the connection to provide a user ID, password, and connection string.
For information about setting up remote connections, see Chapter 8, Creating Views, in the Programmer's Guide.
The first page on the SampleApp form allows you to open the table, view, or remote view. The code associated with the Click event of cmdOpen uses the USE command to open the local table, local view, or remote view, based on the Value of the opgCursorType option button group.
The lblStatus label displays status information about the table or view. Code in the GetStatus method of attempts to open the table or view exclusively and updates the label caption. If the table or view could not be opened exclusively, it is opened shared. If it could not be opened shared, the Caption of lblStatus is set to indicate that the table or view is already opened exclusively.
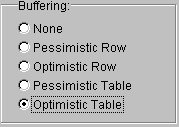
When you edit data in the table and the buffering is No Buffering (CURSORSETPROP(“Buffering”, 1)) the changes are made directly to the table data. You cannot choose Update or Revert.
When you choose any other buffering option, you have the option to update or revert changes made to the data.
When you are updating buffered data, locally or remotely, use the TABLEUPDATE( ) function. The arguments in this function allow you to determine the update scope and whether or not to force updates. For example, the following lines of code are executed in the Click event of the Update button in the SampleApp form:
lnUpdateType = this.parent.opgUpdate.value - 1
llForce = this.parent.chkForce.value
llUpdate = TABLEUPDATE(lnUpdateType, llForce)
The lnUpdateType value is determined by the option button chosen in the Update Scope area.
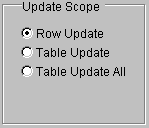
There are three options for the update scope.
When the first argument in the TABLEUPDATE( ) function is 0, only the current row is updated, regardless of whether table or row buffering is enabled. Changes made in any other rows are not written to the data source.
When the first argument in the TABLEUPDATE( ) function is 1, the rows in the table that have been changed are updated, beginning with the first updated row. If a data conflict is encountered, that is, if the CURVAL( ) for a field in the row is different from the OLDVAL( ) for that field, table updating is stopped on the row that generated the conflict.
When the first argument in the TABLEUPDATE( ) function is 2, the rows in the table that have been changed are updated, beginning with the first updated row. All rows without a data conflict are updated.
Other options are specified in the Update Options area.
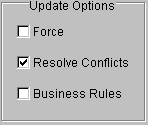
The second argument in the TABLEUPDATE( ) function specifies whether or not to force updates. If you choose Force in the Update Options area, the second argument in the TABLEUPDATE( ) function is true (.T.) and your changes will automatically override any changes that might have been made to the data after you began editing. There cannot be any conflicts to resolve if you force updates.
Note If the user has changed the primary key of a record, the row cannot be updated and is deleted in you local cursor.
If Resolve Conflicts is selected, the Client/Server sample application finds conflicts when they occur and allows you to see the conflicting data and decide to override the existing changes or discard your own changes. If Resolve Conflicts is not selected, your data will not be updated if a conflict is detected:
IF this.parent.chkConflicts.value
   thisform.ResolveConflicts
ELSE
   wait window 'Update failed' nowait timeout 5
ENDIF
For more information about resolving conflicts, see Managing Data Conflicts in the Client/Server Sample Application later in this section.
If Business Rules is selected, the Client/Server sample application enforces the business rules established for this application. For information about the Business Rules option, see Implementing Business Rules in the Client/Server Sample Application later in this section.
The code for upsizing the database is associated with the Click event of cmdUpsize in the Client/Server Application form. The code performs these actions:
The code to create or drop the offline view is associated with the Offline method of the SampleApp form.
IF lcMode = 'create'
   =createoffline(lcView)
ELSE
   =dropoffline(lcView)
ENDIF
If the data in the source table is changed while another user is editing it, there is a possible conflict. You have several ways of resolving this conflict in the Update Options area of the Client/Server Sample form.
Update Options Area
If you select Force in the Update Options area, any changes to the data that were made after you started editing are written over when you update the data with your changes.
If you choose Resolve Conflicts in the Update Options area, the Client/Server sample application finds conflicts when they occur and allows you to see the conflicting data and decide to override the existing changes or discard your own changes. If you do not choose Resolve Conflicts, your data will not be updated if a conflict is detected:
IF this.parent.chkConflicts.value
   thisform.ResolveConflicts
ELSE
   wait window 'Update failed' nowait timeout 5
ENDIF
If you choose Business Rules in the Update Options area, the applications updates the data according to your business rules. For more information about the Business Rules option, see Implementing Business Rules later in this section.
To generate a data conflict
When you choose to update the table the second time, the following line of code in the Click event of cmdUpdate attempts to update the table.
llUpdate = TABLEUPDATE(lnUpdateType, llForce)
If llForce is set to true (.T.), changes made in the other session are overridden. If llForce is set to false (.F.) a data conflict is detected and the TABLEUPDATE( ) function returns false. If llUdate is set to false, the ResolveConflicts method is called:
IF llUpdate
   wait window 'Update succeded' nowait timeout 5
ELSE
   frmConflicts = createobject('Conflicts')
   frmConflicts.show
ENDIF
Code in the Activate event of the Conflicts form creates a cursor with three blank records to display the current values, the old values, and the changed values of the row
=AFIELDS('aEmployee')
SELECT 0
CREATE CURSOR CS_CONFLICTS FROM ARRAY aEmployee

APPEND BLANK
APPEND BLANK
APPEND BLANK
Code associated with the Next method of the Conflicts form populates the cursor with Populate which is the conflict grid with the old, new, and changed values. For example, the following FOR loop fills a record with the old values in the table:
FOR m.i = 1 TO ALEN(aEmployee, 1)
   REPLACE (aEmployee[m.i,1]) WITH ;
      OLDVAL(aEmployee[m.i,1], lcEmployee)
ENDFOR
When users can see exactly what the data conflicts are, they are in a better position to decide whether to override the new values, revert the changes they made, or ignore the conflict.
Code in the Click event of cmdUpdate on the Conflicts form forces the update:
llUpdate = TABLEUPDATE(.F., .T.)
Code in the Click event of cmdRevert throws away the changes the user made:
lnRows = TABLEREVERT(.F.)
If the user chooses Ignore in the Conflicts form, processing continues on the other conflicts in the table.
The Client/Server sample application uses a custom Automation server to enforce business rules. This architecture, known as the three-tier model, allows implementation of business rules in the middle tier, separate from the actual data and separate from the client interface. Multiple applications and multiple databases can all use the same set of business rules, coded and maintained in a single location.
The custom Automation server in the Client/Server sample application is Bizrules. The project for the Automation server is Bizrules.pjx and the class is defined in Bizrules.prg:
DEFINE CLASS SalaryRule AS Custom OLEPUBLIC
Code in the CSEngine class provides an interface to the business object with the ServerStart, ServerStop, ServerIsStarted, and ServerValidateRow methods.
The ServerStart method creates an instance of the SalaryRule class. The ServerValidateRow method passes values to the server for validation:
lcError = this.oServer.validate(m.cTitle, m.nSalary, m.dBirth, m.dHire, m.cCountry)
The Validate method of the SalaryRule class enforces a common set of business rules and returns a list of error messages, one for every rule that failed. For example, the following section of code from the Validate method makes sure that the salary falls within a range specified in the Bizrules.dbf table:
PROCEDURE validate
PARAMETERS lcTitle, lnSalary, ldBirth, ldHire, lcCountry

SELECT bizrules
LOCATE FOR lcTitle = ALLTRIM(title)
IF EOF()
   * Display error message
ELSE
   IF !BETWEEN(lnSalary, min_salary, max_salary)
      * Display error message
   ENDIF
ENDIF