Tables are the basic units you use for working with data and creating relational databases and applications. You might need to work with information currently stored in tables, customize existing tables, or create your own custom tables to store data. To order your data and speed up processing, you can use indexes.
This chapter shows how to work with and modify existing tables, and how to create new tables with Visual FoxPro, either with assistance from the Table Wizard, or using the Table Designer directly. For information about importing table information from other applications, see Chapter 9, Importing and Exporting Data. For information about the additional properties of tables available when they are incorporated into a database, see Chapter 3, Collecting Tables into a Database. For more information about indexes, see Chapter 7, Working with Tables, in the Programmer’s Guide.
This chapter discusses:
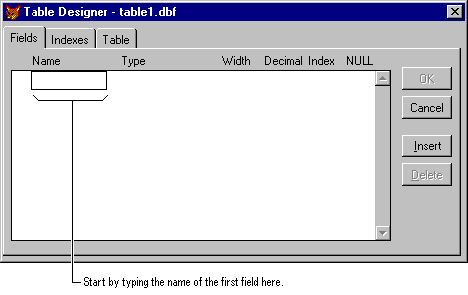
When you need to create a new table, you can get assistance from the Table Wizard, or use the Table Designer and set up a table with the fields you need.
Remember these main points when you set up a table:
Each field in your table holds a particular type of data. You can set the data type of a field to any of the types in the following table.
| Data Type | Description | Example |
| Character | Alphanumeric text | A customer’s address |
| Currency | Monetary units | Purchase price |
| Numeric | Integer or decimal numbers | Quantity of items ordered |
| Float | Same as Numeric | |
| Date | Month, day, and year | Date an order was placed |
| DateTime | Month, day, year, hours, minutes, and seconds | Date and time an employee arrived at work |
| Double | Double-precision number | Data from experiments that require a high degree of precision |
| Integer | Non-decimal numeric values (whole numbers) | Line number in an order |
| Logical | True or False | Whether or not an order has been filled |
| Memo | Alphanumeric text of an indeterminate length | Notes about phone calls in a phone log |
| General | OLE | Microsoft Excel worksheet |
| Character (Binary) | Same as Character but values aren’t translated when the code page changes | User passwords stored in a table and used in different countries |
| Memo (Binary) | Same as Memo but values aren’t translated when the code page changes | A logon script used in different countries |
Whenever you want to create a new table, you can use the Table Wizard to help you set it up. The wizard will ask you a series of questions and build a table for you based on your answers.
To create a table with a wizard
You can also access the Table Wizard from the menu by choosing New from the File menu, selecting Table, and selecting the Table Wizard option.
If you base your table on a database, you can use styles, field mappings, or a primary key, and establish or use relationships in the database tables.
If you want to create your own table without using a wizard, use Tables in the Project Manager Data tab or choose New from the File menu, select Table, and choose New File.
Starting a new table in the Table Designer
If you want to create a table to add to a database, open a database before creating a new table, and the new table will automatically become part of the database. You can also add it later. For more information about database tables, see Chapter 3, Collecting Tables into a Database.
To create a new table
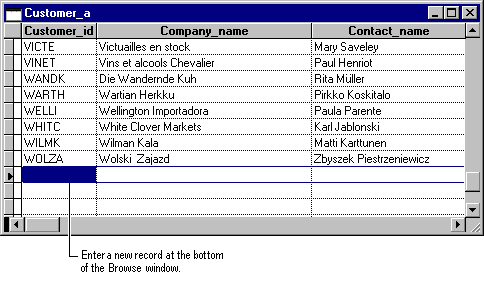
You can choose to begin entering records immediately, or open the table later when ready to enter records.
To add records to a table
If you prefer to view each field on a separate line, switch to Edit mode by choosing Edit from the View menu.
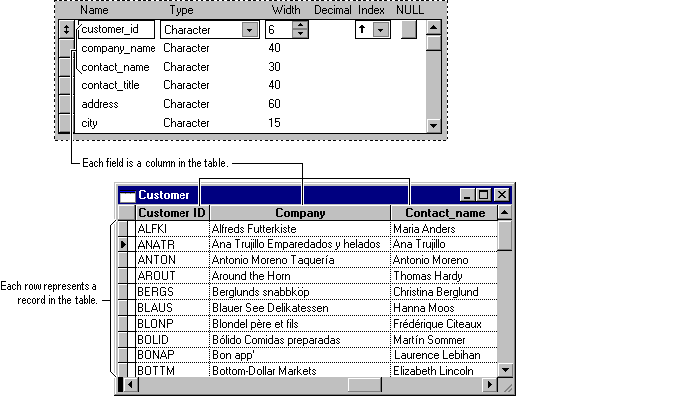
Tables store your data in a row and column format, similar to a spreadsheet. Each row represents a record, and each column represents the fields in the records.
Rows and columns in tables
You can create two types of tables in Visual FoxPro: database tables, which have been incorporated as part of a database, and free tables, which are independent of any database.
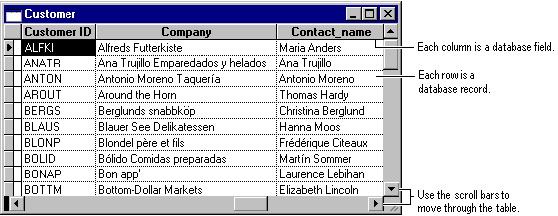
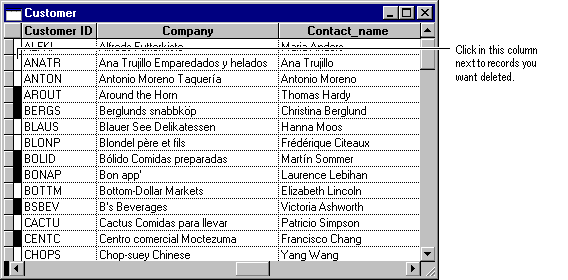
The quickest way to see the contents of a table is to look at it in a Browse window. The Browse window displays the contents of the table as a series of rows and columns you can scroll through. To familiarize yourself with some typical tables, you can browse the sample tables in the Visual Studio …\Samples\Vfp98\Data directory.
To browse a table
You can also select the name of a table in the Project Manager, and choose the Browse button.
For example, open the Customer table in the Visual Studio …\Samples\Vfp98\Data directory.
Table in a Browse window
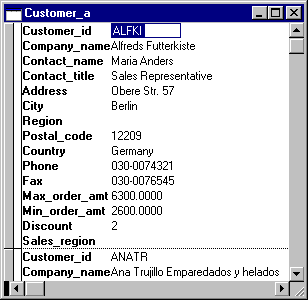
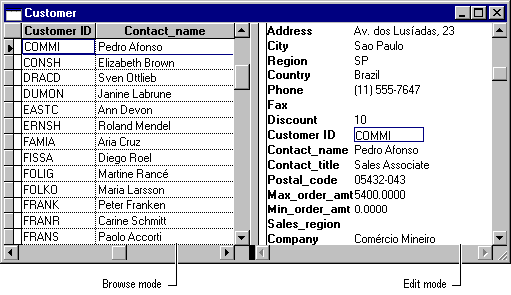
For easier data entry, you can place a Browse window into Edit mode. In Edit mode, the column names are displayed on the left side of the window.
To change the Browse window to Edit mode
Table in Edit mode
In either mode, you can scroll through records, search for specific records, and make changes directly to the contents of the table.
Use the scroll bars to move through the table and display different fields and records. You can also use the arrow keys and the TAB key to move around.
To see different records
To change the current information in a Character, Numeric, Logical, Date, or DateTime field, either place the cursor in the field and edit the information, or select the entire field and begin typing the new information.
To edit the information in a Memo field, double-click the field in the Browse window or press CTRL+PGDN. An editing window opens with the contents of the memo field.
A General field contains an embedded or linked OLE object. You can edit this object by double-clicking the General field in the Browse window and either editing the document directly (as with a Microsoft Word document or a Microsoft Excel worksheet) or double-clicking on the object to open the parent application (as with a Microsoft Paint object).
To quickly add new records to a table, you can place the Browse or Edit windows into Append mode. In Append mode, a blank set of fields appears at the bottom of the file, so you can fill them in to create a new record.
To add a new blank record
Fill in the fields in the new record, tabbing from field to field. A new record is created at the bottom of the file as you complete each record.
Append Mode for a Browse window
Deleting records from a table is a two-step process in Visual FoxPro. First, you mark the records for deletion by clicking the box to the left of each record.
Records marked for deletion
Marking the records does not delete them. To actually remove the records, you choose Remove Deleted Records from the Table menu. This process deletes the records you marked, and consolidates the remaining records in the table. Removing the deleted records closes the table, so you must re-open it to continue working.
To delete records from a table
You can also select a group of records for deletion by setting conditions in the Delete dialog box. Choose Delete Records from the Table menu to enter deletion criteria.
Delete dialog box
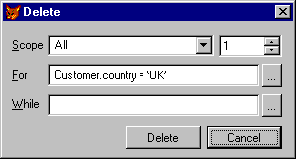
Choose the Scope button to set the range of records to be deleted.
If you can describe a set of records you want to delete, you can build an expression based on that description. Choose the FOR button to bring up the Expression Builder so you can build an expression. For example, using the expression FOR Country = 'UK' selects all the records from the UK and marks them for deletion.
To customize the Browse window to fit your needs, you can rearrange or change the width of columns, turn the grid lines on or off, and split the Browse window into two panes.
You can rearrange the columns of the Browse window into the order you want. This does not affect the actual structure of the table.
To rearrange the columns in a Browse window
-or-
You can also change the width of a column in a Browse window. This resizing does not affect the field length or the structure of the table.
If you want to change the actual length of the fields, modify the structure of the table using the Table Designer (see Modifying Tables later in this chapter).
To change the width of a column
-or-
You can also turn off the grid lines in a Browse window.
To turn grid lines on or off
You may find it useful to split the Browse window so that you can look at two different areas in the table, or look at the same records in Browse and Edit modes simultaneously.
Split Browse window
To split a Browse window
-or-
To resize the panes of a split Browse window
-or-
By default, the two panes of the browse window are linked; that is, as you select different records in one pane, the change is reflected in the other. If you want to detach the two panes so that they function independently, (that is, so that scrolling one pane does not affect the other) clear the Link Partitions command on the Table menu.
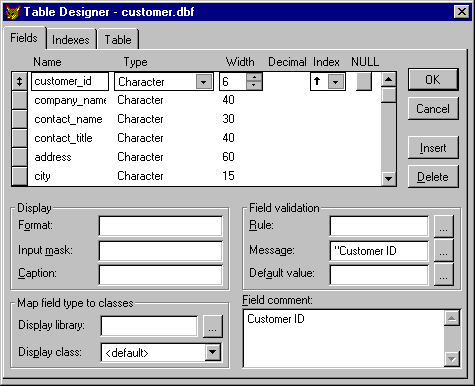
When you need to make changes to the structure of an existing table, use the Table Designer. With the Table Designer, you can add and delete fields, set data types and widths for fields, and view and set the indexes which sort the contents of the table.
If the table you are modifying is part of a database, additional database-specific field and table properties are available. Use of these properties is covered in Chapter 3, Collecting Tables into a Database.
To modify a table
The structure of the table is displayed in the Table Designer.
Table Designer shows current table structure
To add a field to a table
To delete a field from a table
You can customize your tables so that only certain records are displayed by setting a filter on the table. You can also restrict access to certain fields in a table by setting a field filter, which allows you to select which fields to display.
If you want to see only records of a certain type, you can set a filter to limit the records shown in the Browse window. Filtering is useful when, for example, you want to restrict the browse to show only sales above a certain amount, or employees in a range of hire dates.
To set a filter, use the Work Area Properties dialog box, available through the Properties command on the Table menu.
Work Area Properties dialog box

To set a filter on a table
-or-
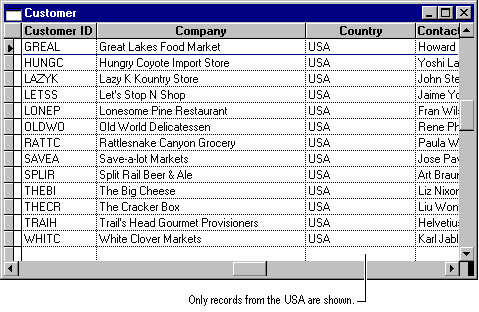
When you browse the table, you see only records that are selected by the filter expression.
For example, using the Customers table from the Visual Studio …\Samples\Vfp98\Data directory, you could focus on customers residing in the United States by entering the following expression in the Data Filter box:
Customer.Country = "USA"
Results of filtering a table
If you want to keep certain fields from displaying when tables are browsed or used in a form, you can set a field filter to restrict access to those fields. You select the fields you want to display, which leaves the remaining fields inaccessible.
To set a field filter
Field filter and its effect on a Browse window
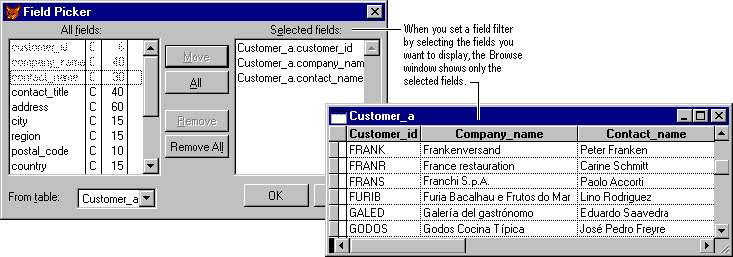
When you browse the table, only fields you selected in the field filter are displayed.
For more information about customizing and working with tables, see Chapter 7, Working with Tables, in the Programmer’s Guide.
Once you create a table, you can order the data to speed up data retrieval by using indexes. With indexes, you can quickly process your records for displaying, querying, or printing. You can also select records, control whether duplicate values are entered in a field, and support relationships between tables.
You can use indexes to increase the speed that records are sorted or searched for display or printing. Indexes are also important for creating relationships between tables in a database.
Indexes in Visual FoxPro are like book indexes: a list of page numbers that points the reader to specific pages in a book. Likewise, a table index is a list of record numbers that points to specific records to process and determines the processing order for the records.
A table index stores a list of pointers to records.
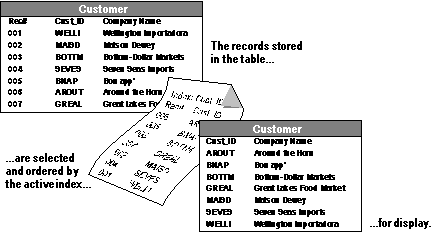
For example, you can look at the records in the Customer table in alphabetical order by company name, prepare them for a mailing list in order by postal code, or organize them to speed up searches. The index does not change the order that data is stored in your table; it changes the order that Visual FoxPro uses to read each record.
You can create more than one index for a table, each representing a different order for processing your records. The indexes you create are stored in a compound structural index file that is opened and updated whenever the table is used. The name for the index file is the same as its associated table and has a .cdx file extension.
Indexes are so easy to create, you might be tempted to define one for every field. However, indexes that you use only rarely can slow performance. Other types of index files are better for storing indexes you don’t use regularly. For more information about the other kinds of index files available to you, see Chapter 7, Working with Tables, in the Programmer’s Guide.
Once you have a table, you can create an index on a field or on an expression. To use indexes efficiently, create indexes on fields you often use in filters on tables, in queries, in views, or for reports. If you place an index on a field that isn't useful for filtering or querying, such as a street address, your filter might slow down processing.
To create an index
The Indexes tab in the Table Designer
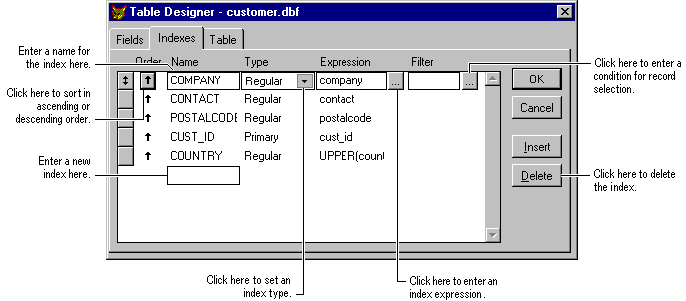
For more information about index types, see the following section, Choosing an Index Type.
-or-
Build an expression by choosing the dialog button at the end of the box to display the Expression Builder.
For information about adding multiple fields to your index expression, see the following section, Ordering by Multiple Fields.
For more information about using a filtered index, see the section, Filtering Records, later in this chapter.
Once you create an index for the table, you can use it to order your records.
To order records using an index
The table appears in the Browse window, displaying the records in the order your index specifies. You can also order the results of queries or reports by running them while the index is selected.
You can choose one of four types of indexes:
Primary indexes ensure only unique values are entered into a field and determine the order in which the records are processed. You can create one primary index for each table if the table is included in a database. If the table already has a primary index, add a candidate index.
Candidate indexes also enforce unique values and determine the order in which the records are processed, like a primary index. You can have multiple candidate indexes per table in both database and free tables.
Regular indexes determine the order in which records are processed but allow duplicate values to be entered into a field. You can add more than one regular index to a table.
For compatibility with previous versions, you can also create a unique index that selects and orders a subset of records based on the first occurrence of a value in the field you specify. If you want to select records this way, you might want to create a query or view instead. For more information about queries or views, see Chapter 4, Retrieving Data, or Chapter 5, Updating Data with Views.
To increase the speed of queries or views that have filters on more than one field, you can order your records by specifying multiple fields in the index expression. The fields are evaluated in the same order they appear in the expression. If you create an index expression using numeric fields, the index orders the records by the sum of the fields, not the fields themselves.
To order records using multiple fields
For example, you might want to order the records by country, postal code within the country, and the company name within the postal code. You can use a plus sign (+) to create the index expression from character fields.
customer.country + customer.postalcode + customer.company
Notice that the field that changes the least is the first one in the list.
If you want to use fields of different data types, you can convert the non-character fields to characters by enclosing the field with STR( ). For example, you can try ordering the records by the Maximum Order Amount field, then by the company name. In this expression, maxordamt is a Currency field and company is a Character field.
STR(customer.maxordamt,20,4) + customer.company
You can control which records are included in the index by adding a filter expression.
To filter records
For example, try creating a filter that selects only the records for customers in Canada:
customer.country = "Canada"
You can improve performance by creating and using indexes for recurring tasks such as ordering your records or supporting table relationships. You can accomplish several tasks depending on the type of index you create.
| If you want to | Use |
| Order the records to increase the speed they are displayed, queried, or printed | A regular, candidate, or primary index. |
| Control entry of duplicate values in a field and order the records | A primary or candidate index for a database table or a candidate index for a free table. |
You can order your records by a field name or another index expression. The index evaluates the expression to determine the order that the records should appear, then stores a list of pointers to the records for processing in that order.
To create an index for ordering records
-or-
Type an expression you want to use to order the records or build an expression by choosing the button at the end of the box to display the Expression Builder.
The arrow on the button points down for descending order and up for ascending.
You might want to control entry of duplicate values in a field. For example, each customer should have a unique value in the Cust_ID field of the Customer table.
An index can enforce entering unique values into a field.
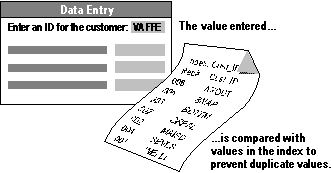
You can use the field as a key field that uniquely identifies a record. If your table is part of a database, you can use either a primary or candidate index. If your table is a free table or already has a primary index, you must use a candidate index.
To create an index that enforces unique values in a field