
Now it is time to look at how the Tutorial Practice page you created will look in a Web browser.
Û To Preview a Page in the Web Browser
The Tutorial Practice page is displayed in your default Web browser.

If you have a properly configured e-mail application installed on your computer, clicking the word will open a new e-mail message window, with your e-mail address filled in as the recipient. Type a message into the message form and send it. If no message window appears, cancel the operation by acknowledging any notifications that may appear.
The hyperlink you created from the image map finds and displays the page describing your personal interests.

If you created additional hyperlinks from the words “Photo Album” and “Favorites,” repeat step 3 and 4 above by clicking on the appropriate image map hyperlink. In each case, click your Web browser’s Back button to return to the Tutorial Practice page.
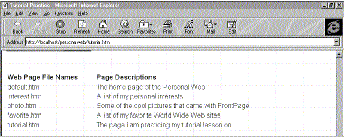
Note that the file names and their descriptions are properly aligned on the page. Your Web browser does not display the table grid that you saw in the FrontPage Editor while editing the table. This is because you inserted a table with a Border Size of zero.
 Scroll down past the marquee and locate the second occurrence of the sentence “Please send me feedback about my Web site!” (located above the Scrolling Text Box and the Submit and Reset push buttons).
You will now test this feedback form by entering some text and submitting the comments to a form results file.
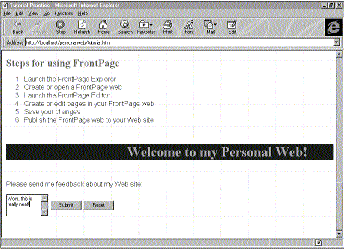
Clicking the Submit push button processes the text in the form field and at once sends it to the default results file. You can specify the path and file name of this results file in the Form Properties dialog box.
Note Depending on which Web browser you are using, a security alert may be displayed, cautioning about sending information over an unsecured connection. This is nothing to be alarmed about, as long as you haven’t entered any personal information such as credit card numbers, your telephone number, or your home address into the form field. To finish sending the comments from the Feedback form, simply acknowledge the warning message.
After the feedback form is submitted, your Web browser will display a Form Confirmation page, advising you that the information was sent successfully.
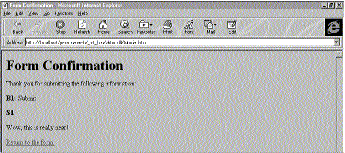
“Return to the form” is a hyperlink which will take you back to the Tutorial Practice page in your Web browser.