Bezier curves
Drawing curves with software is a difficult problem for the math-impaired. You can plot each separate point on a curve defined by a formula, but first you have to figure out the formula. The only variation is what you plot with—points, line segments, arcs, or even bitmaps. The addition of PolyBezier and PolyBezierTo in Win32 makes it easy to draw graceful curves. Making them fit your desired shape is a different matter.
Pierre Bezier invented the technique that bears his name back when the cars he designed were smaller and cost less than the computers he designed with. (Well, maybe cars weren’t really smaller than computers in the 1960s, but they did cost less.) Anyway, the simplest Bezier curve is defined by four points. The outside points are the start and the end of the curve. The middle two points control the curve—that is, they pull and push it, they exert a magnetic attraction on it, they whip it into shape, they stretch it…the only way you’re going to understand what they do is to try them out.
Figure 7-4 shows the Bezier Curves program (TBEZIER.VBP). You can see the curve here, but you’ll have to run the program to see how it works. Drag with the left mouse button to control the top of the curve; drag with the right button to control the bottom of the curve.
The code starts with an array of four points:
Private apt(0 To 3) As POINTL
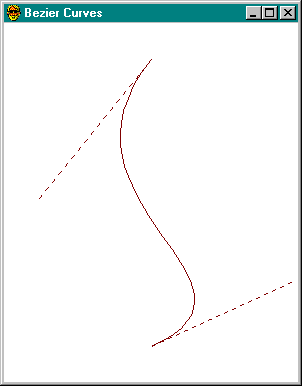
Figure 7-4. A Bezier curve.
InitBezier fills these points with initial values:
Sub InitBezier(cxClient As Long, cyClient As Long)
    apt(0).x = ScaleX(cxClient / 2, vbTwips, vbPixels)
    apt(0).y = ScaleY(cyClient / 10, vbTwips, vbPixels)
    apt(1).x = ScaleX(cxClient / 4, vbTwips, vbPixels)
    apt(1).y = ScaleY(cyClient / 2, vbTwips, vbPixels)
    apt(2).x = ScaleX(3 * cxClient / 4, vbTwips, vbPixels)
    apt(2).y = ScaleY(cyClient / 2, vbTwips, vbPixels)
    apt(3).x = ScaleX(cxClient / 2, vbTwips, vbPixels)
    apt(3).y = ScaleY(9 * cyClient / 10, vbTwips, vbPixels)
    ForeColor = vbRed
End Sub
The points are scaled because PolyBezier, like most GDI functions, expects pixels by default. Points 0 and 3 are the start and the end of the curve. To draw the curve, call DrawBezier:
Sub DrawBezier()
    DrawStyle = vbSolid
    PolyBezier hDC, apt(0), 4
    DrawStyle = vbDot
    MoveTo hDC, apt(0).x, apt(0).y
    LineTo hDC, apt(1).x, apt(1).y
    MoveTo hDC, apt(2).x, apt(2).y
    LineTo hDC, apt(3).x, apt(3).y
End Sub
MoveTo Comes Full Circle
The Win16 API had a MoveTo function, which returned a DWord containing the packed x and y coordinates of the previous current position:
dw = MoveTo(hDC, x, y)
The returned DWord is the equivalent of a 16-bit POINT variable. Some languages (but not Visual Basic) allow you to typecast a DWord to a POINT. Of course, most users don’t care about the return value and simply call it like this:
MoveTo hDC, x, y
Apparently, it never occurred to the designers of MoveTo that Windows might someday have 32 bits. There’s no good way to pack two 32-bit variables into a return value. For that reason, MoveTo was marked obsolete several versions ago and replaced with MoveToEx, although MoveTo was still supported for compatibility in 16-bit Windows.
The Win32 API has no MoveTo, only MoveToEx. The new function has a fourth parameter that returns the previous position through a reference variable of type POINT. It also returns a Boolean value to indicate success:
f = MoveToEx(hDC, x, y, ptJunk)
This is very convenient for the 1 percent of the time when you need to save the last position. The rest of the time, you can pass a null. The MoveToEx in the Windows API type library defines the last parameter with LPVOID (equivalent to As Any) so that you can call it like this:
f = MoveToEx(hDC, x, y, ByVal pNull)
But optional arguments and aliases enable us to do even better. The type library has an entry equivalent to this Declare statement:
Declare Function MoveTo Lib “gdi32” Alias “MoveToEx” ( _
    ByVal hdc As Long, ByVal x As Long, ByVal y As Long, _
    Optional lpPoint As Any = 0) As Long
If you ignore the return value (and why not?), you’ll end up with this:
MoveTo hDC, x, y
Look familiar?
The curve is drawn with a solid line style, and lines connecting the control points are drawn with a dotted line style so that you can see how the control points work. In a real-life program, you wouldn’t show the control points. Notice that you use the MoveTo and LineTo functions instead of the Visual Basic Line statements. The points are already in pixels, so it’s easier to stick with API functions. (Actually, MoveTo isn’t an API function; see the sidebar “MoveTo Comes Full Circle,” page 384.)
After you run the program for a few minutes, you can probably guess the code for the MouseMove and MouseDown events. They set the foreground color to the background color and call DrawBezier to erase the current curve and control lines. Then they calculate new positions for the control points. Finally they reset the draw color and redraw with DrawBezier.
You can draw more than one Bezier curve by adding more elements to the array. Each curve needs three points in the array. The end point of the last curve serves as the starting point of the next curve. The next two points are control points. The last point is the end point of the curve. Your challenge is to enhance the Bezier sample to demonstrate multiple curves. You could also add a Bezier curve drawing tool to the IconWorks sample. Use the Curve tool in Windows Paint as a model.