
The following procedures provide an example of how to add a Microsoft DNS server and primary and secondary zones. This example assumes that the server managing the primary zone is configured on the local computer and that the server managing the secondary zone is located on a remote computer in the same network that is configured with Microsoft DNS server. In addition to illustrating zone concepts, this example also illustrates that you can manage multiple computers configured with Microsoft DNS server from one central computer configured with Microsoft DNS server.
Û To add the Microsoft DNS server that will manage the primary zone
1. In DNS Manager, double-click the Server List icon.
2. On the DNS menu, click New Server, and in the Add DNS Server dialog box enter either the DNS server host name or the IP address.
3. Click OK.
DNS Manager automatically creates the new server icon in the right pane of the DNS Manager window.
Û To configure server properties
1. Right-click the server icon, and click Properties.
2. Click the Interfaces tab.
3. Type an IP address, and click Add.
4. Repeat until all IP addresses configured on the server are entered. You can enter only a maximum of 15 IP addresses, even if the computer is a multihomed computer configured to support more than 15 IP addresses.
If you do not specify IP addresses on the Interfaces tab and the computer is a multihomed computer configured with more than 15 IP addresses, you might encounter Event 410 or 520 errors. These errors occur in part because if no IP addresses are specified, by default Microsoft DNS Manager attempts to monitor all IP addresses configured on the server computer.
5. If you are using a DNS forwarder to control access to the Internet, click the Forwarders tab, and enter the IP address of the Microsoft DNS server that is designated as the forwarder.
6. Click OK.
Û To add a server on the local computer that represents a remote computer configured with Microsoft DNS server
1. In DNS Manager, double-click the Server List icon.
2. Click New Server, and in the Add DNS Server dialog box enter either the DNS server host name for the remote computer or its IP address.
3. Click OK.
DNS Manager automatically adds a new server icon that represents the remote server in the right pane of the DNS Manager window.
If you follow the preceding procedures for a local and a remote server, the servers are added to DNS Manager on the local computer. For the sake of brevity in this example, configuration of the remote server properties is not presented. The next procedures in this example show the creation of primary and secondary zones.
Note
Before creating a zone, make sure you have correctly configured TCP/IP Properties by entering the correct host name and domain name for the local computer on the DNS page in the Microsoft TCP/IP Properties dialog box. To reach this dialog box, click the Start button, point to Settings, and click Control Panel. Double-click the Network icon, click the Protocols tab, click TCP/IP Protocol in the Network Protocols list, and then click Properties.
Û To add a primary zone
1. Right-click the local server icon, and click New Zone to start the zone wizard.
2. Click Primary, and then click Next.
The zone wizard prompts you for additional information and then automatically creates the zone and zone file and adds SOA, NS, and A data records to the zone file.
Tip
To create a reverse-lookup zone, use this same procedure and use a zone name that complies with the reverse-lookup name format (nnn.nnn.nnn.in-addr.arpa). For example, the reverse-lookup zone to contain PTR records for IP addresses 172.16.16.1 through 172.16.224.254 would be named .16.172.in-addr.arpa.
Whenever possible, create a reverse-lookup zone for each zone before adding A records for computers contained in that zone, so that you can use the automatic Create PTR Record option in the Add Host dialog box.
Û To add a secondary zone
1. Right-click the remote server icon, and click New Zone to start the zone wizard.
2. Click Secondary, and enter the requested information.
3. Click Next.
The zone wizard prompts you for additional information and then automatically creates the zone and zone file and adds the SOA, NS, and server A records to the zone file.
After you have successfully added a zone, you can perform additional configuration by changing the zone properties as described in the following list:
Change the zone from a primary to secondary, or vice versa, by using the General tab.
Modify the default server time-to-live (TTL) values, by using the SOA Record tab.
Modify the refresh and zone transfer rates, by using the SOA Record tab.
Configure the primary zone server to automatically notify the secondary zone server when changes are made to the primary zone files, by using the Notify tab.
Configure the zone server to use WINS for host name resolution, by using the WINS Lookup tab. On a reverse-lookup zone, this tab is labeled WINS Reverse Lookup.
The following figure illustrates the Zone Properties dialog box for a normal zone.
Figure 2.1 Zone Properties dialog box
The only difference in the Zone Properties dialog box for a reverse-lookup zone is the text on the WINS Lookup tab, as illustrated in the following figure.
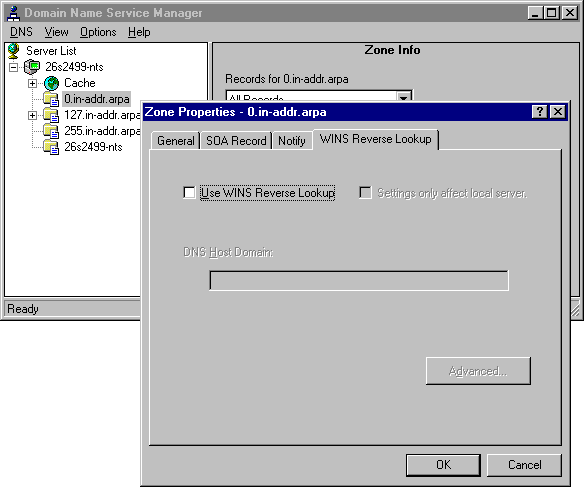
Figure 2.2 Zone Properties dialog box for reverse-lookup zone