Have on hand the Windows NT Server compact disc. You will also need original product disks for any operating system that you want the remoteboot clients to run, such as MS-DOS or Windows 95 disks.
The installation procedure differs depending on whether you are installing a new remoteboot directory or converting an existing LAN Manager for OS/2 remoteboot directory. Use one of the two following procedures.
To install the Remoteboot service (with a new remoteboot directory)
1. If they are not already installed, install the DLC and NetBEUI protocols on the server. The Remoteboot service requires DLC and NetBEUI.
2. Click Start, point to Settings, and click Control Panel.
3. Double-click Network.
4. In the Network Settings dialog box, click Add Software.
5. In the Add Network Software dialog box, select the Remoteboot Service.
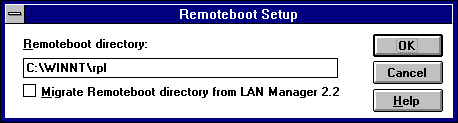
6. In the Remoteboot Setup dialog box, type the full path and directory name where you want to install the remoteboot directory.
The default value is <systemroot>\Rpl. This is the directory shown in descriptions and examples.
7. Click OK.
8. Complete the dialog boxes that appear.
For help with any dialog box, press F1.
See the post-installation information after the next procedure.
To install the Remoteboot service (converting a LAN Manager for OS/2 remoteboot directory)
1. Use the Windows NT Server Upgrade for LAN Manager tools to convert the LAN Manager server's user accounts and file permissions. Then the remoteboot conversion can properly assign permissions and user account properties.
2. On the Windows NT Server computer, delete the RPLUSER global group (it is created by the Upgrade for LAN Manager tools). The Fix Security command of Remoteboot Manager will create an RPLUSER local group.
Note that users who administer the Windows NT Remoteboot service must be members of the Administrators local group. The Upgrade for LAN Manager tools convert the LAN Manager RPLADMIN group to a Windows NT RPLADMIN global group, but it has no function under Windows NT.
3. Copy the entire remoteboot directory from the OS/2 server to the Windows NT Server computer.
For example, if the LAN Manager remoteboot directory is \\SERVER3\C$\LANMAN\RPL and the Windows NT remoteboot directory is C:\Winnt\Rpl, type the following command at the Windows NT Server computer:
xcopy /e \\server3\c$\lanman\rpl c:\winnt\rpl
Keep a copy of the Rpl directory for later reference. Be especially sure to keep backup copies of any .ini, .cnf, and .fit files that were modified from their default state.
4. If they are not already installed, install the DLC and NetBEUI protocols on the server.
The Remoteboot service requires DLC and NetBEUI.
5. In Control Panel, double-click Network.
6. In the Network Settings dialog box, click Add Software.
7. In the Add Network Software dialog box, click the Remoteboot Service.
8. In Remoteboot Setup, make the following choices:
9. Click OK.
10. Complete the dialog boxes that appear.
For help with any dialog box, press F1.
11. Copy the new LAN Manager client software to locations in the Windows NT Server computer's Rpl directory, using the following commands:
xcopy /e d:\clients\rpl\bblock c:\systemroot\rpl\bblock
xcopy /e d:\clients\rpl\fits c:\systemroot\rpl\fits
xcopy /e d:\clients\rpl\rplfiles c:\systemroot\rpl\rplfiles
where d: is the computer's compact disc drive.
12. Run the rplcnv conversion program after remoteboot installation.
The rplcnv program converts the RPL.MAP and RPLMGR.INI files used by the LAN Manager Remoteboot service into the System.mdb and Rplsvc.mdb files used by the Windows NT Remoteboot service database.
This is the syntax for rplcnv:
rplcnv [path]
where path specifies an absolute path to the directory containing the RPL.MAP and RPLMGR.INI files. If this parameter is omitted, it is assumed that the files are in the current directory or in <systemroot>\Rpl.
13. Compare the new .ini, .cnf, and .fit files in the remoteboot directory to the backup copies you made before conversion.
If you had modified the OS/2 versions of these files, you may want to transfer those modifications to the Windows NT versions. Do not simply copy the OS/2 versions over the Windows NT versions, because you might overwrite new data.
14. In Step 11 you installed new configurations. If you have profiles that you want to preserve from the LAN Manager installation, modify the profiles' Autoexec.bat and Config.sys files as follows:
Whether you install a new Rpl directory or migrate from OS/2, the installation process creates the following major directories:
The first time you run Remoteboot Manager and choose the Fix Security command, it creates the RPLUSER local group and assigns permissions as appropriate throughout the Rpl directory.
For a complete explanation of the remoteboot directory structure, see "Directory, File Index, and Configuration File Details" later in this chapter.