If you are using PPTP and Dial-Up Networking to connect to a PPTP server over the Internet, you need to create a phonebook entry for your ISP.
Note You do not need to create a phonebook entry for your ISP if you are using a LAN connection to dial up a PPTP server on the LAN.
Before starting the following procedures, make sure you have:
· Installed all network protocols used on the private network to which you want to connect.
· Configured RAS to dial out using those network protocols.
To create a new ISP entry by using the Phonebook wizard
Click Start, point to Programs, point to Accessories, and then click Dial-Up Networking. (If this is the first phonebook entry you are creating, the Dial-Up Networking dialog box appears. Click OK.)
1. Type a name for your phonebook entry, such as the name of your ISP, in the Name the new phonebook entry box, and then click Next.
2. Click I am calling the Internet and click Next. This configures the phonebook entry to use TCP/IP and PPP as the Dial-Up Networking protocols.
3. Select your modem device in the Select the modem or adapter this entry will use box, and then click Next.
4. Type the ISP's phone number in the Phone number box. Click Use Telephony dialing properties if you need to add an area code or other prefix. Click Alternatives if you have an alternative phone number for your ISP.
5. Click Next, and then click Finish.
6. Verify the phonebook entry by using the following procedure.
To verify or edit your ISP phonebook entry
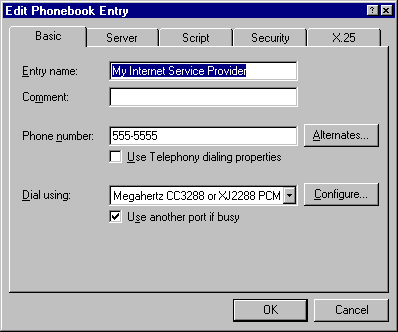
1. Click More in Dial-Up Networking, and then click Edit entry and modem properties to verify that your ISP phonebook entry is correctly configured. The Edit Phonebook Entry dialog box is illustrated in the following figure.

2. Review the information on the Basic tab to ensure that the phone number is correct and that the correct modem or ISDN device is selected. Make any necessary changes.
3. Click the Server tab. The Server tab is illustrated in the following figure.

4. Review the information on the Server tab to ensure that the Dial-up server type displays “PPP: Windows NT, Windows 95 Plus, Internet.”
5. In the Network protocols box, ensure that TCP/IP is selected.
6. Click TCP/IP Settings to display the PPP TCP/IP Settings dialog box. Ensure that the TCP/IP settings conform to the IP address and name server information specified by your ISP.
7. By default, the options Enable software compression and Enable PPP LCP extensions are selected. These settings are compatible with most ISP services. Check with your ISP before changing these default settings.
8. Click the Script tab, and then select None. The PPP protocol provided in RAS is designed to automate remote logon. If your ISP requires a manual logon, consult your ISP for the correct configuration.
9. Click the Security tab. Click Accept only Microsoft encrypted authentication. The configures PPP to encrypt the user name and password for remote logon to a server that enforces Windows NT authentication.
10. Click OK, and then click Close to complete the ISP phonebook entry.