To install the PPTP protocol on a computer running Windows NT Server version 4.0
1. Click Start, point to Settings, and click Control Panel.
2. Double-click Network in Control Panel.
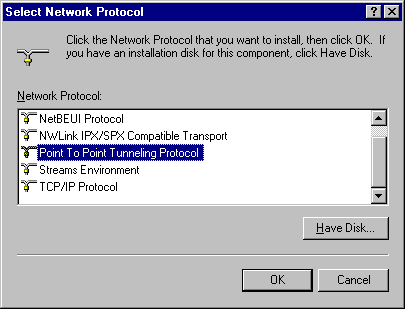
3. Click the Protocols tab, and then click Add to display the Select Network Protocol dialog box. The Select Network Protocol dialog box is illustrated in the following figure.
4. Select Point To Point Tunneling Protocol and click OK.
5. Type the drive and directory location of your Windows NT Server version 4.0 installation files in the Windows NT Setup dialog box, and then click Continue. The PPTP files are copied from the installation directory, and the PPTP Configuration dialog box appears, as shown in the following figure.
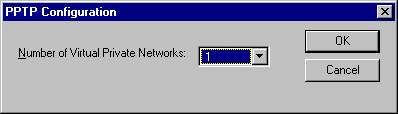
6. Click the Number of Virtual Private Networks drop-down arrow to select the number of simultaneous VPNs you want the server to support. You can select a number between 1 and 256. Typically, multiple VPNs are installed on a PPTP server to enable multiple clients to connect simultaneously to the PPTP server. The server can be configured to support a maximum number of 256 simultaneous VPN connections.
7. Click OK, and then click OK again in the Setup Message dialog box.
8. In the Remote Access Setup dialog box you can do either of the following:
a) Temporarily stop installation of PPTP by clicking Cancel, closing Network, and shutting down and restarting the computer. Note that you must perform the procedure described in the following section “Adding VPN Devices as RAS Ports on a PPTP Server” to complete installation of PPTP.
b) Continue installation of PPTP by clicking Add to add the VPN devices installed with PPTP to RAS. (See step 5 of the following procedure.)