
You can edit an existing macro or write a new macro from scratch using a macro-editing window. Macro-editing windows have several special properties:
To begin writing a new macro, choose Macro from the Tools menu, type a name for the macro in the Macro Name box, and then choose the Create button.

When the macro-editing window appears, the instructions Sub MAIN and End Sub (between which all the other instructions must appear) are already on the screen with the insertion point positioned between them.
To open and edit an existing macro, select the one you want to edit from the list of macros in the Macro dialog box, and then choose the Edit button (the Create button becomes the Edit button when an existing macro is selected).
Û To open the BoldItalic macro for editing
· From the Tools menu, choose the Macro command. Then select the BoldItalic macro and choose the Edit button.
The Word macro recorder does not record keystrokes, as some macro recorders do; it records actions, which are translated into the Word macro language, WordBasic. So when you open a recorded macro in the macro-editing window, the window displays a series of WordBasic instructions.

Consider the text of the BoldItalic macro, beginning with Sub MAIN and ending with End Sub. These two statements begin and end every WordBasic macro. "Sub" stands for subroutine, which is a subsection of a larger program. The larger program in this case is Word itself. From the perspective of WordBasic, a macro is a small task within a larger task — the task of running Word. "MAIN" indicates that this is the main subroutine of the macro. In the case of the BoldItalic macro, it's also the only subroutine in the macro.
Now consider the lines sandwiched between Sub MAIN and End Sub:
FormatFont .Points = "12", .Underline = 0, .Color = 0, .Strikethrough = 0, .Superscript = 0, .Subscript = 0, .Hidden = 0, .SmallCaps = 0, .AllCaps = 0, .Spacing = "0 pt", .Position = "0 pt", .Kerning = 0, .KerningMin = "", .Tab = "0", .Font = "Times New Roman", .Bold = 1, .Italic = 1
These lines form a single statement, the FormatFont statement. A statement is a WordBasic instruction that tells the macro to do something. The FormatFont statement corresponds to the Font dialog box (Format menu). Each word in the statement that begins with a period corresponds to an option in the dialog box. These words, such as .Points, .Strikethrough, and .Hidden, are called arguments — they qualify the statement. (Note that if you recorded your macro on the Macintosh, the FormatFont statement includes two additional arguments—.Outline and .Shadow—that are valid only on the Macintosh.)
Every argument in a statement has a value, which corresponds to the setting of the option in the dialog box. For example, the Font dialog box contains several check boxes which can be either selected or cleared. Likewise, the WordBasic arguments that correspond to those check boxes can have one of two values. If the Strikethrough check box is selected, for example, the WordBasic argument would read .Strikethrough = 1. If the check box were not selected, the argument would read .Strikethrough = 0.
The BoldItalic macro you recorded earlier in this chapter didn't work properly as it was recorded. The only thing you wanted the macro to do was apply bold and italic formatting. Unfortunately, it also applied other character formats such as font and font size. With the macro open in a macro-editing window, you can correct that problem by removing the irrelevant arguments from the FormatFont statement.
Û To edit the FormatFont statement
· With the macro open in a macro-editing window, select and delete every argument except .Bold and .Italic.
The edited BoldItalic macro should look like this:
Sub MAIN
FormatFont .Bold = 1, .Italic = 1
End Sub
In a macro-editing window, you can immediately get reference information about any WordBasic instruction by positioning the insertion point on the same line as the instruction and pressing F1 (Windows), or HELP or COMMAND+/ (Macintosh).
Û To get Help for the FormatFont statement
· Position the insertion point anywhere in the FormatFont statement, and then press F1 (Windows), or HELP or COMMAND+/ (Macintosh).
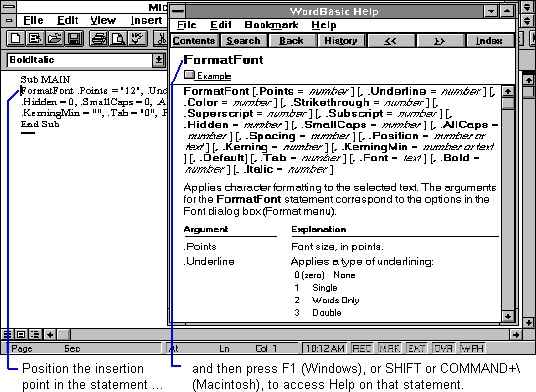
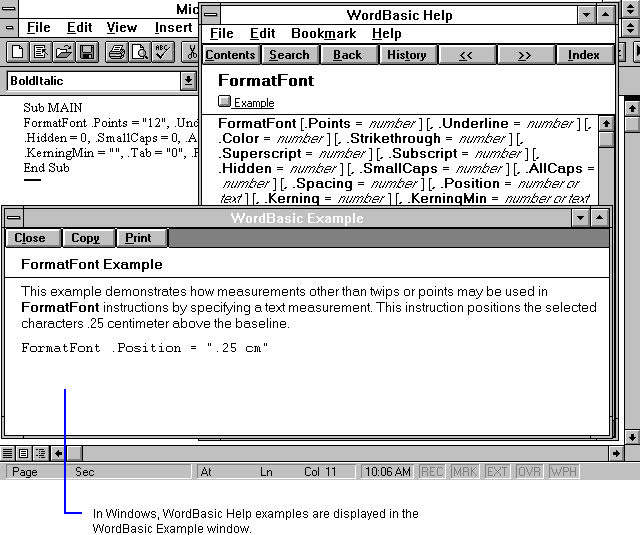
For many WordBasic instructions, Help provides examples you can copy. You can click Example in the Help topic to display the examples. You can choose the Copy button (Word version 6.0) or choose Copy from the shortcut menu (Word version 7.0) in the example window to copy the text of the code example onto the Clipboard. You can then paste the example into your own macro or document.
You can also use the Help menu in Word to access Help topics about WordBasic. Help provides a language summary that groups WordBasic statements and functions by category, as well as information on predefined bookmarks and error messages. All the reference information contained in Part 2, "WordBasic Reference," is available in Help.
Whenever you open a macro-editing window, the Macro toolbar is displayed, if it isn't displayed already.

Many of the buttons on the toolbar are used for testing, but several of the buttons can be used for running and recording macros:
This box lists the macros open in macro-editing windows. If more than one macro is open, you can use the Active Macro box to select which macro runs when you click the Start button.
Displays the Record Macro dialog box, so that you can begin recording a macro.
Records a single command or action in Word and inserts the resulting WordBasic instruction in the active macro-editing window (or the most recently active one, if a document window is active). For more information, see "The Record Next Command Button" later in this section.
Runs the macro selected in the Active Macro box. By default, this is the macro in the active macro-editing window (or the most recently active one, if a document window is active).
Displays the Macro dialog box. Clicking this button is a shortcut for choosing the Macro command from the Tools menu.
For information on the Trace, Continue, Stop, Step, Step Subs, Show Variables, and Add/Remove REM buttons, see Chapter 6, "Debugging." For information on the Dialog Editor button, see Chapter 5, "Working with Custom Dialog Boxes."
You can use the Start button on the Macro toolbar to run the macro in the active macro-editing window. Some macros, however, will not run unless a document window is active. For example, if you run the BoldItalic macro when its macro-editing window is active, an error occurs, because the Font command (Format menu) is not available when a macro-editing window is active.
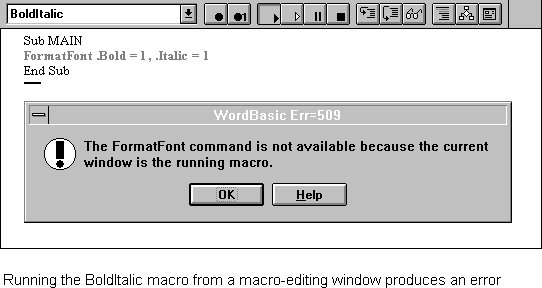
If you browse through the menus when a macro-editing window is active, you can see that many commands are unavailable — they are commands for tasks that aren't useful for editing macros.
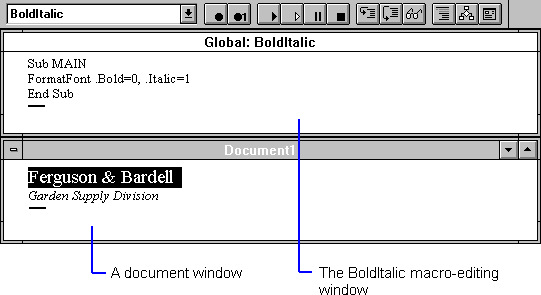
If you have a document window open in addition to a macro-editing window, you can choose the Arrange All command from the Window menu to display both the document window and the macro-editing window. To run the BoldItalic macro now, you can just click in the document window to make it active, and then click the Start button on the Macro toolbar.
Whenever you run a macro, Word automatically checks the syntax of each WordBasic command. In programming, syntax refers to the rules governing the spelling of arguments, the number of arguments, and so on. Word also checks to make sure the arguments have appropriate values. If a macro-editing window is open and Word discovers an instruction with a problem, it highlights the instruction and presents an error message.
To see how Word identifies syntax errors, you can alter the syntax of the BoldItalic macro. Try deleting the comma between the .Bold and .Italic arguments so that the FormatFont statement looks like the following:
FormatFont .Bold = 1 .Italic = 1
Now try running the macro.
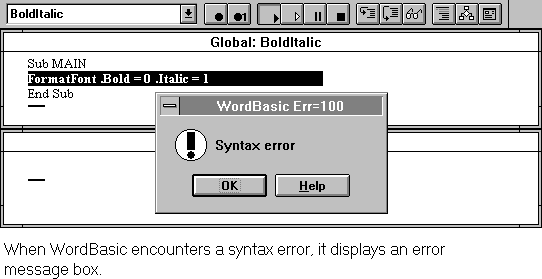
Another common error is to type an argument without the period in front of it. It's easy to make these errors, but by highlighting the line containing the error, the macro-editing window helps you find them.
The Macro Text style determines the formatting of text in macro-editing windows. You can't apply direct formatting to text in a macro-editing window, but you can modify the Macro Text style. The Macro Text style is a special style that is stored in the Normal template. It affects every macro-editing window, regardless of whether the macro displayed in a macro-editing window is stored in the Normal template or in another template.
You use the Style command (Format menu) to modify the Macro Text style. A document window must be active when you choose the Style command; you cannot choose the Style command when a macro window is active.
Note
When you modify the Macro Text style, Word updates the style definition displayed in the Style dialog box (Format menu) only for the document that is active and for the Normal template. This means that when other documents and documents based on other templates are active, the Macro Text style definition displayed in the Style dialog box may not be current.
To find out the current, correct style definition of Macro Text, create a document based on the Normal template. Choose Style from the Format menu, and then select the Macro Text style in the Styles list (if necessary, select All Styles in the List box to see the Macro Text style in the Styles list); the Description box will show the current style definition.
You can use the View tab in the Options dialog box to set view options for macro-editing windows. View options you set for macro-editing windows do not affect view options for document windows. For example, you can hide the status bar in macro-editing windows but not in document windows.
Sometimes, you want to record one or two commands to insert into an existing macro you're working on, but you don't want to record a new macro. The Record Next Command button on the Macro toolbar provides this capability. When you have a macro-editing window open, you can use the Record Next Command button to record the next Word command you choose or action you take (such as scrolling through a document). Word inserts the equivalent WordBasic instruction at the insertion point in the macro-editing window.
If a macro window is active and you want to record a command that isn't available in macro-editing windows, switch to a document window before clicking the Record Next Command button. If you click the Record Next Command button and then switch to a document window, Word will record your switching windows rather than the command you want to record.
Stopping or Pausing a Macro When a macro is running, you can stop or pause it by pressing the ESC key. Word displays a message stating that the macro was interrupted. If the macro is open in a macro-editing window, you can click the Continue button on the Macro toolbar to continue running the macro, or you can press the ESC key again or click the Stop button on the Macro toolbar to stop the macro. If the macro is not open in a macro-editing window when you press the ESC key, Word simply stops the macro. |