
You can use the Dialog Editor to create a new dialog box or to edit an existing one. Here's the sequence for creating and using a custom dialog box:
1. Design the dialog box using the Dialog Editor application.
2. Select the completed dialog box and copy it into the macro in which you want to use it.
3. Add the instructions needed to display the dialog box and to retrieve information from it.
The Dialog Editor is a separate application included in the Word package. If you chose not to install the Dialog Editor when you set up Word, you can run the Word Setup program again to install it.

The Dialog Editor button (Macro toolbar)
To start the Dialog Editor, click the Dialog Editor button on the Macro toolbar. In Windows, you can also run the Dialog Editor from Program Manager or File Manager. On the Macintosh, you can run the Dialog Editor by double-clicking the Dialog Editor icon in the Word folder.
Note
In Windows, the Dialog Editor does not support 3-D dialog effects. However, when a WordBasic macro displays a dialog box created with the Dialog Editor in Windows, the dialog box has the same 3-D look as built-in Word dialog boxes, assuming the 3-D Dialog And Display Effects check box is selected on the General tab in the Options dialog box (Tools menu).
When you start the Dialog Editor, it displays an empty dialog box to which you can add dialog box controls such as buttons, text, and list boxes. In the Dialog Editor, controls are called items. You use the Item menu to add them to the dialog box.
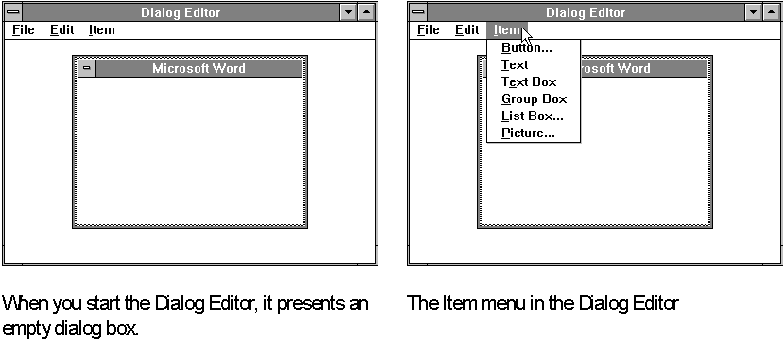
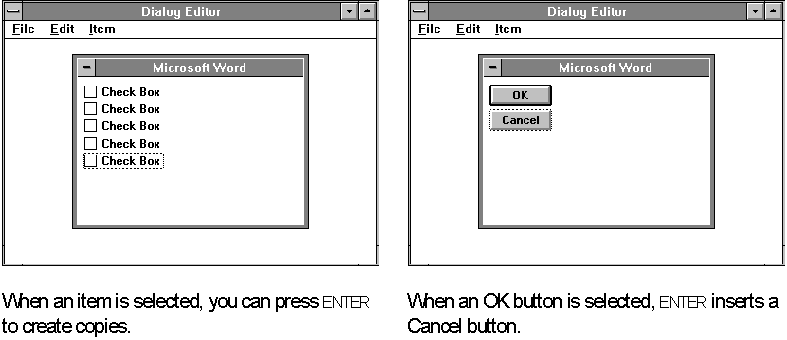
After you have used the Item menu to insert an item, the item remains selected. You can press ENTER to create a copy of the selected item. For example, when a check box is selected you can press ENTER to insert another check box. When an OK button or push button is selected and you press ENTER, the Dialog Editor inserts a Cancel button if there isn't one already; likewise, when a Cancel button or a push button is selected and you press enter, the Dialog Editor inserts an OK button if there isn't one already. If both an OK button and a Cancel button are present, pressing enter when any command button is selected inserts a new push button.
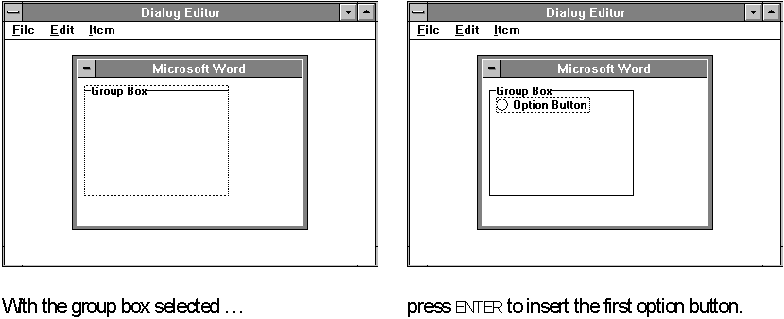
An easy way to create a group of option buttons is to insert a group box, press ENTER to insert the first option button, and continue to press ENTER to insert additional option buttons. To insert a group box, choose Group Box from the Item menu. Immediately after creating each option button, type a name for it. (When an option button is selected, you can replace the default text, "Option Button," by typing new text.)
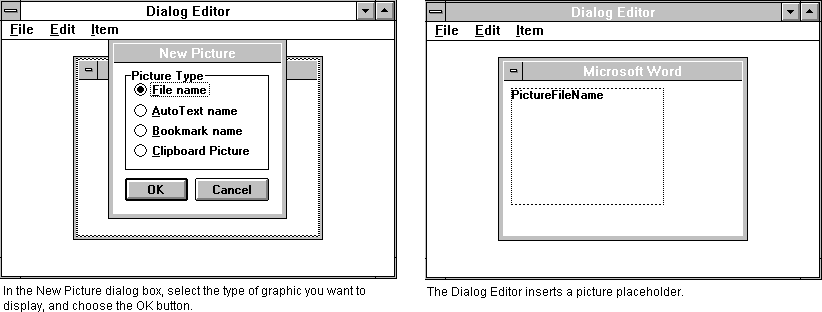
Using the Picture command on the Item menu, you can add graphics to your dialog boxes. When you choose the Picture command from the Item menu, it displays the New Picture dialog box, in which you can indicate how the graphic you're adding is stored — as a file, an AutoText entry, an item marked with a bookmark, or an item on the Clipboard. In the Text$ box of the Information dialog box (Info command, Edit menu) for the picture item, type the path and filename of the graphics file, the name of the AutoText entry, or the name of the bookmark, or just type Clipboard. The Dialog Editor does not display the graphic, but you can position and size the picture item just as you can any other item. Don't worry if you don't know the name of the file or the picture type; you can specify it later.
When you use the Dialog Editor to insert a text box control, the text box is sized to hold a single line of text. To make the text box into a multiple-line text box, you change the text box's height so that it can accommodate more than one line. Initially, however, the Dialog Editor doesn't allow you to change a text box's height. This is to prevent you from accidentally changing the height as you change the width. To change the height, you have to double-click the text box to display the Information dialog box, which displays settings pertinent to the selected dialog box item, and then clear the Auto check box next to Height. You can then adjust the height of the text box to make it into a multiple-line text box.
The Dialog Editor does not have a command to insert a File Preview box. However, you can use another item that can be sized in a similar way as a placeholder. A group box, for example, makes a good placeholder. When you paste the dialog box into your macro, you can then change the name of the item's instruction to FilePreview. Keep in mind that a dialog box can include only one File Preview box; also, when a dialog box includes a File Preview box, it must call a dialog function. For information on dialog functions, see "Using Dynamic Dialog Boxes" later in this chapter. For more information, see FilePreview in Part 2, "WordBasic Reference."
Once you have added an item, you can use the mouse to position and size it.

The mouse pointer
for positioning
You can position an item by dragging it with the mouse. When the mouse pointer is positioned over an item, the pointer changes to a four-headed arrow.
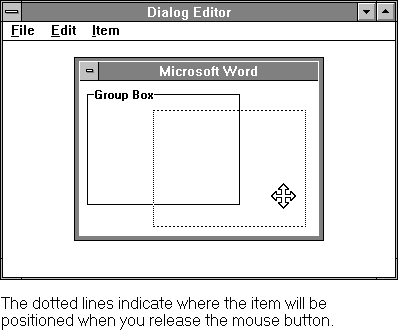

The mouse pointers for sizing
You can size an item by dragging its borders with the mouse. When the mouse pointer is positioned over a border, the pointer changes to a double-headed arrow.
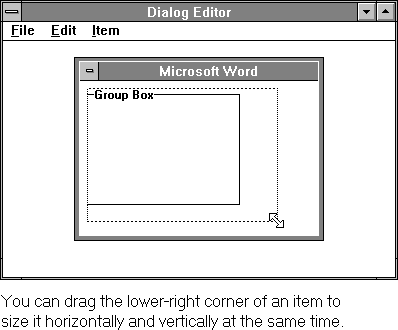
If you hold down the SHIFT key just before you move an item, you can drag only vertically or only horizontally, depending on which direction you first move the mouse.
You can use the arrow keys to position or size a selected item. You can position an item by pressing an arrow that corresponds to the direction you want to move the item. To size an item, hold down the SHIFT key and press an arrow key. In Windows, the selected item is moved or sized by four X or Y units each time you press an arrow key. To move or size the item by just one X or Y unit, hold down the Ctrl key while moving or sizing. For example, to increase the width of a selected item by one X unit in Windows, you could press Ctrl+Shift+right arrow. In Windows, you must press ENTER to finish moving or sizing an item; you can press ESC to cancel. On the Macintosh, the selected item is moved or sized one X or Y unit each time you press an arrow key; you can hold down the OPTION key to move or size an item by four X or Y units each time you press an arrow key. For example, to increase the width of a selected item by one X unit on the Macintosh, you could press Shift+right arrow.
The Information dialog box displays the exact position and size of an item, so that you can set it precisely. You can also see at a glance whether or not an item is precisely aligned with another item. For example, if you want to align two items horizontally, a good technique is to do it first by eye and then use the Information dialog box to get the Y coordinates of the items; if one of them is off by one or two Y units, you can adjust its position accordingly. To display the Information dialog box for an item, double-click the item, or select it and choose Info from the Edit menu.
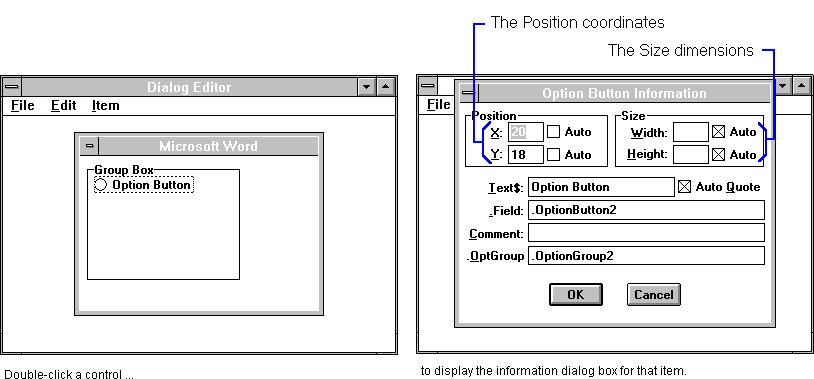
What Do X and Y Represent? The Dialog Editor positions and sizes items in X units for horizontal positioning and width, and Y units for vertical positioning and height. Because monitors have different resolutions, these units are defined in relative rather than absolute terms. X units are increments of 1/8 of the System font in Windows or the dialog font on the Macintosh. Y units are increments of 1/12 of the System font in Windows or the dialog font on the Macintosh. Note that in Windows, the System font is not the same as the font used to display text in a custom dialog box. Generally, the dialog font and the System font are scaled in proportion to each other, but some display drivers install a System font that is easier to read and disproportionately large. For example, the Windows Super VGA 1024 x 768 (large fonts) display driver uses this technique. When one of these display drivers is installed, the Word dialog font does not expand to the degree the System font does. This means that dialog boxes and controls, whose size is dependent on the System font, expand more than dialog box text, which appears a little shrunken. Likewise, if you design a dialog box with a large-fonts display driver installed and then display the dialog box with a small- or normal-fonts display driver installed, dialog box text may be truncated (since dialog box controls shrink more than the text they contain). To avoid this problem, either design your dialog boxes with a standard VGA resolution driver installed or, if you're designing with a large-fonts display driver installed, make sure that controls containing text (such as text label and option button controls) are a little larger than necessary so that text has room to expand when displayed with a different display driver. |
You can select more than one item by holding down the SHIFT key and clicking the additional items you want to select. This is useful if you want to move several items as a group. You can select every item in a dialog box by using the Select All Items command on the Edit menu.
When you move option buttons or other items within a group box, you typically want to move them as a group. The Dialog Editor provides a Select Group command to select all the items within a group box, including the group box. A group box is most often used to group option buttons, but you can include any item within it.
The Dialog Editor automatically positions or sizes some items. When an Auto check box is selected for an item, you cannot change the item's position or size. Automatic sizing is a useful way to fix the size of items you generally don't want to resize, such as OK buttons and Cancel buttons. To select or clear automatic positioning and sizing for any item, double-click the item and select or clear the appropriate Auto check boxes in the Information dialog box.
Note that if you select Auto for the position of an item you've already moved, it returns to the position where the Dialog Editor originally inserted it; this may conflict with the position of other items you have moved. However, you can set automatic positioning for an item just after inserting it to force it to move with the item that precedes it. For example, if you select Auto for the position of a text box inserted beneath a text item, you can move them together by dragging only the text item.
When you have added all the items the dialog box will contain, you can drag the borders of the dialog box (Windows) or drag the sizing box at the bottom-right corner (Macintosh) to fit the items. You can also choose the Resize command from the Edit menu or double-click the dialog box border (Windows) or click the zoom box (Macintosh) to have the Dialog Editor size the dialog box for you.
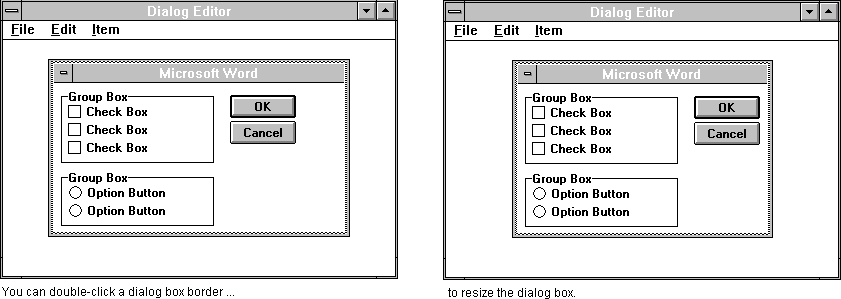
You can delete one or more selected items by choosing Clear from the Edit menu. In Windows, you can also press the Delete key; on the Macintosh, you can press either Del or COMMAND+Delete (on the Macintosh, the Delete key deletes text in an item label, not the item itself). To delete all of the items in a dialog box, select the dialog box itself or choose Select All Items from the Edit menu before deleting. To start from scratch with a new, empty dialog box with the default label and default size and position, choose New from the File menu.
When you insert an item, it has a default label such as "Check Box," "Option Button," or "Text." Immediately after you've inserted an item, while it is selected, you can replace the default label by typing the one you want. Once you have changed the default text, you can select the item and use the Backspace key (Windows) or the Delete key (Macintosh) to delete what you typed, or you can use the Information dialog box to edit it.
To display the Information dialog box, double-click the item or select the item and choose the Info command from the Edit menu. In the Information dialog box, you edit the label by changing the text in the Text$ box. The Auto Quote check box is selected by default; it inserts quotation marks around the item's label when you paste the dialog box definition into a macro. If you want to use a variable name as a label, you can clear the Auto Quote check box (since a variable name should not be enclosed in quotation marks). On the Macintosh, the Auto Quote check box is not included in the Dialog Editor.
Many dialog box items are designed to return a value to the macro that displays the dialog box. In your macro, you use an item's identifier to access the value associated with that dialog box item. The Dialog Editor assigns these items default identifiers such as .CheckBox1 or .ListBox2. You can use the .Field box in the Information dialog box to change an item's identifier to something less generic. The .Field box is so named because the values returned by dialog box items are stored in a dialog record. In programming terminology, values stored in a record are "fields." In this book, the term "identifier" is used instead because identifiers serve not only to indicate fields within records but also to identify dialog box items to other instructions within a macro.
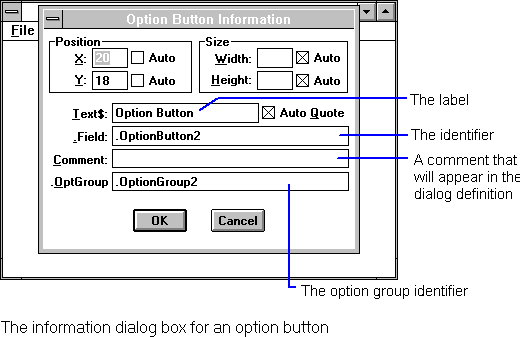
In the Comment box, you can add a comment that will appear in the dialog box definition when the dialog box is copied from the Dialog Editor into a macro. In your macro, the comment will be located on the same line as the WordBasic instruction associated with the item.
Access keys allow quick keyboard access to items in a dialog box. When an access key is defined for an item in a custom dialog box, the user can press ALT+the specified letter (Windows) or COMMAND+the specified letter (Macintosh) to activate a text box, select or clear a check box, or choose a command button, for example. In the Information dialog box, you define an access key for an item by including an ampersand (&) character before a letter in the Text$ box. In the dialog box, the letter appears underlined. (Note that on the Macintosh, you must hold down the COMMAND key for a second or two before the letter appears underlined.) To define an access key for a text box, you define one for a text item associated with the text box. To associate a text item with a text box, insert the text item first, then insert a text box. In the dialog box definition created when the dialog box is pasted into a macro, the Text instruction must immediately precede the TextBox instruction.
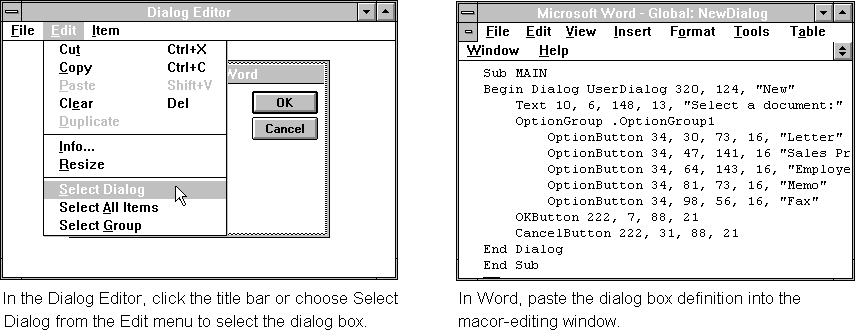
When you're ready to insert a dialog box into the macro that will display it, you select the dialog box in the Dialog Editor and copy it. You don't have to select each item in the dialog box; you just select the dialog box itself. You can do this by clicking the dialog box title bar or by choosing the Select Dialog command from the Edit menu.
When the dialog box is selected, choose the Copy command from the Edit menu to copy it. In Word, open the macro and position the insertion point where you want to insert the dialog box definition. Then paste the dialog box definition. It will appear as a series of instructions enclosed by a Begin Dialog¼End Dialog instruction.
In the Dialog Editor, choose Exit (Windows) or Quit (Macintosh) from the File menu. If you've created a new dialog box or changed an existing one and have not copied your work, the Dialog Editor asks if you want to copy it to the Clipboard. If you want to use the dialog box in Word, choose the Yes button. If you choose the No button, the new dialog box or any changes made to an existing one will be lost.
You can change a custom dialog box in any macro by copying the dialog box definition from the macro to the Clipboard and then pasting it from the Clipboard into the Dialog Editor. You can then edit the dialog box in the Dialog Editor. Note that when you select a dialog box definition, the selection must start with the Begin Dialog instruction and end with the End Dialog instruction.
The following tips can save you time and effort when building custom dialog boxes with the Dialog Editor.
Within the Dialog Editor, everything is relative to the upper-left corner of the dialog box. When you resize a dialog box, items aligned with the top and left borders of the dialog box will keep their position relative to the top and left borders, but items aligned with the bottom and right borders will lose their position.
If you hold down the SHIFT key before moving an item with the mouse, you will only be able to move the item in the direction you first move it. You can confidently position the item without worrying that you'll accidentally move it out of alignment in the other direction. You can also use the SHIFT key to select multiple items and move them together so they maintain their positions relative to each other.
You can minimize the amount of rearranging you have to do if you keep in mind that when you add an item, the Dialog Editor positions it below the currently selected item. For example, if you know you want to add a text box with a text label, add the text label first, then add the text box (assuming that you want the text label to appear above the text box, as it usually does).
If you want to enclose items such as option buttons or check boxes within a group box, add the group box first. If you add the check boxes or option buttons first, the group box will hide rather than enclose them.
A group box normally includes a text label, but if you delete the label, the group box forms a rectangle that you can use as a design element.
In Windows, when you press an arrow key, you move the selected dialog box item four X or Y units; when you press CTRL+an arrow key, you move the item one X or Y unit. To size an item, press SHIFT+an arrow key or CTRL+SHift+an arrow key. Press ENTER to complete positioning or sizing or ESC to cancel it.
On the Macintosh, when you press an arrow key, you move the selected item one X or Y unit; when you press OPTION+an arrow key, you move the item four X or Y units. To size an item, hold down SHIFT and press an arrow key or OPTION+an arrow key.
A dialog box must include at least one command button. That is, it must include either an OK button, a Cancel button, or a push button. Otherwise, Word will generate an error when you run the macro to display the dialog box.
Sometimes when you insert a large item such as a group box into a dialog box, the item's boundaries fall outside the dialog box border. If you paste the dialog box into a macro and run it, Word will display a "value out of range" error. You can avoid this error by simply repositioning the item that causes the error. A macro can't display an item in a dialog box unless it lies entirely within the dialog box. (Drop-down list boxes can drop slightly outside the dialog box, but no more than an eighth of an inch or so.)
A Glossary of Dialog Box Terms The vocabulary associated with dialog boxes can be confusing. Here's a glossary of terms. Custom dialog box A dialog box defined by WordBasic instructions. Usually, the Dialog Editor is used to design a custom dialog box, which is then copied into a macro. A custom dialog box is used to display and return information. Also known as a user-defined dialog box. Dialog box control An element of a dialog box such as a command button, check box, text label, or list box. Within the Dialog Editor, a dialog box control is referred to as an "item." For descriptions of the dialog box controls available for custom dialog boxes, see "Dialog Box Controls" earlier in this chapter. Dialog box control identifier A string used to identify a particular dialog box control. The identifier is used with a dialog record to insert and retrieve values from dialog boxes and to reference dialog box controls. Dialog box definition The set of WordBasic instructions used in a macro to define a custom dialog box. These instructions are enclosed within a Begin Dialog¼End Dialog instruction. The Dialog Editor automatically generates a dialog box definition. Dialog function A special user-defined function that can be called while a custom dialog box is displayed. The dialog function can make a custom dialog box "dynamic" by responding to events while the dialog box is displayed. See "Using Dynamic Dialog Boxes" later in this chapter. Dialog record A variable that contains the values returned by a Word dialog box or by a custom dialog box. Each setting in a dialog box is stored in a field within the record associated with the dialog box. For more information, see "Working with Dialog Records" in Chapter 4, "Advanced WordBasic." Dynamic dialog box A custom dialog box whose contents can change dynamically in response to user actions while the dialog box is displayed. See "Using Dynamic Dialog Boxes" later in this chapter. Word dialog box A dialog box built into Word. Most dialog boxes are displayed by choosing a menu command, but some, like the Organizer dialog box, are available only by choosing buttons in other dialog boxes. |