A custom dialog box is designed to display and return information. Once you have built a dialog box in the Dialog Editor and copied it into a macro, you need to add instructions to put information into the dialog box, display the dialog box, and retrieve information from it. Here's an overview of the steps involved:
1. Define the dialog box. You use the Dialog Editor to define the dialog box. The instructions the Dialog Editor generates are called a dialog box definition.
2. Create a dialog record. You use a Dim statement to create a dialog record for a custom dialog box, just as you do for a built-in dialog box.
3. Put values into the dialog box. If the dialog box includes a list box, drop-down list box, or combo box, you probably want to fill it with items. You may also want to place default text in a text box or select check boxes before displaying the dialog box.
4. Display the dialog box. You use a Dialog instruction to display the dialog box. As with built-in dialog boxes, you can use either the Dialog statement or the Dialog() function.
5. Retrieve values from the dialog box. The settings of dialog box controls are stored in the dialog record, so you retrieve information from the dialog record after the dialog box is closed.
A dialog box definition is the set of instructions that defines the contents of a dialog box as well as its size and position. When you create a dialog box in the Dialog Editor, it generates these instructions.
Dialog box definition instructions are enclosed within the Begin Dialog¼End Dialog statement. Here is the syntax:
Begin Dialog UserDialog [HorizPos, VertPos,] Width, Height, Title$
[, .DialogFunction]
Series of instructions to define controls in the dialog box
End Dialog
The optional HorizPos and VertPos arguments position the dialog box; if they are omitted, Word displays the dialog box at the center of the Word window. Width and Height size the dialog box. The Title$ argument is the text that appears in the dialog box title bar. If you do not specify HorizPos and VertPos, you can omit Title$; you can omit Title$ even if you specify HorizPos and VertPos if you also specify .DialogFunction. If you omit Title$, "Microsoft Word 6.0" appears in the title bar. The .DialogFunction argument is used only if you want to create a dynamic dialog box. For information on dynamic dialog boxes, see "Using Dynamic Dialog Boxes" later in this chapter. For complete information, see Begin Dialog¼End Dialog in Part 2, "WordBasic Reference."
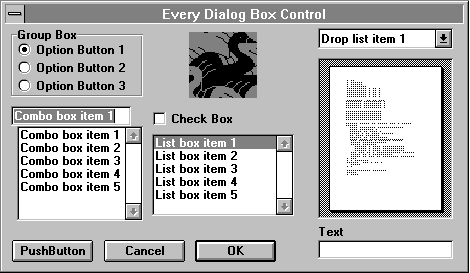
The following dialog box includes every dialog box control.
Here is the dialog box definition that defines the dialog box:
Begin Dialog UserDialog 612, 226, "Every Dialog Box Control", \
        .DlgFunction
    ComboBox 8, 76, 176, 111, MyList$(), .ComboBox1
    CheckBox 198, 79, 180, 16, "&Check Box", .CheckBox1
    ListBox 195, 102, 189, 83, MyList$(), .ListBox1
    DropListBox 417, 5, 179, 108, MyList$(), .DropListBox1
    Text 417, 186, 35, 13, "&Text"
    TextBox 417, 199, 179, 18, .TextBox1
    GroupBox 7, 4, 177, 65, "&Group Box"
    OptionGroup  .OptionGroup1
        OptionButton 17, 16, 148, 16, "Option Button &1"
        OptionButton 17, 33, 148, 16, "Option Button &2"
        OptionButton 17, 50, 148, 16, "Option Button &3"
    Picture 199, 7, 181, 62, "BIRD", 1, .Picture1
    FilePreview 417, 31, 179, 148, .fileprev
    PushButton 10, 199, 108, 21, "&PushButton"
    CancelButton 131, 199, 108, 21
    OKButton 253, 199, 108, 21
End Dialog
Note that each dialog box control has its own instruction within the dialog box definition. The first pair of numbers that follows each instruction for a control positions the control relative to the upper-left corner of the dialog box; the second pair defines the control's width and height.
Controls that store a value, such as combo boxes and check boxes, include in their instructions identifiers that begin with a period. For example, the CheckBox instruction includes the identifier .CheckBox1. These identifiers are used to access the control's value or setting in a dialog record.
To see the full syntax for a dialog box definition statement such as CheckBox or ListBox, see the corresponding entry in Part 2, "WordBasic Reference."
A dialog record stores the values that you put into and retrieve from a dialog box. A dialog record for a custom dialog box is defined in much the same way as one for a built-in Word dialog box:
Dim DialogRecord As UserDialog
The DialogRecord argument can be any variable name. As UserDialog identifies the dialog record as the record for a custom dialog box (just as As FormatFont in a Dim instruction identifies a dialog record for the Font dialog box). You can include as many custom dialog boxes in a macro as you need, but you can define only one UserDialog record at a time.
It's often necessary to place initial values into a custom dialog box and to specify the default settings of some controls before the dialog box is displayed. The values you can place in a dialog box and the settings you can control include the following:
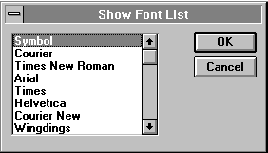
The items displayed in a list box, drop-down list box, or combo box control are stored as elements of an array. Therefore, before you display a dialog box containing one of these controls, you must define an array and fill it with the items to be listed; you then refer to the array in the instruction for the control in the dialog box definition. For example, if you want a dialog box to present a list of fonts, as in the following illustration, you first create an array to hold the font names.
Here are the instructions that define and fill an array, FontArray$(), for the font names:
lastElement = CountFonts() - 1
Dim FontArray$(lastElement)                'Define the array
For count = 0 To lastElement                'Fill the array
    FontArray$(count) = Font$(count + 1)
Next
To place the array elements into a list box, you refer to the array in the ListBox instruction. For example:
ListBox 10, 25, 160, 84, FontArray$(), .ListBox1
Putting it all together, here are the complete instructions for displaying the Show Font List dialog box in the preceding illustration. The array is defined first, then the dialog box, and finally the dialog record used in the Dialog() instruction to display the dialog box.
lastElement = CountFonts() - 1
Dim FontArray$(lastElement)                'Define the array
For count = 0 To lastElement                'Fill the array
    FontArray$(count) = Font$(count + 1)
Next
Begin Dialog UserDialog 362, 122, "Show Font List"
    ListBox 10, 9, 206, 100, FontArray$(), .FontList
    OKButton 265, 7, 88, 21
    CancelButton 265, 31, 88, 21
End Dialog
Dim dlg As UserDialog                    'Define the dialog record
buttonchoice = Dialog(dlg)                'Display the dialog box
A text box — a box in which the user can enter text — is usually empty when the dialog box is first displayed. But in some cases, you may want to place default text in a text box. For example, in the following dialog box the user is prompted to type his or her name and phone number. Most of the time that text will not change, so rather than force the user to type the text each time the dialog box is displayed, you can make the name and phone number default text.
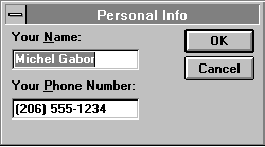
You place default text in a text box (or combo box) by assigning it to the dialog identifier that corresponds to the text box. Recall that the dialog record contains a value corresponding to the identifier for each dialog box control that can return a value. The identifier is part of the instruction that defines the control. The following instructions define the text boxes in the Personal Info dialog box shown in the previous illustration:
TextBox 7, 21, 160, 18, .Name$
TextBox 7, 64, 160, 18, .Phone$
Note that .Name$ and .Phone$ are the identifiers for the text boxes (the dollar signs ($) aren't necessary, but indicate that the fields in the dialog record corresponding to these identifiers hold string values). You could use the following instructions to assign default text to these identifiers, where PersonalInfoDlgRec is the name of the dialog record:
PersonalInfoDlgRec.Name = "Michel Gabor"
PersonalInfoDlgRec.Phone = "(206) 555-1234"
Of course, you must define a dialog record before you can assign values to identifiers within it. Here are the complete instructions to display the dialog box:
Begin Dialog UserDialog 320, 102, "Personal Info"
    Text 7, 5, 89, 13, "Your &Name:"
    TextBox 7, 21, 160, 18, .Name$
    TextBox 7, 64, 160, 18, .Phone$
    Text 7, 47, 157, 13, "Your &Phone Number:"
    OKButton 225, 3, 88, 21
    CancelButton 225, 27, 88, 21
End Dialog
Dim PersonalInfoDlgRec As UserDialog            'Define dialog record
PersonalInfoDlgRec.Name$ = "Michel Gabor"    'Assign value to .Name$
PersonalInfoDlgRec.Phone$ = "(206) 555-1234"    'Assign value to .Phone$
x = Dialog(PersonalInfoDlgRec)                'Display dialog box
You can use the same method of assigning values to text boxes to specify the initial setting of a check box. After defining the dialog record, you assign one of three values to the identifier for the check box: 0 (zero) to clear the check box (this is the default), 1 to select the check box, and –1 to make it indeterminate.
When a control is active, it is said to have the focus, which means that you can act on it. For example, if a text box has the focus, you can type in it. You can use the tab key to move the focus and activate controls in a dialog box. The tab order is the order in which controls become active when you use the tab key to move to them. The tab key is particularly useful for dialog boxes that contain more than one text box; if you're typing in a text box, it's natural to use the tab key to move to the next text box.
The control that has the focus when the dialog box is first displayed is said to have the initial focus. The initial focus is important in dialog boxes in which the user is prompted to type something. For example, in the dialog box shown in the following illustration, the initial focus should be on the Fax Number text box. If it isn't and the user starts typing, nothing will happen; the dialog box will seem not to work properly.
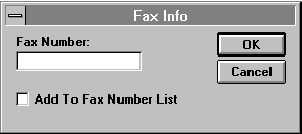
The order of the instructions within the dialog box definition determines the initial focus and the tab order: The first control in a dialog box definition has the initial focus, the second control has the focus next, and so on. Items that cannot be active, such as the text control, are ignored. (On the Macintosh, only text box and combo box controls can have the focus.)
Here are the instructions for the Fax Info dialog box shown in the previous illustration. Note that the first instruction is a Text instruction. Since a text control cannot have the focus, the initial focus is on the text box defined by the TextBox instruction.
Begin Dialog UserDialog 370, 92, "Fax Info"
    Text 14, 7, 96, 13, "Fax Number:"
    TextBox 14, 23, 160, 18, .TextBox1
    CheckBox 14, 57, 211, 16, "Add To Fax Number List", .FaxList
    OKButton 270, 6, 88, 21
    CancelButton 270, 30, 88, 21
End Dialog
Dim dlg As UserDialog
buttonchoice = Dialog(dlg)
You use the Dialog statement or the Dialog() function to display a custom dialog box in the same way that you can use them to display a dialog box built into Word.
In general, the Dialog() function rather than the Dialog statement is the best choice for custom dialog boxes. If you use the Dialog statement, Word generates an error if the user chooses the Cancel button in the dialog box. You can use the On Error statement to handle this error, but you can avoid it entirely by using the Dialog() function. Also, if your dialog box contains a push button, you need to use the Dialog() function to determine whether the push button was chosen (or which one was chosen if the dialog box contains more than one).
For complete information on the Dialog statement and the Dialog() function, see the entry in Part 2, "WordBasic Reference."
You can use the DefaultButton argument of the Dialog statement or the Dialog() function to determine the default command button. The default command button is the button that is highlighted when the dialog box is first displayed. It is also the command button that is chosen if a control other than a command button has the focus when the user presses ENTER. Unless you specify otherwise, the OK button is the default command button.
For the DefaultButton argument to have any effect, the instruction for the specified button must be preceded in the dialog box definition by an instruction for a non-command button dialog box control that can receive the focus, such as a list box or check box. (Note that because a text control cannot receive the focus, it does not meet this criterion.) Otherwise, the first button in the dialog box definition is the default command button.
Once a custom dialog box has been displayed and the user has closed it, the macro can retrieve the settings of the dialog box controls. These values are stored in the dialog record, so retrieving values is a matter of accessing the appropriate identifiers in the dialog record.
The following table shows the values that different dialog box controls store in the dialog record.
Control | Value stored in the dialog record |
Check box | If the check box is selected, 1; if the check box is clear, 0 (zero); if the check box is indeterminate, –1 |
Option group | A number corresponding to the option button selected |
List box or drop-down list box | The number of the item chosen, beginning with 0 (zero) |
Combo box | A text string (what the user typed or selected in the list of items) |
Text box | A text string |
The following example tests the value of the Add To Fax Number List check box in the Fax Info dialog box (shown in the following illustration) to determine whether the user selected that control.

Two nested If conditionals are used to test two conditions. The first If instruction uses the condition buttonchoice = -1 to test whether the user chose the OK button to dismiss the dialog box (Dialog() returns –1 if the user chose the OK button). If this condition is true, the second If instruction tests the value of the Add To Fax Number List check box, which is stored in dlg.FaxList. If the check box is selected, meaning the fax number should be added to the list of fax numbers, the dialog record identifier for the check box is equal to 1. The macro then runs the instructions to add the fax number to the list of numbers.
Begin Dialog UserDialog 370, 92, "Fax Info"
    Text 14, 7, 96, 13, "Fax Number:"
    TextBox 14, 23, 160, 18, .TextBox1
    CheckBox 14, 57, 211, 16, "Add To Fax Number List", .FaxList
    OKButton 270, 6, 88, 21
    CancelButton 270, 30, 88, 21
End Dialog
Dim dlg As UserDialog
buttonchoice = Dialog(dlg)
If buttonchoice = -1 Then
    If dlg.CheckBox1 = 1 Then
        'Series of instructions to add fax number to list.
    End If
End If
The following example formats the selected text with the font selected in the Show Font List dialog box shown in the following illustration.
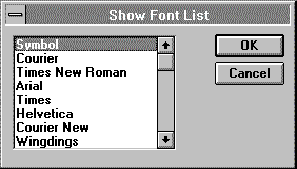
As in the previous example, the If instruction tests whether the user chose the OK button to dismiss the dialog box (rather than the Cancel button to indicate that the dialog box should not carry out an action). If the user chose the OK button, the instruction Font FontArray$(dlg.FontList) formats the selection with or prepares to insert text in the font the user selected in the dialog box. The FontArray$() array stores the names of the fonts displayed in the dialog box. The dlg.FontList setting in the dialog record contains the number of the font selected in the list box.
Begin Dialog UserDialog 362, 122, "Show Font List"
    ListBox 10, 9, 206, 100, FontArray$(), .FontList
    OKButton 265, 7, 88, 21
    CancelButton 265, 31, 88, 21
End Dialog
Dim dlg As UserDialog                    'Define the dialog record
buttonchoice = Dialog(dlg)                'Display the dialog box
If buttonchoice = - 1 Then
    Font FontArray$(dlg.FontList)        'Format selected text
End If