The Range object can represent a single cell, a range of cells, an entire row or column, a selection containing multiple areas, or a 3-D range. The Range object is somewhat unusual in that it can represent both a single cell and multiple cells. There is no separate collection object for the Range object; you can think of it as being both a single object and a collection. There are many different properties and methods that return a Range object, as shown in the following list.
For more information about these properties and methods, see the individual property and method topics in Help.
One of the most common ways to return a Range object is to use the Range method. The argument to the Range method is a string that's either an A1-style reference or the name of a range. The examples in the following table show several different ways to use the Range method.
|
To do this |
Use the following code | |
|
Set the value of cell A1 on Sheet1 |
Worksheets("Sheet1").Range("A1").Value = 3 | |
|
Set the formula for cell B1 on the active sheet |
Range("B1").Formula = "=5-10*RAND()" | |
|
Set the value of each cell in the range C1:E3 on the active sheet |
Range("C1:E3").Value = 6 | |
|
Clear the contents of the range A1:E3 on the active sheet |
Range("A1", "E3").ClearContents | |
|
Set the font for the range named "myRange" (a workbook-level name) to bold |
Range("myRange").Font.Bold = True | |
|
Set the value of each cell in the range named "yourRange" (a sheet-level name) to bold |
Range("Sheet1!yourRange").Value = 3 | |
|
Set an object variable to refer to a range |
Set objRange = Range("myRange") | |
Remember that expressions such as Range("C1:E3").Value = 6 assume that the Range method operates on the active sheet. If you try to run this code from the module that contains it, a run-time error occurs (error 1004, "Range method of Application class failed").
Another cause for errors can be using the Range method in an argument to another method, without fully qualifying the Worksheet object to which the Range method applies. For example, the following code, which is supposed to sort a range of cells on Sheet1, also causes run-time error 1004.
Sub SortRange()
Worksheets("Sheet1").Range("A1:B10").Sort _
    key1:=Range("A1"), order1:=xlDescending
End Sub
This error is more difficult to find, because the line that contains the Sort method is correct. The error is caused by the second line, which contains the key1 argument. This code will run correctly if Sheet1 is the active sheet, but it will fail when it's run from another worksheet or from a module. To correct the error, use the Worksheets method in the argument.
Sub SortRange()
    Worksheets("Sheet1").Range("A1:B10").Sort _
        key1:=Worksheets("Sheet1").Range("A1"), order1:=xlDescending
End Sub
The Cells method is similar to the Range method except that it takes numeric arguments instead of string arguments. When you use this method to return a single cell, the first argument is the row number of the cell, and the second argument is the column number of the cell. The examples in the following table show several different ways to use the Cells method.
|
To do this |
Use the following code |
|
Set the value of cell A1 on Sheet1 |
Worksheets("Sheet1").Cells(1, 1).Value = 3 |
|
Set the formula for cell B1 on the active sheet |
Cells(1, 2).Formula = "=5-10*RAND()" |
|
Set an object variable |
Set objRange = Worksheets("Sheet1").Cells(1, 1) |
The Cells method is very useful when you want to refer to cells using loop counters. For example, the following code loops through cells A1:D10 on Sheet1. If any of the cells has a value less than 0.01, the example replaces the value with 0 (zero).
Sub RoundToZero()
    For rwIndex = 1 to 4
        For colIndex = 1 to 10
            If Worksheets("Sheet1").Cells(rwIndex, colIndex) < .01 Then
                Worksheets("Sheet1").Cells(rwIndex, colIndex).Value = 0
            End If
        Next colIndex
    Next rwIndex
End Sub
The following example shows a quick and easy way to display items in a multicolumn list. The code creates a new worksheet and sets the object variable newSheet to refer to the worksheet. The code then creates a list of all the names in the active workbook and shows their formulas in A1-style notation.
Sub ListNames()
    Set newSheet = Worksheets.Add
    i = 1
    For Each nm In ActiveWorkbook.Names
        newSheet.Cells(i, 1).Value = nm.Name
        newSheet.Cells(i, 2).Value = "'" & nm.RefersTo
        i = i + 1
    Next nm
    newSheet.Columns("A:B").AutoFit
End Sub
In some situations, you may need to create a Range object based on a top row, a bottom row, a left column, and a right column, given as numbers. You can return Range objects by combining the Range and Cells methods in a single statement. The following code returns a Range object that refers to cells A1:D10 on Sheet1. The two Cells method calls define cells A1 and D10, and then the Range method call returns an object bounded by these two cells.
Set myObj = Worksheets("Sheet1").Range(Cells(1, 1), Cells(10, 4))
The following code uses a Range object that refers to the range bounded by row 1 and column 1 at the upper left and by row 10 and column 6 at the lower right. The range bounds are variables in this example (rwMin, rwMax, and so on).
Sub DemoCells()
    rwMin = 1   ' the top row
    rwMax = 10  ' the bottom row
    colMin = 1  ' the left column
    colMax = 6  ' the right column
    Set TLCell = Worksheets("Sheet1").Cells(rwMin, colMin)
    Set BRCell = Worksheets("Sheet1").Cells(rwMax, colMax)
    Set myRange = Worksheets("Sheet1").Range(TLCell, BRCell)
    myRange.Value = "abc"
End Sub
You often need to return a range of cells that's a certain number of rows or columns from another range of cells. The Offset method takes an input Range object, a RowOffset argument, and a ColumnOffset argument to return a new range. For example, the following code determines the type of data in each cell of a range. The code writes the data types in the column to the right of the input cells.
Sub ScanColumn()
    For Each c In Worksheets("Sheet1").Range("A1:A10").Cells
        If Application.IsText(c.Value) Then
            c.Offset(0, 1).Formula = "Text"
        ElseIf Application.IsNumber(c.Value) Then
            c.Offset(0, 1).Formula = "Number"
        ElseIf Application.IsLogical(c.Value) Then
            c.Offset(0, 1).Formula = "Boolean"
        ElseIf Application.IsError(c.Value) Then
            c.Offset(0, 1).Formula = "Error"
        ElseIf c.Value = "" Then
            c.Offset(0, 1).Formula = "(blank cell)"
        End If
    Next c
End Sub
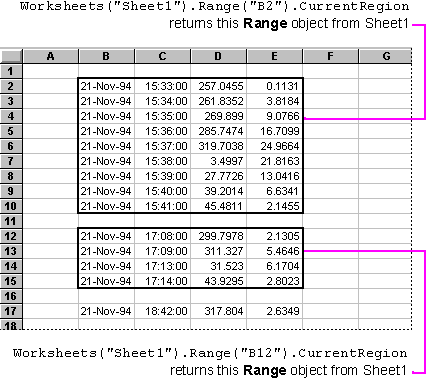
These two properties are very useful when your code operates on ranges whose size you have no control over. The current region is a range of cells bounded by empty rows and empty columns, or by a combination of empty rows, empty columns, and the edges of the worksheet.
The CurrentRegion property applies to a Range object. There can be many different current regions on a worksheet, depending on the Range object to which you apply the CurrentRegion property.
Suppose that Sheet1 contains a list to which you want to apply a number format. The only thing you know about the list is that it begins at cell A1 you don't know how many rows or columns it contains. The following code shows how to format the list using the CurrentRegion property.
Sub FormatRange()
    Set myRange = Worksheets("Sheet1").Range("A1").CurrentRegion
    myRange.NumberFormat = "0.0"
End Sub
The used range is bounded by the upper-left and lower-right nonempty cells on a worksheet. It's a range that contains every nonempty cell on the worksheet, as well as all the empty cells that are interspersed among them. There can be only one used range on a worksheet; the UsedRange property applies to a Worksheet object, not to a Range object.
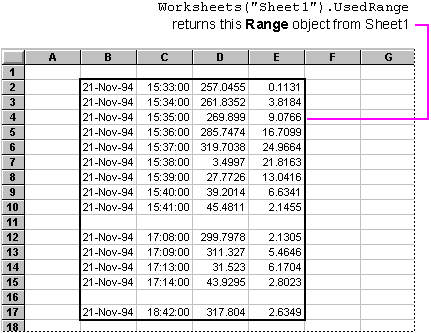
Suppose that the active worksheet contains data from a timed experiment. The used range contains the dates in the first column, the times in the second column, and the measurements in the third and fourth columns. You want to write code that combines each separate date and time into a single value, converts that value from Greenwich Mean Time (GMT) to Pacific Standard Time, and then applies a date format. The raw data appears as in the following example.
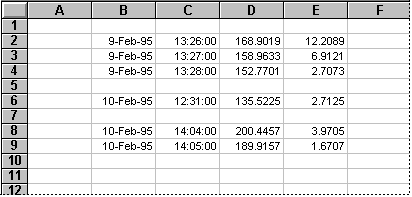
Notice that the table can contain empty rows and columns. You can use the UsedRange property to return the entire used range, including the two embedded blank rows. The following code shows one way to convert and format the dates and times.
Sub ConvertDates()
    Set myRange = ActiveSheet.UsedRange
    myRange.Columns("C").Insert
    Set dateCol = myRange.Columns("C")
    For Each c In dateCol.Cells
        If c.Offset(0, -1).Value <> "" Then
            c.FormulaR1C1 = "=RC[-2]+RC[-1]-(8/24)"
        End If
    Next c
    dateCol.NumberFormat = "mmm-dd-yyyy hh:mm"
    dateCol.Copy
    dateCol.PasteSpecial Paste:=xlValues
    myRange.Columns("A:B").Delete
    dateCol.AutoFit
End Sub
The formatted worksheet appears as in the following example.
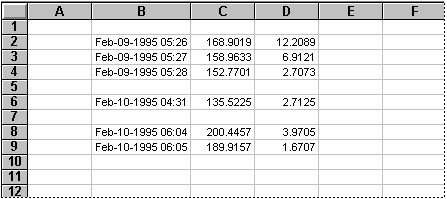
Notice that the code uses the expression ActiveSheet.UsedRange.Columns("C") to return the third column from the used range (although this is the third column in the used range, it appears in column D on the worksheet because column A is empty). You can use other Range object properties and methods in a similar way to build complex expressions that return sub-ranges or super-ranges of an input Range object. Some properties and methods commonly used in this way are Areas, Cells, Columns, EntireColumn, EntireRow, Range, and Rows.
There are several different ways to loop on the cells in a range. This section shows examples of the For Each...Next statement and the Do...Loop statement applied to looping on a range of cells.
The recommended way to loop on the cells in a range is to use the For Each...Next loop, which is also the recommended way to loop on the elements in a collection.
The following example shows how to loop through the range A1:D10 on Sheet1, setting any number whose absolute value is less than 0.01 to 0 (zero).
Sub RoundToZero()
    For Each r In Worksheets("Sheet1").Range("A1:D10").Cells
        If Abs(r.Value) < 0.01 Then
            r.Value = 0
        End If
    Next r
End Sub
Suppose that you want to modify this code to loop over a range of cells that a user selects. One way of doing this is to use the InputBox method to prompt the user to select a range of cells. The InputBox method returns a Range object that represents the selection. By using the type argument and error handling, you can ensure that the user selects a valid range of cells before the input box is dismissed.
Sub RoundToZero()
    Worksheets("Sheet1").Activate
    On Error GoTo PressedCancel
    Set r = Application.InputBox( _
            prompt:="Select a range of cells", _
            Type:=8)
    On Error GoTo 0
    For Each c In r.Cells
        If Abs(c.Value) < 0.01 Then
            c.Value = 0
        End If
    Next c
    Exit Sub

PressedCancel:
    Resume
End Sub
If you don't want the user to select the range, you may be able to use the CurrentRegion property or the UsedRange property to return a Range object. For example, if you know that the data on Sheet1 begins at cell A1 and has no empty rows or columns, you can use the CurrentRegion property to return the entire range automatically.
Sub RoundToZero()
    Set r = Worksheets("Sheet1").Range("A1").CurrentRegion
    For Each c In r.Cells
        If Abs(c.Value) < 0.01 Then
            c.Value = 0
        End If
    Next c
End Sub
The following two examples show two different ways to hide every other column in the used range on Sheet1. The first example shows a For Each...Next loop in which the Column property of the object variable is tested.
Sub HideColumns()
    Set r = Worksheets("Sheet1").UsedRange
    For Each col In r.Columns
        If col.Column Mod 2 = 0 Then
            col.Hidden = True
        End If
    Next col
End Sub
The second example shows a For Each...Next loop using a loop counter in which the loop counter is tested.
Sub HideColumns()
    Set r = Worksheets("Sheet1").UsedRange
    For i = 1 To r.Columns.Count
        If i Mod 2 = 0 Then
            r.Columns(i).Hidden = True
        End If
    Next i
End Sub
Occasionally, the For Each...Next loop isn't the best way to loop on a range. Suppose that you have a column of data and you want to write a macro that sorts the data and then deletes rows that contain duplicate data. You could try to use a For Each...Next loop, as shown in the following code.
Sub BuggyRemoveDuplicates()    ' DON'T USE THIS CODE!
    Worksheets("Sheet1").Range("A1").Sort _
        key1:=Worksheets("Sheet1").Range("A1")
    Set r = Worksheets("Sheet1").Range("A1").CurrentRegion.Columns("A")
    For Each c In r.Cells
        If c.Offset(1, 0).Value = c.Value Then
            c.Offset(1, 0).EntireRow.Delete
        End If
    Next c
End Sub
Unfortunately, this code doesn't work correctly because the Delete method is modifying the range over which the For Each...Next loop is iterating. This causes duplicates not to be deleted in some cases.
A better solution is to use a Do...Loop structure, as shown in the following code.
Sub GoodRemoveDuplicates()
    Worksheets("Sheet1").Range("A1").Sort _
            key1:=Worksheets("Sheet1").Range("A1")
    Set currentCell = Worksheets("Sheet1").Range("A1")
    Do While Not IsEmpty(currentCell)
        Set nextCell = currentCell.Offset(1, 0)
        If nextCell.Value = currentCell.Value Then
            currentCell.EntireRow.Delete
        End If
        Set currentCell = nextCell
    Loop
End Sub
The loop tests the object variable currentCell, exiting when it encounters an empty cell at the bottom of the column of data. You could build an equivalent loop by testing the value in currentCell against an empty string, as shown in the following code.
    Do While currentCell.Value <> ""
        ' code here
    Loop
In either case, don't forget to increment the cell (Set currentCell = nextCell, for example) at the bottom of the Do...Loop structure.
You can apply the Address property to any Range object. The Address property returns the cell address of a range, as a string. The following example shows how to use the Address property to debug the HideColumns code.
Sub HideColumns()
    Set r = Worksheets("Sheet1").UsedRange
    MsgBox r.Address  ' debugging only!
    For i = 1 To r.Columns.Count
        If i Mod 2 = 0 Then
            r.Columns(i).Hidden = True
            MsgBox r.Columns(i).Address  ' debugging only!
        End If
    Next i
End Sub
You can also set watch expressions instead of using message boxes. For the preceding example, you could set two watch expressions r.Address and r.Columns(i).Address and then examine the values of the watch expressions in the Immediate pane of the Debug window. For more information about debugging, see Chapter 6, "Debugging."