
You can use pop-up forms and dialog boxes in your application to:
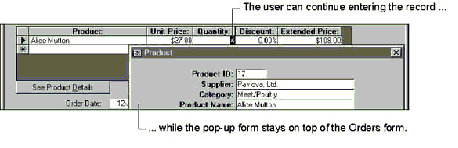
A pop-up form stays on top of other open forms, even when another form is active. For example, the property sheet in form Design view is a pop-up form. Another example of a pop-up form is the ProductsPopup form in the Orders sample application, which is discussed earlier in this chapter.
The ProductsPopup form is modeless, which means you can access other objects and menu commands in Microsoft Access while the form is open and make them active. In contrast, a modal pop-up form prevents you from accessing other Microsoft Access objects or menu commands until you close or hide the form. Use a modeless pop-up form when you want the user to be able to shift the focus between the pop-up form and other elements of the user interface without having to close the pop-up form. For example, use a modeless pop-up form if you want to be able to view information on the pop-up form while accessing menu commands and toolbar buttons.
A familiar example of a modal pop-up form is a dialog box. For example, the PrintInvoiceDialog form is a dialog box in the Orders sample application that prompts the user to specify an order invoice to print.
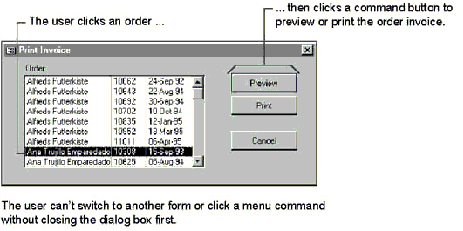
Use a dialog box (a modal pop-up form) when you want the user to close the dialog box or respond to its message before proceeding, such as when you collect information your application needs to complete an operation.
Û To create a modeless pop-up form
Û To create a modal pop-up form (such as a dialog box)
Note You use the BorderStyle property to set the style of the border for a pop-up form or dialog box. To display a dialog box with a typical thick border that has no Minimize and Maximize buttons, set the BorderStyle property to Dialog. For more information on the different border styles you can use, search the Help index for “BorderStyle property.” For information on the interaction between the BorderStyle, MinMaxButtons, and ControlBox properties when creating pop-up forms and dialog boxes, search the Help index for “pop-up forms.”
You can also open any form as a dialog box by setting the windowmode argument of the OpenForm method to acDialog (or in a macro, by setting the Window Mode argument of the OpenForm action to Dialog). The following line of code opens a dialog box named FilterDialog:
DoCmd.OpenForm "FilterDialog", windowmode:=acDialog
When you use this technique, Microsoft Access suspends execution of the code or macro until the dialog box form is hidden or closed.
See Also For more information on the windowmode argument of the OpenForm method or action, search the Help index for “OpenForm method” or “OpenForm action.”

Tip If you simply want to display a short message to the user or prompt the user for short text input, the easiest approach is to use a message box or input box instead of a pop-up form. For more information on displaying a message in a message box, see “Using a Message Box to Display a Message” later in this chapter. For more information on displaying an input box to prompt the user for text input, search the Help index for “InputBox function.”
The Orders form in the Orders sample application includes a command button named Details that opens a form showing details about the current product in the subform.
See Also For information on creating the Details command button, see the example “Customizing a Command Button That Opens a Form” earlier in this chapter.
Because you want users to be able to continue filling out an order while answering customers’ questions about the product, you need the form opened by the Details button to stay on top of the Orders form.
Step One: Create the pop-up form Use the Form Wizard to create the pop-up form, specifying the product, supplier, and category information you want to display. Name the form ProductsPopup.
Step Two: Set the form’s properties Open the form in Design view and set properties to make the form look and work like a dialog box. The following table shows the property settings for the form.
| Property | Setting | Comment |
| AllowDeletions | No | Prevents users from deleting records. |
| AllowAdditions | No | Prevents users from adding new records. |
| RecordsetType | Snapshot | Prevents users from modifying product information on the form. |
| ScrollBars | Neither | Because the form always shows one entire record, scroll bars aren’t needed. |
| RecordSelectors | No | Not needed. |
| NavigationButtons | No | Not needed. |
| AutoCenter | Yes | Centers the dialog box on the screen. |
| PopUp | Yes | Keeps the form on top. |
| Modal | No | Allows users to work with other objects while the form is open. |
| BorderStyle | Dialog | Displays the form as a dialog box. |
| MinMaxButtons | None | Not needed. |
| ShortcutMenu | No | Because users can’t edit data on this form, a shortcut menu isn’t needed. |
Note Menu commands the user chooses when a pop-up form is open don’t apply to the pop-up form. For example, when the ProductsPopup form is open on top of the Orders form, menu commands can perform operations on the Orders form and its data, but they don’t affect the ProductsPopup form. A pop-up form can’t have a custom menu bar associated with it.
You use a dialog box in your application to display important messages or to collect information your application needs to complete an operation. Typically, the user responds to a dialog box by providing information and then closing the dialog box by clicking a command button labeled OK or Cancel. For dialog boxes that give the user more than one choice, you can use command buttons with captions that indicate what action each button takes.
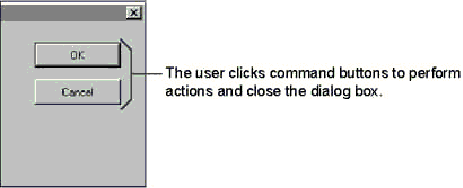
You can make your dialog box easier to use with the keyboard by specifying default and cancel buttons:

Tip When a user clicks a command button in a dialog box, you often want to hide the dialog box without closing it. That way, you can use the values entered in the dialog box to complete the actions the command button performs. To hide a dialog box, set the form’s Visible property to False. After your macro or event procedure has completed the actions that use the information from the dialog box, you can use the Close method or action to close the dialog box.
Northwind sales representatives frequently print an invoice for an order immediately after taking the order. You can create a dialog box to make it easier for the sales representatives to print the invoice.
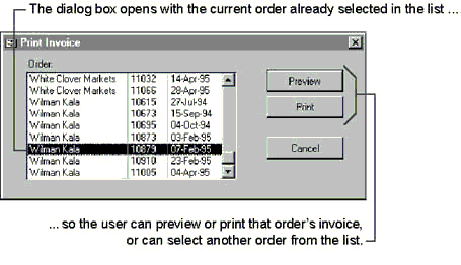
Users open the dialog box using a button on a custom toolbar attached to the Orders form.
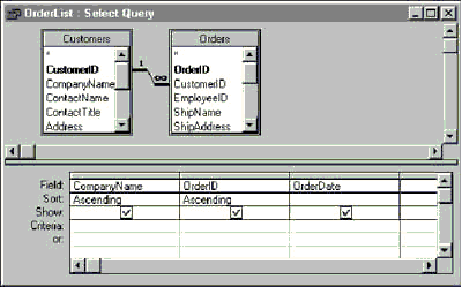
Step One: Create the query for the list box If the list box will display values from more than one table, you must first create a query that displays the appropriate rows. Create a query called OrderList that includes three fields from the Customers and Orders tables, as shown in the following illustration.
Step Two: Create the dialog box and the list box Create a blank form and add an unbound list box to it using the List Box Wizard. Specify the OrderList query as the row source for the list box, and include all three fields as columns in the list box. Select OrderID as the list box’s bound column. Adjust the column widths so the data in all three columns is visible at the same time. The List Box Wizard creates the list box and sets its properties. The following table shows some of the properties for the list box in the Orders sample application.
| Property | Setting |
| RowSourceType | Table/Query |
| RowSource | OrderList |
| ColumnCount | 3 |
| ColumnWidths | 1.25 in;0.5 in;0.5 in. (3.18 cm;1.27 cm;1.27 cm) |
| BoundColumn | 2 |
| Width | 2.6 in. (6.6 cm) |
Step Three: Create buttons for the dialog box Add three command buttons to the form using the Command Button Wizard: a Preview button, a Print button, and a Cancel button. For the first button, tell the wizard that you want it to preview the Invoice report. Tell the wizard to display the text “Preview”—instead of a picture—on the button. Follow the same steps to create a Print button that prints the report and a Cancel button that closes the form.
Step Four: Modify the event procedures that the wizard creates When the user chooses to preview or print the report, you want to hide the dialog box before opening the report. Additionally, you want the report to print only the record the user selects in the dialog box.
Open the event procedures for the Preview and Print buttons. In the procedures, hide the dialog box by setting its Visible property to False. To filter records in the report so only the selected record is included, pass the criteria identifying the record in the wherecondition argument of the OpenReport method.
See Also For more information on filtering records, see “Filtering and Sorting Data in Forms and Reports” later in this chapter.
The event procedure for the Preview command button with the new lines of code is:
Private Sub Preview_Click()
	On Error GoTo Err_Print_Click

	Dim strDocName As String
	Dim strLinkCriteria As String

	Me.Visible = False
	strDocName = "Invoice"
	strLinkCriteria = "OrderID = " & OrderID
	DoCmd.OpenReport strDocName, acViewPreview, , strLinkCriteria
		.
		.
		.
End Sub
The event procedure for the Print command button is identical, except that it passes the acViewNormal constant (instead of acViewPreview) to the OpenReport method.
Note If you prefer, you can use macros instead of event procedures to make the dialog box work. In the macros for the Preview and Print buttons, use the SetValue action to set the dialog box’s Visible property to No, and use the OpenReport action to preview or print the report, setting the Where Condition argument as follows:
OrderID = Forms!PrintInvoiceDialog!OrderID
In the macro for the Cancel button, use the Close action to close the dialog box. In the macro for the list box’s DblClick event, use the RunMacro action to run the Preview button’s macro.
Step Five: Set properties to make the form behave like a dialog box Set the form’s PopUp and Modal properties to Yes, and then save the form with the name PrintInvoiceDialog.
The following table shows some of the property settings for the form.
| Property | Setting | Comment |
| ScrollBars | Neither | Not needed. |
| RecordSelectors | No | Not needed. |
| NavigationButtons | No | Not needed. |
| AutoCenter | Yes | Centers the dialog box on the screen. |
| PopUp | Yes | Keeps the form on top. |
| Modal | Yes | Prevents users from working with other objects while the dialog box is visible. |
| BorderStyle | Dialog | Displays the form with thick borders that can’t be resized and with no Minimize or Maximize buttons. (This is the standard border style for a dialog box.) |
| MinMaxButtons | None | Not needed. |
| ShortcutMenu | No | Not needed. |
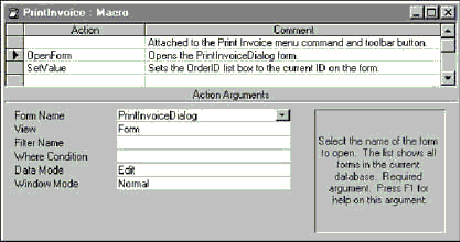
Step Six: Create the macro that opens the dialog box Create a macro to open the dialog box. Add two actions to it: an OpenForm action that opens the PrintInvoiceDialog form, and a SetValue action that sets the OrderID list box on the form to the ID number of the current order on the Orders form. Save the macro with the settings as shown in the following illustration, and name it PrintInvoice.
The arguments for the SetValue action are:
| Argument | Setting |
| Item | [Forms]![PrintInvoiceDialog]![OrderID] |
| Expression | [Forms]![Orders]![OrderID] |
Step Seven: Add a toolbar button to run the macro Create a custom toolbar for the Orders form, and add a button that runs the PrintInvoice macro.
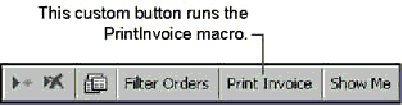
When a user clicks the button, the macro opens the dialog box. If you want, you can also include the Print Invoice command on a custom menu bar for the form. To see an example of a custom menu bar, use the Customize dialog box (View menu, Toolbars submenu) to view the OrdersMenuBar toolbar in the Orders sample application.
See Also For more information on creating custom menus and toolbars, see Chapter 1, “Creating an Application.”

Tip To make the dialog box even easier to use, you can write an event procedure that lets users double-click an order in the list box to choose the order and the Preview button at the same time. To do this, write an event procedure for the list box’s DblClick event that calls the Preview command button’s Click event procedure, as follows:
Private Sub OrderID_DblClick(Cancel As Integer)
	Preview_Click
End Sub
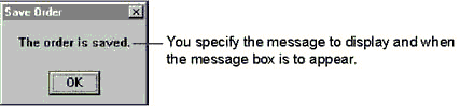
When you want to display a brief message such as an error, warning, or alert, you can use a predefined dialog box called a message box. You specify the message to display and when the message box is to appear. The following illustration shows a typical message box.
Note When a user has the Office Assistant displayed, message box information displays in a speech balloon associated with the Assistant. If the Office Assistant is hidden or wasn’t installed, a message box displays as a dialog box, as shown in the preceding illustration.
You can use an action or a function to display a message box. The following table describes each method.
| Use this | To |
| MsgBox action | Display a message in a message box using a macro. |
| MsgBox function | Display a message in a message box using Visual Basic. It can return a value to Visual Basic indicating which command button a user has clicked. |
To display the message box in the previous illustration using a macro, you add a MsgBox action to the macro and set the arguments as shown in the following table.
| Argument | Setting |
| Message | The order is saved. |
| Beep | Yes |
| Type | None |
| Title | Save Order |
To display the same message with Visual Basic, use the following code:
MsgBox "The order is saved.", , "Save Order"
See Also For more information on the MsgBox action or function, search the Help index for “MsgBox action” or “MsgBox function.”
You can display your message on two or more lines in a message box and specify where you want a new line to start. To do this when you’re using the MsgBox function in Visual Basic code, use the vbCrLf constant where you want the new line to start. The vbCrLf constant is equivalent to the concatenation of the special characters for a carriage return and line feed, Chr(13) and Chr(10).
For example, to use the MsgBox function to display “New Product:” on one line and “Enter a 5-digit Product ID” on the next line, you use the following code:
MsgBox "New Product:" & vbCrLf & "Enter a 5-digit Product ID"However, when you’re using the MsgBox action in a macro, you must concatenate the special characters for carriage return and line feed into the message expression. For example, to produce the same result, you enter the following expression in the Message argument of a MsgBox action:
= "New Product: " & Chr(13) & Chr(10) & "Enter a 5-digit Product ID"