Mike Gunderloy and Mary Chipman
Mike Gunderloy is a partner at Pyramid Computers, a Microsoft Solution Provider based in Brooklyn, New York. He is a Microsoft Certified Solution Developer, Microsoft Certified Systems Engineer, and Microsoft Certified Trainer, and is currently working on books on client/server Access and the Microsoft object models. 718-789-4946, CompuServe 72271,275.
Mary Chipman, a senior consultant at Pyramid Computers, is a Microsoft Certified Professional and Microsoft Certified Trainer, and has done extensive work in Access security and corporate applications. She is currently working on books on client/server Access and the Microsoft object models. Fax 212-687-3428, CompuServe 71760,2432.
This article originally appeared in the February 1996 issue of Smart Access, published by Pinnacle Publishing Inc., PO Box 888, Kent, WA 98035-0888; 800-788-1900; 206-251-1900; http://www.pinpub.com.
By using OLE Custom Controls, you can take advantage of the new Windows 95 look in your Access 95 applications. Mike Gunderloy and Mary Chipman demonstrate how you can use three of these controls to create a Windows 95 Explorer-like interface for use in browsing a hierarchy of tables.
Back in 1994 when the Access Developers Toolkit 2.0 (ADT) hit the market, it was the first Microsoft product to support OLE Custom Controls, with the inclusion of the Calendar control, the Scrollbar control, and the Data Outline control. Since then we've all heard much marketing hype about how OLE Custom Controls (usually referred to as OCXs) are the architecture of the future, eventually replacing VBXs (Visual Basic custom controls) and extending across Microsoft's entire desktop product line. The original goal was for OCXs to work equally well in any product and support both 16-bit and 32-bit architectures. Well, the future isn't quite here yet. There are still many Microsoft products that don't support OCXs (most notably Microsoft Word 95), but the Access 95 ADT is chock full of OCXs and a Calendar control is shipped with Access 95 itself. In this article, we'll discuss the Tree View, the Image List, and the ListView controls, and we'll show you how to use them to present a hierarchical view of your data in a familiar Windows 95 interface. Learning to use custom controls is one of the best things you can do to leverage your understanding of Access and increase your skills across multiple products. Once you understand their use in Access, you can build these same controls into applications developed with Excel 95 or Visual Basic 4.0.
The new 32-bit OLE Custom Control architecture is more powerful and flexible than the old VBX architecture, and you can expect to see the third-party market in OCXs expand rapidly both for Visual Basic and Access. Many vendors have already announced OCX versions of their VBX controls. The MSBASIC forum on CompuServe is a good source of information on new custom controls.
The easiest way to think of custom controls is as extensions to the familiar set of Access form and report controls (text boxes, combo boxes, and so on). A custom control is a self-contained program that can take over a part of an Access form and intercept actions that happen there. In addition, it can tie its own methods, properties, and events directly to Access through the VBA (Visual Basic for Applications) programming language.
If you used OCXs in Access 2.0 then you're probably already familiar with their general use. Nothing much has changed; each OCX still supports its own set of methods and properties, which you can explore by clicking the right mouse button and selecting the object's properties (third item down on the drop-down list). To obtain more information about specific methods and properties for the custom controls that ship with the ADT for Access 95, see MSADTCTL.HLP (located in your Windows directory), which covers all of the controls.
For developers, using OCXs provides a lot of functionality and code that you don't have to write or debug. Often you only have to add one line of code for an event. Most of the heavy duty programming work was done behind the scenes by the C programmer who wrote the OCX. All you have to do is figure out the entry points and how to use them.
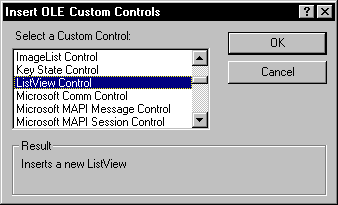
Inserting a custom control is easier than ever since it has been moved directly onto the Insert menu and you have only to choose Custom Control from the Insert menu and choose the custom control of your choice from the list. Figure 1 shows the process of inserting a new custom control on an Access form. As we mentioned earlier, the Calendar control will be your only choice unless you've installed the ADT, Visual Basic 4.0, or another source of additional controls.
Figure 1. Inserting a custom control.
For the most part, the custom controls shipped with the ADT for Access 95 are a subset of those shipped with Visual Basic 4.0. The ADT includes a new version of the Data Outline control, the common dialog control, and the spinner control, as well as all the standard Windows 95 interface controls:
Access 95 can use some of the custom controls that ship with Visual Basic 4.0. Access supports simple data-bound controls (those that bind to a single field like the Calendar control), but it doesn't support advanced data bound VB controls (those that link directly to a row of data via the Data Control). In addition, some supported controls may look different in design view than they do in VB, due to limitations in Access's support for OCXs in design view. Access also doesn't support control nesting, a feature in Visual Basic 4.0 that allows you to place one custom control inside of another. If you're faced with an unfamiliar custom control, you'll have to test it to see how well (or whether) it works in Access.
The application on the Companion Disk is intended to show how you can use multiple OCXs together to provide a drill-down view of the data in your database. The OCXs and all code are found in the form frmExplore. The sample database has a relatively simple schema: Customers can have one or more orders, and orders can have one or more order detail lines. This sort of hierarchical schema is common in many applications, and is ideally suited for an Explorer view. We could have used the Data Outline Control (DOC) from the ADT to present this same information. However, for this particular application the DOC is overkill. It's designed for extremely deep hierarchies with complex relations between the levels and forms associated with each level. The controls we used here provide a much simpler toolkit for the limited problem at hand.
When you open the Data Explorer form, you see the Customers icon, which represents the top of the hierarchy. Double-clicking on Customers causes the outline to expand, showing individual customers. If you click on a customer, the view expands further, showing orders for these customers. On the right side of the form, you see the address for the customer. In Access, this information is stored in the Customers table, but your user might think of it as a "property" of the customer. Thus this interface parallels that in the Windows 95 Explorer, allowing you to see both the structure of your data and its detail at the same time. If you now double-click on any of the orders, you see parts and dates. Clicking on a part shows quantity and price. Figure 2 shows an expanded view of the Data Explorer after drilling down a few levels.
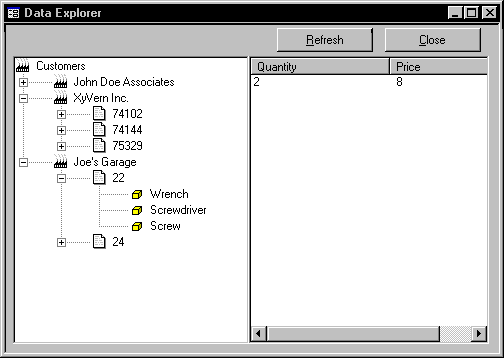
Figure 2. The Data Explorer in action.
This entire application required less than 150 lines of VBA programming. Most of the difficult work—for example, displaying the icons for each type of entity—is wrapped up in the three custom controls. The left hand side of frmExplore is a TreeView control. The right hand side is a ListView control. There's also an ImageList control, which is invisible at runtime but that serves up icons to other controls. The three controls used to present this unified view of the database are outlined next.
The ImageList control is actually a collection of ListImage objects, and isn't intended to be used on its own. Each ListImage object stored in the control is referred to by its index and is used by other OCXs on a form as a sort of image-supply warehouse. Figure 3 shows an ImageList control loaded with some images.
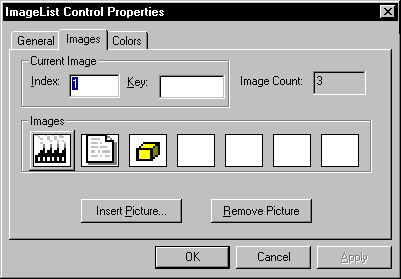
Figure 3. The ImageList control at design time.
To insert an image in the control, choose the Images tab on the properties dialog, which will present you with various options for inserting images in the control. Unlike DAO, the numbers of the indexes in OCXs start at 1 instead of 0, so the first picture inserted will be referred to in code as "ocxListImage.ListImages(1).Picture." Other controls may have methods that refer directly to the ImageList control. For example, when you add a new Node to a TreeView control, you can specify directly the index number to use from the associated ImageList.
When setting up an ImageList, you also need to pay attention to the MaskColor. The MaskColor property (located on the Colors property tab for the control) specifies a pixel color to turn transparent when moving the image to the screen. This is black by default, and if you leave your ImageList at the defaults, all of the black pixels in your images will vanish since they are being "masked out" when the bitmaps are drawn on the screen. With most applications you'll want to change this to white—unless you're overlaying the images on a control with a different back color.
Use the TreeView control to display information in a hierarchical tree view format, for instance, displaying index entries, files, and directories on a disk or headings in a document. The TreeView control itself consists of a label and an optional bitmap. We use it here to display the information in our database and assign bitmaps to it from the ImageList control. You can program the TreeView control to expand and collapse the objects in the tree to display or hide all child nodes through its three main events: Collapse, Expand, and NodeClick. The default behavior of expanding and contracting in response to mouse clicks requires no programming at all; it's built into the control.
The TreeView control has quite a few properties that allow you flexible control of its operation., Refer to the online help for the complete list, but here are a few of the more important properties:
· ImageList Property—The ImageList property is used to associate an ImageList with the control at runtime by setting the control's ImageList property to the ImageList control you want to use, as shown here:
Set objTree.ImageList = objImage
· LineStyle Property—The LineStyle property is used to return or set the style of lines used when connecting Node objects using one of two constants. Use the tvwTreeLines constant (the default) to display lines connecting Node siblings to their parent Node. Use tvwRootLines to display lines connecting Node siblings to their parent and between the root nodes. None of this applies unless you also set the Style property to something that includes tree lines. To set the LineStyle to display root lines, you could use this code:
objTree.LineStyle = tvwRootLines
· Nodes Property—The Nodes property is a collection of Node objects, each Node being a line that can be displayed in the tree. This property supports the Add and Remove methods that are used to add or remove nodes. Each node can be referred to by its index or by a unique key, which you must supply and which is stored in the Key property. The following example adds two nodes to an empty tree. By default, the first node will be added at the top of the tree. "R" is the user-supplied key, while "Root" is the text of the Node when it's shown on screen. The second Node is added as a child of the Node whose key is "R", given the key of "C1" and the text of "Child 1".
 Dim nodX As Node
Set nodX = objTree.Nodes.Add(,,"R","Root")
Set nodX = objTree.Nodes.Add("R", _
 tvwChild,"C1","Child 1")
· SelectedItem Property—The SelectedItem property applies to the ListView, TabStrip, and TreeView controls and returns a reference to the currently selected ListItem, Node, or Tab object. It can be used to manipulate the selected object, as seen in the following example, which deletes the selected object from the tree if it isn't in the root:
 If objTree.SelectedItem.Index <> 1 Then
  objTree.Nodes.Remove objTree.SelectedItem.Index
End If
· Style property—The Style property controls the overall "look" of the TreeView. It has settings to include or suppress all of the visual elements, as shown in Table 1.
Table 1. Settings for the TreeView Style property
| Setting | Description |
| 0 | Text only |
| 1 | Image and text |
| 2 | Plus/minus and text |
| 3 | Plus/minus, image, and text |
| 4 | Lines and text |
| 5 | Lines, image, and text |
| 6 | Lines, plus/minus, and text |
| 7 | (Default) Lines, plus/minus, image, and text |
On our example form, Style is set to 7. We've made this setting directly in the property sheet instead of via code. Figure 4 shows some of the TreeView properties you can set directly by right-clicking on the object and selecting TreeView Control Object, Properties.
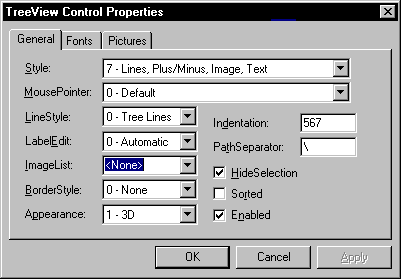
Figure 4. Property Sheet for the TreeView control.
You can navigate through a tree in code by retrieving a reference to Node objects using the Root, Parent, Child, FirstSibling, Next, Previous, and LastSibling properties.
In our sample database, we use the StockTree subprocedure to populate our objects. This procedure uses standard Access recordsets to retrieve information from database tables, and then uses the Add method to add a node for each record found. As each customer is added, we add all of their orders, and then all of their order details. By walking the hierarchy in this manner, we are always adding children to Nodes we have just created, which makes it easy to temporarily store the index we need in each case:
 Set rstCustomer = dbCurrent.OpenRecordset( _
 "SELECT * FROM Customers")
If Not rstCustomer.EOF Then
  Do Until rstCustomer.EOF
    Set objNode = objTree.Nodes.Add(intParentKey, _
     tvwChild, "C" & rstCustomer!CustomerID, _
     rstCustomer!CompanyName, 1)
    intCustomerKey = objNode.Index
    Set rstOrder = dbCurrent.OpenRecordset _
     ("SELECT * FROM Orders WHERE CustomerID=" _
     & rstCustomer!CustomerID)
    If Not rstOrder.EOF Then
      Do Until rstOrder.EOF
        Set objNode = objTree. Nodes. _
         Add(intCustomerKey, tvwChild, _
         "O" & rstOrder!OrderID, _
         rstOrder!PurchaseOrderNumber, 2)
        intOrderKey = objNode.Index
        Set rstOrderDetail = dbCurrent. _
         OpenRecordset("SELECT * FROM " _
         & "OrderDetails WHERE OrderID=" _
         & rstOrder!OrderID)
        If Not rstOrderDetail.EOF Then
          Do Until rstOrderDetail.EOF
            Set objNode = objTree. _
             Nodes.Add(intOrderKey, _
             tvwChild, "D" _
             & rstOrderDetail! _
             OrderDetailID, _
             rstOrderDetail!Product, 3)
            rstOrderDetail.MoveNext
          Loop
         End If
       rstOrder.MoveNext
       Loop
     End If
  rstCustomer.MoveNext
  Loop
End If
The ListView control displays its objects using one of four different views—Large Icons, Small Icons, List, or Report—just like the Windows 95 Explorer.
You can use the View property to determine how you want your items displayed in the list and manage details such as the labels wrapping to more than one line, sorting, and general appearance.
The ListItem object in the ListView control defines descriptions, icons, and subitems. The ColumnHeader object uses the HideColumnHeaders property to control whether column headings appear or don't appear in the ListView control.
When you dynamically set the list for each level of the tree, as we do in the example form, you need to clear it first. To do this, invoke the Clear method of the List control's ColumnHeaders collection. Clearing the Column Headers also clears all of the information that was displayed in those columns:
 Set objList = Me!objList.Object
objList.ColumnHeaders.Clear
The following sets the column header text to "City" and the width of the column to 1.25 inches. As with other measurements in Windows, custom controls generally use twips as their unit of measurement. One inch is the equivalent of 1,440 twips:
 Set objCol = objList.ColumnHeaders.Add()
objCol.Text = "City"
objCol.Width = 1.25 * 1440
After the columns are set, use the Add method to add data to the list. In our example, we retrieve information in response to the NodeClick event of the TreeView object. Whenever the user clicks on a node, the event procedure determines which type of node it is and then queries the database for information on that node:
 Set objItem = objList.ListItems.Add()
Set rst = dbCurrent.OpenRecordset("SELECT * " _
 & "FROM Customers WHERE CustomerID=" & lngKey)
objItem.Text = rst!City
objItem.SubItems(1) = rst!StateOrProvince
objItem.SubItems(2) = rst!PostalCode
objItem.SubItems(3) = rst!PhoneNumber
The first column in a ListView is special and can be written via the Text property of the appropriate ListItem object. The rest of the columns are all in the ListItem's SubItems collection.
There are many ways to extend this form. For example, you could allow the user to edit selected items from the ListView by double-clicking on them, or change the name of a customer directly in the TreeView control. This bit of code will retrieve the selected item from a TreeView:
 Dim objNode As Node
Dim objTree As TreeView

Set objTree = Me!objTree.Object
Set objNode = objTree.SelectedItem
strKey = objNode.Key
The SelectedItem property of a TreeView returns a reference to the Node that currently has the focus, and you can use this Node's Key property to return the unique Key you stored when the node was created. In our example, if you retrieved a key of "D75," you would know the user had selected the Order Detail record with an ID of 75.
For a large database, you might have to abandon the approach that frmExplore takes of completely stocking the tree when the form is first opened. Since the TreeView control generates events when it's clicked, you could tell when the user was attempting to expand a node and run a query to get the node's children at that time.
You might also wish to use the Form's OpenArgs property to pass in information on what to display. With some extra work, this could be turned into a general-purpose data-browsing form.
As you can see by examining the sample database provided here, using the new OCXs doesn't require a ton of code, but it can be a tricky business figuring out how to use them since the supporting documentation is rather sparse. We hope you're now on your way towards exploring what promises to be a rich new resource for the programmer.

To find out more about Smart Access and Pinnacle Publishing, visit their website at http://www.pinpub.com/access/.
Note: This is not a
Microsoft Corporation website.
Microsoft is not responsible for its content.
This article is reproduced from the February 1996 issue of Smart Access. Copyright 1995, by Pinnacle Publishing, Inc., unless otherwise noted. All rights are reserved. Smart Access is an independently produced publication of Pinnacle Publishing, Inc. No part of this article may be used or reproduced in any fashion (except in brief quotations used in critical articles and reviews) without prior consent of Pinnacle Publishing, Inc. To contact Pinnacle Publishing, Inc., please call (800)788-1900 or (206)251-1900.