The Mysteries of Remote Automation: When, Why, and How
by Ken Bergmann
In the last few months, I have noticed a phenomenon. And I don’t mean the World Wide Web. I am talking about the inundation of client/server developers with a lot of hype about three-tiered architectures and distributed processing.
At the heart of this blizzard of information is a new buzzword: Remote Automation. At developer conferences, on the Net, in press articles, the mantra is: "Remote Automation will help you. Use Remote Automation in your system and distribute the load. Remote Automation is your friend."
Take a break, folks. Remote Automation won’t work for every system; it will only help in a very small percentage of situations. The trick is understanding when it will help, and then milking it for everything it’s worth.
This article details the existing Remote Automation architecture and talks about the different issues involved in the construction or deployment of Remote Automation solutions. It assumes a solid knowledge of the Microsoft Visual Basic programming system and a firm understanding of the OLE Automation model and usage.
It covers three main topics. The first section is for developers who have used OLE servers before and who have some understanding of Remote Automation, but who need the details on how to turn their OLE server into a Remote Automation server.
The second section moves through an example of a Remote Automation server that allows clients to print Microsoft Access reports from a remote database. The sample in this section is designed to illustrate several key Remote Automation concepts.
The third section outlines some of the more abstract concepts involved in developing Remote Automation solutions. These concepts should be helpful for anyone who wants to understand the differences among the variety of Remote Automation architectures.
The details of Remote Automation
First, let’s run down some of the specifics about Remote Automation’s components.
The server:
RACMGR32.EXE (Remote Automation Connection Manager for 32-bit operating systems). This application sets up an OLE server to accept Remote Automation requests. It allows the user to specify which network protocol to use, which security contexts are allowed, and other information for the Automation Manager. Information maintained in this application is stored in the system registry.
RACMGR16.EXE (Remote Automation Connection Manager for 16-bit operating systems). This application serves the same purpose as RACMGR32.EXE, but it runs on 16-bit operating systems.
AUTMGR32.EXE (Automation Manager for 32-bit operating systems). This program uses the settings from the registry to proctor Remote Automation requests from the network through the automation proxy to the appropriate automation servers. This application must be running for a computer to accept Remote Automation requests.
AUTPRX32.DLL (Remote Automation proxy for 32-bit applications). Automation Manager uses this dynamic-link library (DLL) to act as a proxy with a local automation client. This proxy relays automation requests to the Automation Manager over the network and from the network to the local automation client.
AUTPRX16.DLL (Remote Automation proxy for 16-bit applications on 32-bit operating systems). This proxy performs the same function as AUTPRX32.DLL, but it services 16-bit applications.
AUTPRX.DLL (Remote Automation proxy for 16-bit applications on 16-bit operating systems). This proxy performs the same function as AUTPRX16.DLL, but it runs on 16-bit operating systems.
Figure 1 shows where the pieces go in your system:
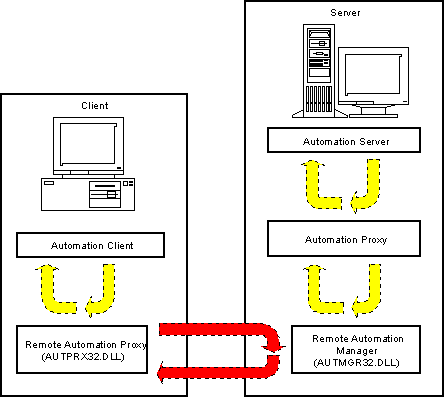
Figure 1: Where the pieces go in your system
Here are some more facts about what Remote Automation uses today:
A 32-bit operating system for a server platform: Windows NT or Windows 95.
A client machine running Windows 3.1 or later.
Visual Basic (16-bit) as a minimum development platform for the client executable.
Visual Basic (32-bit) Enterprise Edition as a minimum development environment for the server executable.
How to set up the Remote Automation components
As should be apparent from Figure 1, you need to have the Remote Automation proxy running on the client machine and the Remote Automation Manager running on the server machine.
Here are the steps to get an existing system with both sets of source code (client and server) up and running remotely. First, we’ll outline the steps to create a client installation package.
Creating the client installation package
Open the server’s project file in the Design Environment. On the Tools menu, click Options. Select the Project tab. Ensure that the OLE server is checked in the StartMode frame. Click OK.
On the File menu, click Make EXE. Press the Options button. Ensure that the Remote Server Support Files option is checked. Press OK. Press OK again to build the server executable.
If you already have an executable for the client, go to the next step; if not, build this executable now.
Open the Visual Basic 4.0 Setup Wizard. Enter the path and file name for the project file for the client source code. Choose any options you want here. Press the Next. If you chose to build a new executable, this happens now. Continue with the next step when the Setup Wizard is at Step Four.
If your client application uses any local automation servers, these should be listed in the list box. Press the Add OLE Servers.
You should be at a File Navigation dialog box. Change the Files of Type combo box to display Remote OLE Servers (*.VBR). You will find a .VBR file in the same directory as the server executable. Choose this file and press OK.
You should now be at a Remote OLE Server Details dialog box. Enter the name of the server machine in the Network Address text box. Choose your primary network protocol from the Network Protocol combo box. Choose the authentication level you desire from the Authentication combo box. Press OK.
Continue through the Setup Wizard until you reach Step Six. Choose Install in Application Directory in the Deployment Model group box. Ensure that the check box for Remote Automation support files is cleared. Press the Next button.
Complete your work with the Setup Wizard. When done, you will have a complete client installation package. Run the SETUP.EXE that was created to install the client software on a client machine.
Creating the server installation package
To create an installation package for the server executable:
Open the Visual Basic 4.0 Setup Wizard. Enter the path and file name for the project file for the server source code. Choose any options you want here. Press the Next button. If you chose to build a new executable, this happens now. Continue with the next step when the Setup Wizard is at Step Six.
When the Setup Wizard is at Step Six, choose Install as an OLE Automation shared component in the Deployment Model group box. Ensure that the check box for Remote Automation support files is checked. Press the Next button.
Complete your work with the Setup Wizard. When done, you will have a complete server installation package. Run the SETUP.EXE that was created to install the server software on a server machine.
At this point, you should have installation packages for your client and your server. Install the software on the respective machines. The server installation should create a Remote Automation Management Folder or Group. The two icons created in this folder or group can be used to set up and administer all of the Remote Automation services for the server machine.
Run the Automation Manager application. This is the component to which the clients will connect. It will pass client requests to local OLE servers. Now go to a client machine and install the client software. During the installation, the information about the remote server is inserted into the registry of the client machine.
Peripheral issues
These are the basics, but there are some other issues involved. If you want the user at a client machine to control the server name or network transport that is used to connect to the server machine, you will also need to install RACMGR32.EXE on the client. Setup Wizard currently doesn’t do this. For an unattended system, there must be a facility to ensure that the Automation Manager is started when the system reboots. For situations where the network address of the server machine changes, you will need to provide update mechanisms for the clients to run on their local machines.
These issues bring up the subject of CLIREG32.EXE, a handy tool for a client installation included in the setup package with the Setup Wizard. The purpose of CLIREG32.EXE is to modify the registry of a client machine to include the necessary entries for the client to perform Remote Automation against the server. This utility accepts the following parameters:
• <VBR File> = the name of the remote server’s .VBR file. This file is included with the installation package. It contains the information to register the server’s .TLB file, which is also included.
• –s = Specifies the network address (server name) for the server machine.
• –p = Specifies the network protocol used to communicate with the server machine.
• –a = Specifies the authentication level used by the server machine.
• –t = Specifies the type library file.
• –u = Installs the registry entries from the .VBR file.
• –q = Quiet mode, runs with no dialogs.
• –l = Logs any error information in the CLIREG.LOG file.
• –nologo = Specifies to not display any copyright information.
This is essentially the same information that can be viewed and modified using RACMGR32.EXE. The difference is that RACMGR32.EXE requires that the entries for the type library already exist. Using CLIREG32.EXE’s command-line interface makes it easy to create a batch file to call this application and handle the registration and configuration in one step. This would be ideal for upgrading clients when a server name or OLE server type library changes.
How to build a Remote Automation server
Building a Remote Automation server is really not much different from building any other automation server—or so it appears at first. Indeed, implementing Remote Automation servers is no different than implementing any other automation server.
But the design of a Remote Automation server presents numerous issues that can directly affect its architecture. Many of these issues are not nearly as critical to the design of local automation servers because the cost involved in moving data locally is so much less than moving it remotely. With that in mind, here are some things to remember throughout this section:
I included the sample below so I can point out some important considerations that went into the server design. This server is a learning tool, and certainly not intended as a real product. However, for the sample to be effective, it needs to serve a purpose and show some real functionality. I use this example to show the basics of building an automation server to help readers focus on the real issues and not get bogged down in the details of the class design.
Designing the server interface
The sample has both server (RepGen) and client (RepGenTest) components. The server exposes, among other things, a list of reports from Microsoft Access for Windows 95. It provides the basics of a network printing utility and allows the user to print reports without having to have Microsoft Access loaded on the user’s machine.
Anyway, this is what my class definition looks like:
Private AccessApp As Access.Application
Private sDBName As String
Private sCurrentRep As String
Public fPhaseTwo As Boolean
Public Property Get DBName() As String
Public Property Let DBName(ByVal sVal As String)
Public Function GetReport(ByVal sRepName As String) As Object
Public Function InitializeAccess(ByVal sDBName As String) As Boolean
Public Function ReportList() As Variant
Public Sub PrintReport(Optional fAsync As Boolean)
Private Sub ReportPrint()
Public Sub TerminateAccess()
Notice that I don’t expose the application object and that I have limited the scope of all objects as much as possible. In the case of the fPhaseTwo variable, I don’t need property procedures because there isn’t much to it, and I wanted to minimize this code as much as possible. Remote servers should always be as tight as possible.
Object references
I always try to give users of my server as much power as possible without slowing down the access mechanisms. So I am just providing the client with a reference to a report object. Essentially, once they have this reference, they can just party on it and do whatever they want. Note that this isn’t always the best idea; if it weren’t making a point for me, I would probably remove the object reference on the GetReport routine. The following lines of code from the function show why:
sCurrentRep
= sRepName
AccessApp.DoCmd.OpenReport
sCurrentRep, acPreview
Set
GetReport = AccessApp.Reports(sCurrentRep)
There are two reasons I wouldn’t usually return an object reference like this. First, the report object I am returning is a user interface construct (a window). This generally isn’t a good idea because you can’t really guarantee the life of such a window. Specifically in this case, I can’t be sure what the users are going to do to it; they could easily freeze the interface on the remote machine.
Secondly, the reference returned from the function will require a cross-process call every time the user accesses the object. Cross-process calls are very expensive for an application, particularly when the processes are on two different machines.
Notifications between the client and the server
For those who would like to understand what callbacks and asynchronous processes look like in code, the PrintReport routine shows one mechanism used to disjoint processes:
Public Sub PrintReport(Optional fAsync As Boolean)
If IsMissing(fAsync) Then
ReportPrint
Else
If fAsync Then
fPhaseTwo = False
tmMain.Enabled = True
Else
ReportPrint
End If
End If
End SubEnd If
In this example, I didn’t use a standard callback routine. Instead, I implemented a two-phase commit. The point is: Don’t always assume that standard implementations will provide the most efficient support for the features in your system. If you don’t need the overhead of implementing full callback routines, don’t use them. In this example, I wanted the user to have the choice to print reports in real time or asynchronously. A two-phase commit provides this with almost no code duplication.
Figure 2 shows the synchronous process flow:
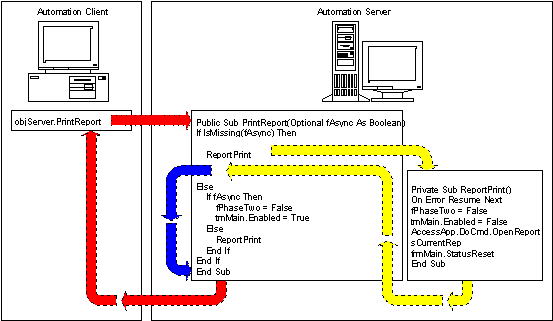
Figure 2: A synchronous process flow
Figure 3 illustrates the asynchronous process flow:
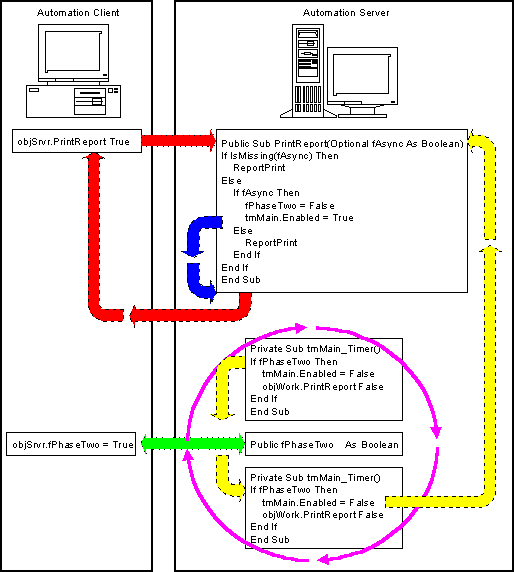
Figure 3: An asynchronous process flow
You can see that including the flag enables the client to request the printing of a report asynchronously. The client can have the report printed in real time simply by omitting the flag. Of course, I could have just as easily reversed these conditions and required a flag to print in real time with no flag for asynchronous printing; it depends on my server’s expected usage.
The other important point to glean from this is the implementation of a local callback routine. Many people consider callbacks useful only in distributed applications. As Figure 3 shows, local callback routines can be very effective in delegating the normal processes in a client/server system. For more information about callback routines and process linkages, see the next section, "Remote Automation in Perspective."
Remote automation in perspective
The object of this section is to provide a high-level explanation of the decisions that go into specific implementations of Remote Automation servers. It also attempts to tie in the benefits or shortcomings of Remote Automation with the issues faced in online transaction processing (OLTP) in client/server development today.
The simple case
The most basic use for Remote Automation is fairly trivial: A Remote Automation server is instantiated on a machine by a nonlocal client. The nonlocal client gives the server the information it uses to do some form of processing. Once the processing is completed, the server returns control to the nonlocal client, and is then released by the nonlocal client. Figure 4 shows this process:
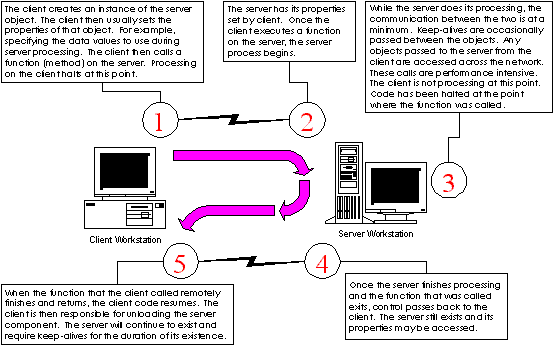
Figure 4: A basic use of Remote Automation
Here are some cases in which you might use this process:
Performing intense calculations on data that require lookup, such as computing taxes, risk analysis of loans, stellar cartography.
Massaging data based on business rules. This could include building matchcodes, retrieving or creating universal ID numbers, or doing full-text searches of the Library of Congress for words sounding like "Vogon." You get the idea.
Encapsulating departmental processing routines into a common server. These could include, for example, routines for calculating the number of paydays for your department in the current quarter; figuring out the best time of day to ask your boss for a raise; or for returning the full title of anyone in the company when given an e-mail name (assuming you weren’t using Microsoft Mail or Microsoft Exchange).
Launching processes that require custom software. These may include printing reports using "My Favorite Report Writer for OS/2," retrieving data from the Internal Revenue Service, or writing a really cool app to e-mail a daily cartoon from the Internet to 4,000 of your closest friends.
This list is not very expansive and contains items that have no reason to be distributed. This kind of distribution just doesn’t have much impact on the OLTP solutions prevalent today.
Callback routines and asynchronous processing
The next most complex use for Remote Automation is still pretty basic, but now the system can operate asynchronously. Here the client passes a callback reference to the server before requesting that server commence processing. The server takes the data and the callback handle, and returns control to the client by exiting the routine. It then wakes up on its own, processes the data, and executes the callback method of the callback object on the nonlocal client. Figure 5 shows this process:
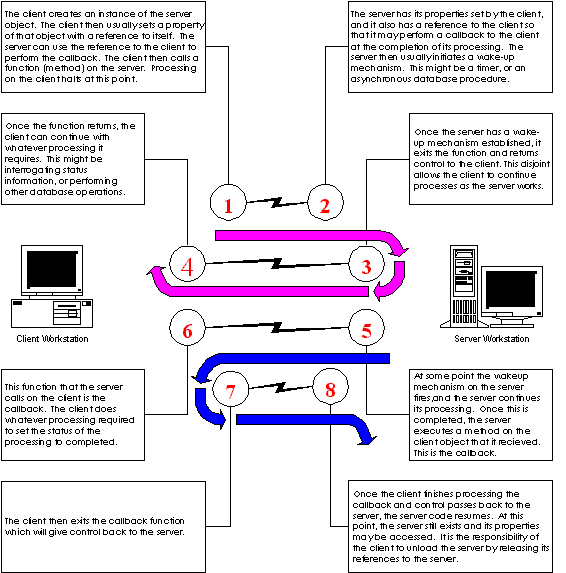
Figure 5: Asynchronous Processing
The classification list and the performance numbers for this approach are the same as when the client controls the server. The difference is that the client machine may be active during the time the server is processing. This approach has some other subtleties that are not relevant at this level of discussion. Suffice it to say that this approach usually achieves only the smallest of performance gains and its implementation can be extremely tricky.
The three-tiered model
The most common use of Remote Automation is controlling a server that proctors services from a set of nonlocal servers to a set of nonlocal clients. In this case there are at least three different machines that communicate, theoretically, via Remote Automation (hence "three-tiered"). Figure 6 illustrates the communication paths between the machines and their physical relation to each other:
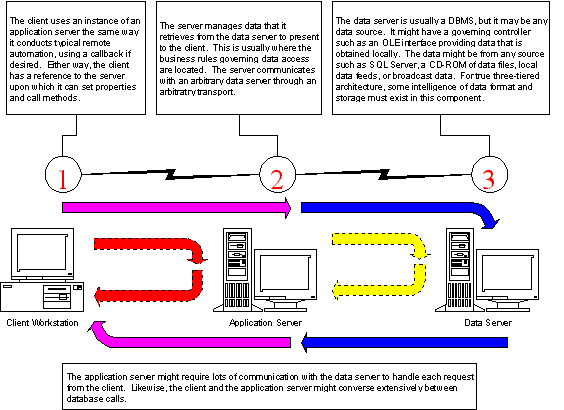
Figure 6: Remote Automation in a three-tiered model
Here are some reasons to use this approach:
You need to obtain a high level of abstraction between your front-end and your data. Usually this means that you are pulling data from more than one source. If you just want another layer between your SQL Server and your Visual Basic code, this shouldn’t count.
You need a fire wall between your data network and your applications network. This usually occurs when you have the database on a server on one network with an application running on another network. The middleware will sit on the fence with access to both networks. Applications on the second network have no privileges into the first network; they can only manipulate the server that can, in turn, manipulate the data on the first network.
You have self-contained processes, such as batch report printers or data processors, that can be run in a scaled environment. These processes usually accept either limited startup information and just process predefined sets of data, or can be designed to operate on a job-by-job basis. The information for a job is sent to a proctoring server that hands out the job to a "grunt boy" (a.k.a. processor). The client can then monitor the job through the server. The server can be designed to spawn grunt boys as required to handle the current load of jobs.
You have several steps of data processing that must be coordinated but cannot tie up an end-user machine. By using this type of proctor to facilitate the processing, you can free the end-user’s machine, periodically interrupting it as the job progresses. This differs from the previous case because it requires no callbacks or knowledge of the client or the processors to perform its tasks.
Summary
So now you’ve had a look at the three main types of Remote Automation. If you understand them, it should not be hard to choose the right implementation for your system. But remember the sample discussed previously. Sometimes the implementation that is just right for you doesn’t fall into a single category; instead it falls right on the line. But, hey, that’s another article (which I haven’t yet written).
Ken Bergmann, a developer and writer in the Developer Network, is not really known for anything. His sole redeeming factor is love of systems design. His prime motivation as a writer usually takes the form of a precisely aimed boot to the head.
Take a break, folks. Remote Automation won’t work for every system.
The design of a Remote Automation server presents numerous issues which can directly affect its architecture.
Always try to give users of your server as much power as possible without slowing down the access mechanisms.
The most common use of Remote Automation is controlling a server that proctors services from a set of nonlocal servers to a set of nonlocal clients.