
Ron Fosner
Ron Fosner is a computer graphics consultant specializing in OpenGL and DirectX. He can be reached at Ron@directx.com.
Click to open or copy the PROGRAM project files.
Click to open or copy the VIEWPORT project files.
One of the cool features of Windows NT¨ that has finally made it to Windows 95¨ is the OpenGL graphics API. OpenGL is pretty much the industry standard for high-quality 3D graphics applications. If you admired the dinosaurs in Jurassic Park, then you were looking at an OpenGL application. A big advantage of OpenGL is that it's platform-independent; it's available on a variety of hardware platforms and operating systems, including Windows 95, Windows NT, OS/2, DEC's AXP and Open VMS, and X Windows.
It'd be nice if someone would wrap up all the stuff necessary to get OpenGL running on a Windows platform—kind of like how MFC wraps up the Windows API and makes it easy to use. If you've always wanted to do some 3D graphics programming but never had the time to learn how set up OpenGL, this article is for you. I'll take a look at all the parts necessary to set up OpenGL and then wrap them up in a completely reusable MFC-based view class. You can simply drop this class into your application and get a fully functioning OpenGL view that you can customize.
This OpenGL view class comes out of my own work. My main job is working on graphics applications; I love graphics, and it's always rewarding to see the fruits of your labor on the screen. But graphics applications are almost always algorithm heavy. The rewards of 3D graphics programming are great, but the learning curve is steep. Whenever I needed to create an new OpenGL program, it always took me about an hour to create a basic OpenGL view class from scratch, remembering the details one by one and implementing them. I finally realized that with a little more effort I could create a totally reusable MFC class that would work right away, and could have features that make OpenGL programming a simple matter of adding a few lines of code to my program. The OpenGL view class presented here greatly reduces the level of knowledge you'll need to use OpenGL.
By the time you read this, Windows NT 4.0 and the new Windows 95 OEM packages should be available. Both operating systems contain new and improved versions of the OpenGL 1.1 binaries. In addition, Silicon Graphics wasn't too happy with the performance of Microsoft's OpenGL 1.0 binaries, and they have supplied their own version of the 1.1 binaries for Windows (known as Cosmo GL). What this means is that there are some pretty big players interested in improving OpenGL's performance on the Windows platform.
To use OpenGL in your programs, you need either Microsoft Windows NT 3.5 or later (preferably 4.0) or a recent version of Windows 95. If your version of Windows 95 doesn't have OPENGL32.DLL and GLU32.DLL in the Windows system directory, you'll need to download them from Microsoft (see Knowledge Base article Q154877 for the details). Once you have the DLLs and LIBs in place, then you're all set to start programming.
You'll also need a suitably recent compiler that contains the LIB files (OPENGL32.LIB and GLU32.LIB) and the include directory for using OpenGL (include\gl, just like the include\sys subdirectory for OpenGL). Most of the major compiler venders, including Microsoft, Borland, Symantec, IBM, and Watcom, provide support for OpenGL in varying degrees. You might have to call the support line to figure out exactly how OpenGL works with your compiler. If your compiler vendor includes the OpenGL auxiliary library (GLAUX.LIB), then you can use this library as a wrapper and ignore any Windows APIs.
The AUX lib, as it is called, is outlined in the standard reference on OpenGL programming, the OpenGL Programming Guide (also known as the Red Book). This library allows you to easily test OpenGL programs that don't need a great deal of sophisticated interaction with the operating system.
Unless you've either written OpenGL programs before or you regularly peruse the documentation on your compiler updates, there are probably some OpenGL concepts that you're unfamiliar with.
A pixel format is a description of the actual format given to a particular window. You probably know that your typical VGA card is capable of driving a window in 256-color mode. This is also called an 8-bit color depth window, since there is a single 8-bit value (capable of 256 discrete values) for each pixel on the screen. If you like more realistic colors, then you might have a video card in either 15-bit (32,768), 16-bit (65,536), or 24-bit (16 million) color mode. If your video card has 1 or 2MB of video memory on it, then your card is probably capable of displaying a pixel format with a larger color depth. For example, if you want to display 32,768 or 65,536 colors in 800´600 mode, you'd need at least a megabyte of video memory: 2 bytes of color/pixel ´ 800 vertical pixels ´ 600 horizontal pixels = 960,000 bytes of memory, which is rounded up to 1MB. Bump the resolution up to 1600´1200 resolution and you'll need 4MB of memory.
And that's just for current display memory. Graphics APIs like DirectXŞ, Direct3DŞ, and OpenGL support the concept of front and back buffers. The front buffer is what's currently on the screen. A back buffer is typically used in animations when you don't want the user to see the scene as it's being drawn—you want the scene to appear suddenly. One way of achieving this is to send the drawing commands to the back (hidden) buffer. When you're finished drawing, the front and back buffers are swapped. Contrary to how it sounds, there's no copying of megabytes of memory; typically, only a pointer value in memory is changed. In addition to allowing instantaneous-looking rendering, it's usually faster to draw to the back buffer since most video cards won't let you edit video memory while a vertical screen retrace is occurring. There is no vertical retrace for the back buffer, so your rendering commands aren't held up 50 or 70 times a second.
In addition to back buffers (which double the amount of onboard memory required), some OpenGL drivers also support stereo displays (which gives left and right buffers to your front and back ones), extra texture memory for storing bitmaps, and layer planes for implementing things like hardware cursors. This is why some of the high-end OpenGL cards cost thousands of dollars. On the plus side, a few years ago these types of cards were tens of thousands of dollars. This year saw the first crop of OpenGL and DirectX accelerated cards. This winter, expect to see just about every major video card manufacturer with a hardware-accelerated video card on the market. 1997 should have a slew of lower-priced OpenGL and Direct3D hardware accelerators on the market, with OEMs like Compaq, Dell, and Gateway using them in their systems.
As you can see, selecting a pixel format depends on the capabilities of your card and your program. Many of the new 32-bit functions deal with the interface between Windows and OpenGL. These functions (which are part of GDI) are called the wgl ("wiggle") functions. (wgl is short for Windows GL.) A few new OpenGL-related functions don't, for some mystery reason, have the wgl prefix.
You are given pretty much total control over the pixel format. Things that you can select are the color depth, support of GDI calls, rendering to a window, rendering to a memory location, double buffering, stereo, using RGB colors or a paletted color scheme, or supporting an alpha (transparency) plane. But you can't simply select any combination. You can either ask for the list of formats (there will be at least 24), or create your own template and ask for the closest match.
The pixel format can also tell you other things, like whether the video card is hardware-accelerated or not. Microsoft provides a generic software implementation of OpenGL that will run on all video cards—albeit slowly if you tax it too much. If you have a new video card, you may have a built-in accelerator available. The pixel format will tell you if a particular format is hardware accelerated or if the routines are implemented using the generic software driver. OpenGL 1.1 introduces an additional driver classification that implements some of the functionality in hardware and leaves the rest to the generic driver. This is called the mini-client driver, and it will probably end up representing the majority of OpenGL driver implementations. If you're interested in speed, then you should keep your eye out for these hardware-assisted formats when selecting a pixel format.
Another new item is the rendering context (RC). An RC is the OpenGL equivalent of a GDI device context (DC). The RC is the portal though which OpenGL calls are rendered to the device. While the DC is, in part, GDI's repository for state variables (the current pen color, for example), the RC plays a similar function for OpenGL's state variables: they're simply data structures that keep the state of the current settings and route calls to the appropriate device. Creating a DC and an RC is simply part of the ritual that you have to execute before you can use OpenGL functions (just as you need a DC before you can draw using GDI, you need an RC before you can render using OpenGL).
The first step in creating an OpenGL program is to set up the rendering window so OpenGL calls will work. OpenGL is a totally different rendering procedure than GDI. The OpenGL specification supports things such as double buffering, stereo displays, and additional hardware video planes that aren't possible under GDI (at least, so far). For OpenGL to render to a Windows window, you have to make the window format acceptable to OpenGL. The steps that you'll need to take care of include:
As I mentioned before, setting up the window correctly for OpenGL is a pain because you have to do all these steps. Fail to execute one correctly and all you'll get is a blank screen. The first step is to make sure the window you're creating is set with the WS_CLIPSIBLINGS and WS_CLIPCHILDREN styles. This is because an OpenGL window has its own pixel format. Only DCs created for the client area of an OpenGL window are allowed to draw into the window. Since Windows does not automatically clip a child window from the parent window's client area, the parent window draws over the child window if it carries out any drawing in the same location as the child window. If the child window is clipped, the parent window cannot draw over it and you have OpenGL bliss. WS_CLIPSIBLINGS performs this same function between siblings of the parent window.
Additionally, the window class attribute should not include the CS_PARENTDC style. A window with the CS_PARENTDC style bit will receive a regular DC from the system's cache of DCs. These DCs aren't suitable for OpenGL rendering.
The next step is to get a DC for the rendering window. Once you have a DC you can set the pixel format. Figure 1 shows the new Win32¨ functions that allow you to use pixel formats. You can get the total number of pixel formats and then use GetPixelFormat to loop through them. Once you find a pixel format you like, select the window pixel format using SetPixelFormat.
Figure 1 Pixel Format Functions
ChoosePixelFormat Obtains a DC's pixel format that's the closest match to a pixel-format template you've provided. Windows tries to match your requirements to what's available.
SetPixelFormat Sets a DC's current pixel format to the pixel-format index specified. Assumes that you know the pixel format identified by the index. Always check the return from this function! If it fails, all your OpenGL calls will produce nothing.
GetPixelFormat Returns the pixel format index of a DC's current pixel format.
DescribePixelFormat Given a DC and a pixel format index, fills a PIXELFORMATDESCRIPTOR data structure with that pixel format's properties.
Once you have selected a pixel format, the next step is to get an RC. There's a total of sixteen wgl functions (according to the Microsoft Visual C++¨ 4.1 documentation—it keeps changing), of which seven are related to manipulating RCs (see Figure 2).
Figure 2 RC-Manipulating wgl Functions
wglCreateContext Creates a new OpenGL RC suitable for drawing on the device referenced by the associated DC. The pixel format of the new RC takes its pixel format from the DC.
wglMakeCurrent Makes an existing RC the current RC for a particular thread. This needs to be done before any OpenGL commands are issued. Note that the DC that is used doesn't have to be the same one that was used to create the RC, but it must be on the same device and must have the same pixel format.
wglDeleteContext Deletes the specified RC, which must be associated with the current thread. Also makes the RC not current. Has no effect upon the DC associated with this RC.
wglCopyContext This function lets you copy the state of one OpenGL RC to another RC. The RCs must be from the same OpenGL implementation. You can always copy a rendering state between two RCs with the same pixel format in the same process. The destination RC must not be the current RC.
wglGetCurrentDC Returns a handle to the current DC associated with the current thread's RC.
wglGetCurrentContext Returns a handle to the current thread's RC.
wglShareLists Enables an RC to share the display-list space of another RC in another thread. Display lists are a way of caching rendering commands. When you create an RC, it has its own display-list space. All RCs sharing a common pixel format can always share display lists. (wglShareLists isn't available on the very first version of OpenGL for Windows NT. Only version 1.01 or later has this functionality.)
The wglCreateContext function takes a DC that has a valid pixel format selected and returns an RC. Once you've created an RC you need to make it current by a call to wglMakeCurrent. When there's a current RC associated with the a thread, you can then use the OpenGL commands to render to that RC. In Figure 2, you'll see that a few functions can share items between threads. While you won't get a great performance boost by using a multithreaded app on an old 486 PC, your app can really be accelerated by multithreaded programming techniques on the new dual or quad Pentium Pro, DEC Alpha, or PowerPC systems.
You're almost set once you get a current RC—OpenGL commands will work at this point. Before you run off and start coding, there's some OpenGL setup (as opposed to Windows setup) to take care of. Up to this point, you've just been worrying about getting Windows ready to use OpenGL. Now you've got to tell OpenGL about the window you're rendering to and how you want your scene to be viewed. For example, when you get a new WM_SIZE message, you have to decide how to tell OpenGL to modify its view. If you're using perspective mode, you probably want the perspective to change as the window dimensions change. Alternatively, you might want to render different scenes or different views of the same scene into the window.
OpenGL has something called a viewport that lets you specify how you want the rendering area to relate to the actual window dimensions. If you look at Figure 3, you can see one effect of having two viewports in a single window. This view is from a program I wrote that lets you visualize different viewing transformations upon the same scene. The scene at the left is the default view, while the scene at the right is the result of a user-specified series of transformations. Two different OpenGL viewports are used, but just one Windows window.
Figure 3 Two viewpoints in one window
Once you've selected the viewport and the viewing transformations (that is, selected your perspective or orthogonal viewing parameters), then you're all set to render using OpenGL. Describing how to program an OpenGL scene is way beyond the scope of this article, but I'll go over the commands that I used for the OpenGL sample program I developed so you'll have some idea of what's going on.
The last step is to clean up. In this case, all you need to do is delete the RC you created using the wglDeleteContext function and release the DC associated with the RC. Typically you'd do this in the WM_DESTROY message handler. And that's pretty much it!
Now that I've gone over the essentials, let's see how to incorporate them into MFC by creating a new subclass of the MFC CView class to handle OpenGL natively rather than as some weird dialect.
The simplest way to actually use OpenGL is to encapsulate all this functionality and keep it in one place. After all, the process of creating an OpenGL window when using MFC is going to be similar no matter what your OpenGL program does. So let's encapsulate all this initialization and setup into a reusable class for viewing OpenGL models by using C++. I've chosen MFC for two reasons: most compilers support MFC in some manner and Microsoft's OpenGL support is excellent. This isn't to say that you couldn't use OpenGL in your OWL program, for example. It's just that you need to install the lib and headers manually for Borland's C++ compiler.
The CView class provides the basic functionality for programmer-defined view classes. A view is typically attached to a document and acts as an intermediary between the document and the user. The purpose of the view is to render an image of the document on the screen and to interpret user input as operations upon the document or changes to the view itself. I'll modify the CView class by deriving a new class, COpenGLView, to provide a default platform on which to create your own 3D views, much as a CView now provides a default platform to create ordinary views.
The first step is to create a new project using the Developer Studio. You'll need to perform the following steps:
When you're finished, you should see something like Figure 4. Continue through the last dialog box. Developer Studio will have created the COpenGLView class file skeleton and a framework where you can test it. At this point, you might want to compile the app just to make sure that there are no errors in your build process. If the project builds successfully, you're ready to proceed to the next step: making the view class capable of displaying OpenGL images.
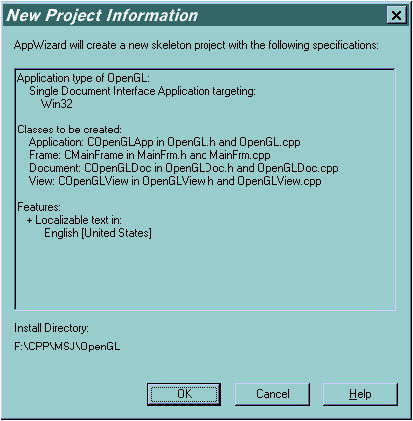
Figure 4 AppWizard residue
Once you have a project that compiles, add the include statements for the OpenGL header files. I've added mine to the COpenGLView.h file because I assume that whenever I'll be using the OpenGL view class I'll be needing the OpenGL headers. Placing them in the header for the view class means I don't have to add them to my file. If you have religious convictions that prevent you from nesting header files, place them wherever you like. In any event, you'll need to add something that looks like the following to the top of the header file.
 #include "gl\gl.h"    // Include the standard OpenGL
                      // headers
#include "gl\glu.h"   // Add the utility library
#include "gl\glaux.h" // Add in the auxiliary library
                      // (optional)
Since the header for a file is typically included after the stdafx.h include, you don't have to worry about the windows.h header since it's part of the stdafx.h include. Note that you need to include the GDI headers before the OpenGL headers.
After the includes, the next step is to add the OpenGL libraries to the link step. If you're using Visual C++, select Build Settings, and then select the Link tab. Select the Input category and add OPENGL32.LIB, GLU32.LIB, and GLAUX.LIB to the Object/Library Modules edit control. The last one is only necessary if you're using the auxiliary library. If your compiler complains, then you may not have the auxiliary library. This is another good time to try rebuilding the program; if you build successfully, then you're all set to start editing the functions.
Now you're ready to actually add some code! First, add the necessary message handlers so you can set up the view to handle OpenGL calls. If you open up the ClassWizard and select the COpenGLView class, you'll see that there are already message handlers for OnDraw and PreCreateWindow. You'll need to add functions for the messages WM_CREATE (for OnCreate), WM_DESTROY (for OnDestroy), WM_ERASEBACKGROUND (for OnEraseBkground), and WM_SIZE (for OnSize).
Let's start off simply with the OnEraseBkground member function. You don't really need to override this function, but without it Windows will clear the window with the background color every time your window is redrawn, and then OpenGL will clear the viewport with its own background color. Since Windows background colors are typically not black and OpenGL's are, this will make your window flash at each redraw. You can easily fix this by just returning TRUE, telling Windows not to erase the background. Figure 5 shows what changes you'll need to make to OnEraseBkground.
Figure 5 View Class Startup Behavior Changes
 BOOL COpenGLView::OnEraseBkgnd(CDC* pDC)
{
     // TODO: Add your message handler code here and/or call
     // default

     // Comment this line out
     // return CView::OnEraseBkgnd(pDC);

     return TRUE; // OpenGL will erase the background
}

BOOL COpenGLView::PreCreateWindow(CREATESTRUCT& cs)
{
    // TODO: Modify the Window class or styles here by modifying
    //  the CREATESTRUCT cs

    // An OpenGL window must be created with the following
    // flags and must not include CS_PARENTDC for the
    // class style.

    cs.style |= WS_CLIPSIBLINGS | WS_CLIPCHILDREN;

    return CView::PreCreateWindow(cs);
}
The next step is to modify the PreCreateWindow member function. You need to modify the default style so that the WS_CLIPSIBLINGS and WS_CLIPCHILDREN styles are set. The bottom of Figure 5 shows what the finished function looks like. After you make these changes it's probably a good idea to try a test compile to make sure everything is compiling correctly. If you execute the program now and move the window around, you'll notice that it correctly fails to erase the background of the window.
Now it's time to tackle the most complicated set of changes, those to the OnCreate member function. This is the function that creates the DC and the RC and selects the pixel format for your OpenGL window. The changes that you need to make here can be done in three steps: get a DC, select a pixel format for this DC, then get and hold an RC associated with this type of DC.
Let's simplify this task by breaking it into parts. Since there might be other things you want to do in your OnCreate function, add a new protected member function called InitializeOpenGL. It's called from OnCreate and it's shown in Figure 6. This function needs to create a DC, select a pixel format for this DC, create an RC associated with this DC, and select the RC. You might note that you're holding onto both the RC and the DC for the life of the viewing window rather than the old method of creating a DC as required. This method is not only faster, but it results in simpler code.
Figure 6 View Class Startup Initialization
 int COpenGLView::OnCreate(LPCREATESTRUCT lpCreateStruct)
{
     if (CView::OnCreate(lpCreateStruct) == -1)
          return -1;

     // TODO: Add your specialized creation code here

     InitializeOpenGL();

     return 0;
}


BOOL COpenGLView::InitializeOpenGL()
{
    m_pDC = new CClientDC(this);

    if ( NULL == m_pDC ) // failure to get DC
        {
    ::AfxMessageBox("Couldn't get a valid DC.");
        return FALSE;
        }

    if ( !SetupPixelFormat() )
        {
    ::AfxMessageBox("SetupPixelFormat failed.\n");
        return FALSE;
        }

    if ( 0 == (m_hRC =
        ::wglCreateContext( m_pDC->GetSafeHdc() ) ) )
        {
    ::AfxMessageBox("wglCreateContext failed.");
        return FALSE;
        }

    if ( FALSE ==
        ::wglMakeCurrent( m_pDC->GetSafeHdc(), m_hRC ) )
        {
    ::AfxMessageBox("wglMakeCurrent failed.");
        return FALSE;
        }

    // specify black as clear color
    ::glClearColor( 0.0f, 0.0f, 0.0f, 0.0f );
    // specify the back of the buffer as clear depth
    ::glClearDepth( 1.0f );
    // enable depth testing
    ::glEnable( GL_DEPTH_TEST );

    return TRUE;
}


BOOL COpenGLView::SetupPixelFormat(
    PIXELFORMATDESCRIPTOR* pPFD)
{
    // default pixel format for a single-buffered,
    // OpenGL-supporting, hardware-accelerated,
    // RGBA-mode format. Pass in a pointer to a different
    // pixel format if you want something else
    PIXELFORMATDESCRIPTOR pfd =
        {
        sizeof(PIXELFORMATDESCRIPTOR),// size of this pfd
        1,                      // version number
        PFD_DRAW_TO_WINDOW |    // support window
          PFD_SUPPORT_OPENGL,   // support OpenGL
        PFD_TYPE_RGBA,          // RGBA type
        24,                     // 24-bit color depth
        0, 0, 0, 0, 0, 0,       // color bits ignored
        0,                      // no alpha buffer
        0,                      // shift bit ignored
        0,                      // no accumulation buffer
        0, 0, 0, 0,             // accum bits ignored
        16,                     // 16-bit z-buffer
        0,                      // no stencil buffer
        0,                      // no auxiliary buffer
        PFD_MAIN_PLANE,         // main layer
        0,                      // reserved
        0, 0, 0                 // layer masks ignored
        };

    int pixelformat;
    PIXELFORMATDESCRIPTOR* pPFDtoUse;

    // let the user override the default pixel format
    pPFDtoUse = (0 == pPFD)? &pfd : pPFD;

    if ( 0 == (pixelformat =
        ::ChoosePixelFormat( m_pDC->GetSafeHdc(), pPFDtoUse )) )
        {
    ::AfxMessageBox("ChoosePixelFormat failed.");
    return FALSE;
        }

    if ( FALSE == ::SetPixelFormat( m_pDC->GetSafeHdc(),
        pixelformat, pPFDtoUse ) )
        {
    ::AfxMessageBox("SetPixelFormat failed.");
        return FALSE;
        }

    return TRUE;
}
InitializeOpenGL returns a Boolean value to signal the success of the initialization. TRUE signals that the function succeeded, while FALSE signals failure. The first thing the function does is get a DC for your client area (which comes from the client area of the frame window). If this fails, it posts an afx message and then returns FALSE.
The next step is to choose and select a pixel format, which is such a complicated process that it's delegated to its own function, ChoosePixelFormat, which I'll explain later. Once the pixel format is selected, the next two steps are to create a rendering context and then to make that RC current. Problems in setting up OpenGL windows usually occur during one of these three steps, so if you're having problems—such as an OpenGL window that never displays anything—then this should be the first place to look. Use the wglCreateContext to create an RC from the DC. If this succeeds, make that RC current. Note that the m_pDC and the m_hRC variables are members of the COpenGLView class, and that these hold the DC and RC that you'll use throughout the life of the program. You'll need to add the following lines to the protected area of the class definition:
 HGLRC    m_hRC;
CDC*     m_pDC;
Now you come to the actual setting of the pixel format. Jeff Prosise did a good job of describing the parts of the PIXELFORMATDESCRIPTOR in his MSJ articles on OpenGL (see the October and November 1994 and February 1995 issues). The PIXELFORMATDESCRIPTOR structure describes a pixel format used by a DC. You might want to set up a template pixel format and let Windows take a guess at an existing pixel format that matches your requirements. Note that some of the information has changed since Jeff wrote his article. The dwLayerMask and dwDamageMask values are no longer used, and there are a bunch of new pixel format flags. Since these are explained in the new documentation, I'll only mention the one new flag that is of particular interest here.
There is a flag in all OpenGL versions called PFD_GENERIC_FORMAT that is set only when you are running on the generic implementation. In version 1.0, if you were interested in speed, you'd loop though the pixel formats till you found a format that didn't have this flag set. These formats ran entirely in the video driver and could generally be assumed to be at least twice as fast as the software-only driver, if not more. The problem was that all of the OpenGL commands had to reside in the driver, even if there was no benefit over the generic code. With OpenGL 1.1, Microsoft has added another flag, PFD_GENERIC_ACCELERATED (0x00001000), which can be used to identify the new mini-client driver. This driver implements some of the OpenGL calls in hardware and lets the generic driver handle the rest. At the time of this writing, the only card capable of this that I'm aware of is the Matrox Millenium with 4 or more MB.
You can use these two flags to tell the drivers apart. If neither flag is set, then it's a fully accelerated card running an installable client driver. This is the fastest implementation. If both flags are set, then it's a mini-client driver. This is the second fastest, and will have only some areas (like lighting effects, or perhaps texture-mapping) accelerated, depending upon the card. If only the PFD_GENERIC_FORMAT flag is set, then it's the generic software driver. You also might want to check out the performance of your particular application. In some instances, when animating a model of only a few polygons, the overhead of the other drivers actually makes the generic driver faster! Also be aware that the new OpenGL 1.1 generic driver is in most cases 2 to 4 times as fast as the 1.0 generic driver. Your mileage may vary.
Getting back to the pixel format, the capabilities of an OpenGL window depend upon the pixel format selected for the OpenGL rendering window. Here are some of the properties that you want some control over:
I already talked about the various flavors of drivers. Double buffering, which I briefly mentioned before, allows you to make any rendering appear quickly since you draw to the back buffer, which is then BLT'd to the front buffer the user sees. The disadvantage is that it requires twice as much video memory, although some drivers might make use of system memory for the back buffer. You'll usually want to draw to a window, but because of the major differences between OpenGL's rendering methods and GDI's, you can't simply render an OpenGL scene to a printer DC unless you are running Windows NT 4.0. On other platforms you are forced to render to a memory DC and then BLT to a printer DC. Hopefully this will no longer be necessary in the near future. If you want to mix GDI and OpenGL calls, you can only use a single-buffer pixel format. Since GDI currently has no knowledge of back-buffer pixel formats, you are forced to choose between fast 3D animation and the familiar GDI 2D calls. If you do a lot of 2D stuff, don't worry—OpenGL can render 2D images as well as 3D.
The last three items listed are for color and depth buffers. The depth values refer to the size of the color space and z-axis space respectively. If you want to render in only a few colors with no 3D effects like shading, lighting, or texture-mapping, then you might want to run in what's termed color-index mode. This is just the familiar paletted color mode you've grown to know and hate. Running in color-index mode allows you to do things like palette animation, but it complicates your OpenGL code since you'll have to handle palette-change messages. OpenGL really shines running in RGBA mode, which means that you have at least 15 color bits per pixel. This allows OpenGL to interpolate between colors fairly realistically with no effort on your part. It's also possible to do this in color-index mode, but that's beyond the scope of this article.
For my sample, I'll set the default pixel format to attempt to be a single-buffered, true-color, depth-enabled, hardware-accelerated, RGB window for static 3D rendering. You probably won't get hardware acceleration, and if you're running in less than 15-bit color, you probably won't get good RGBA representation. But generally these settings will allow you to create a nice, lighted 3D scene. You can pass in your own pointer to a PIXELFORMATDESCRIPTOR if you want a pixel format other than the default. Notice that you only need a temporary PIXELFORMATDESCRIPTOR in the function since you'll only use it once. If you need to get the current pixel format, you can always query it.
The bottom of Figure 6 shows the SetupPixelFormat function. Examining SetupPixelFormat, you'll see that, after the pixel format is set, ChoosePixelFormat is called to choose the pixel format that Windows thinks is a close match to your specifications, followed by SetPixelFormat, which actually sets the pixel format for the DC. And that's it for the setup!
Since you just created your window, let's examine what you need to do when the window is destroyed. Unlike OnCreate, destroying an OpenGL window is relatively easy: simply release the DC and RC that you've held onto. Figure 7 shows the OnDestroy member function. The wglMakeCurrent call isn't really necessary since the wglDeleteContext call makes the RC not current anyway, but leaving it in gives symmetry to the whole process.
Figure 7 View Class Cleanup
 void COpenGLView::OnDestroy()
{
    CView::OnDestroy();

    // TODO: Add your message handler code here

    // this call makes the current RC not current
    if ( FALSE ==  ::wglMakeCurrent( 0, 0 ) )
        {
        ::AfxMessageBox("wglMakeCurrent failed.");
        }

    // delete the RC
    if ( m_hRC && (FALSE == ::wglDeleteContext( m_hRC )) )
        {
        ::AfxMessageBox("wglDeleteContext failed.");
        }

    // delete the DC
    if ( m_pDC )
        {
        delete m_pDC;
        }
}
If you've never worked with 3D graphics before, you may not be familiar with the term frustum, a Latin word for "piece broken off," which refers to the part of some shape after two parallel planes slice off a part. In 3D graphics a frustum is the viewing volume sliced by the front and back planes. Everything that can be viewed is inside this volume. Frustums are useful since they are part of the culling process; if something is outside the viewing frustum, then it's discarded from the rendering pipeline. OpenGL has two kinds of viewing frustum: the familiar perspective projection (in which objects that are closer appear larger) and orthographic or parallel projection (in which the sizes and angles between objects are maintained no matter what their distance from the viewer). Most people think of perspective projection when they think of 3D graphics. If you're interested in architectural or CAD or business graphics, though, you might want an orthographic projection. Figure 8 shows examples of both. As you can see, the shape of a perspective projection frustum is a truncated pyramid, while the shape of an orthographic projection frustum is a "rectangular parallelepiped"—or as 3D graphics programmers say, a box.
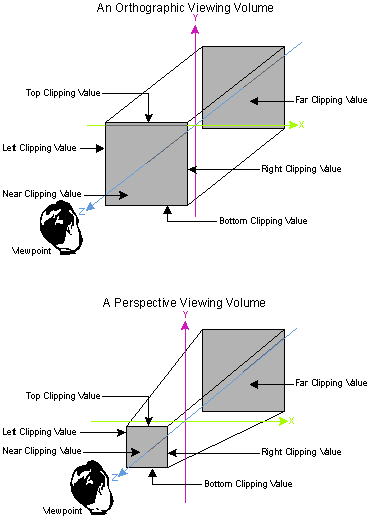
Figure 8 Othographic and Perspective Viewing
What you have to do in the OnSize member function is set up the viewport and the viewing frustum. You also set the viewing transformations here—the location of the viewpoint with respect to everything else—simply because it's convenient. You don't want to set up the viewing transformations in the painting routine unless you're going to be modifying the viewing transformation as your program runs—when translating or rotating the viewpoint as the program animates, for example. Since the viewport and the viewing frustum rarely change unless you're trying to achieve some special effects, the best place to place them is in the OnSize member function.
The basic operations that occur in the OnSize member function are to set up the viewport (via a member function), then select the projection matrix, initialize it, and set up the viewing frustum (also via a member function). The last operations are to select the Modelview matrix, initialize it, and then set up the viewing transformations by calling another member function. This use of member functions allows great flexibility in tailoring the COpenGLView class to your needs without your having to rewrite a great deal of code. Figure 9 contains the OnSize member function in addition to the helper functions that OnSize calls.
Figure 9 Handling Window Sizing
 void COpenGLView::OnSize(UINT nType, int cx, int cy)
{
    CView::OnSize(nType, cx, cy);

    // TODO: Add your message handler code here

    if ( 0 >= cx || 0 >= cy )
        {
        return;
        }

    // save the width and height of the current window
    m_WindowWidth = cx;
    m_WindowHeight = cy;

    // compute the aspect ratio
    // this will keep all dimension scales equal
    m_AspectRatio = (GLdouble)m_WindowWidth/(GLdouble)m_WindowHeight;

    // Now, set up the viewing area-select the full client area
    ::glViewport(0, 0, m_WindowWidth, m_WindowHeight);

    if ( GL_NO_ERROR != ::glGetError() )
    {
    ::AfxMessageBox("Error while trying to set viewport.");
    }

    // select the projection matrix as the recipient of
    // matrix operations (there's three to choose from)
    ::glMatrixMode(GL_PROJECTION);
    // initialize the projection matrix to a pristine state
    ::glLoadIdentity();

    // select the viewing volume. You do it after you
    // get the aspect ratio and set the viewport
    SetupViewingFrustum( );

    // now select the modelview matrix and clear it
    // this is the mode we do most of our calculations in
    // so we leave it as the default mode.
    ::glMatrixMode(GL_MODELVIEW);
    ::glLoadIdentity();

    // now perform a default viewing transformations
    SetupViewingTransform();
}


BOOL COpenGLView::SetupViewingFrustum( void )
{
    // select a default perspective viewing volumn
    ::gluPerspective( 40.0f, m_AspectRatio, 0.1f, 20.0f );

    // NOTE: Other commands you could have here are
    // glFrustum, which gives you much more control over
    // the perspective view, or glOrtho which is used for
    // parallel projections. No matter what you use, check
    // the error status when you set the viewing frustum!

    if ( GL_NO_ERROR != ::glGetError() )
    {
    ::AfxMessageBox("Error while trying to set viewing frustum.");
    return FALSE;
    }

    return TRUE;
}


BOOL COpenGLView::SetupViewingTransform()
{
    // select a default viewing transformation
    // of a 20 degree rotation about the X axis
    // then a -5 unit transformation along Z
    ::glTranslatef( 0.0f, 0.0f, -5.0f );
    ::glRotatef( 20.0f, 1.0f, 0.0f, 0.0f );

    return TRUE;
}
Notice that the code checks to make sure that you're really getting called with some valid dimension—MFC makes some spurious calls with zero values as it brings the window up. You can ignore these since they cause trouble if you try to calculate the aspect ratio of the window at that point. OnSize first saves the new window size and calculates the aspect ratio. Once these values are saved, it then sets up the default viewport. In this case it's probably going to be exactly what you want—an OpenGL window to take up the entire client area. If you want something different, you can change it here. This is what I did to get Figure 3. The viewports and the scenes shown in that figure were all done at rendering time; the size of the window still needs to be saved to compute the aspect ratio.
The next thing OnSize does is to set up a default viewing frustum by calling a member function. In this case I've made the default implementation of SetupViewingFrustum use a default perspective view centered on the middle of the screen. If you'll be using an orthographic or a custom perspective view, or if you want an animated viewpoint, then you can override this member function. If you're mostly interested in simple 3D perspective views, then this default viewing frustum is probably just what you need.
The next thing to do is set up the viewing transformation. The viewing transformation is the part of the code that selects the viewpoint, or "eye-coordinates," for the OpenGL scene. Due to the nature of 3D graphics, you select the viewing transformations before you start placing your objects in the scene. In the sample, the SetupViewingTransform member function positions the viewpoint with a 20° rotation about the y axis and a movement of –5 units back from the origin. This places the viewpoint in a convenient position to view a scene centered at the origin. You can override this function to place your own viewpoint.
Finally you're ready to override the OnDraw member function. OnDraw is where you depart from the normal methodology of overriding base-class member functions to change their behavior. This is because there's usually a sequence of events that occurs in OpenGL programs when it's time to rerender a scene:
I've modified the COpenGLView class' OnDraw member function to call additional member functions, each designed to handle one of these particular subtasks. The actual clearing of the viewport occurs in the PreRenderScene member function. You need to clear the screen after the viewport is set up; if you are using multiple viewports, you'll need to clear the screen after each viewport is selected. If you're interested in hidden-surface removal, then you'll need to enable depth testing, which I did at the end of the InitializeOpenGL member function, and clear the depth buffer, which is also done in PreRenderScene.
After the PreRenderScene member function is called, the current matrix stack (which was set to the modeling/viewing matrix) is pushed, then the RenderStockScene member function is called. This subtask takes care of rendering the static or "stock" part of the view. If you're creating a program that has some sort of set that serves as a backdrop, you'd place that code in here. It's wrapped with a push/pop of the modeling matrix since you typically manipulate this matrix when creating a scene; this is just a safety feature that restores the matrix to its original state. If you forget to restore the state, then your models might get placed in the wrong spot. The default stock scene for the COpenGLView class is a black and white checkerboard lying on the x-z plane.
After the stock scene, call the primary subtask, the RenderScene member function. This is where you'll be spending most of your time since this function is intended to provide you with a location to construct your model. In the default RenderScene let's provide a simple default scene consisting of a blue wireframe cube with a red sphere inside it (see Figure 10). The sphere and cube are sitting on the checkerboard's surface.
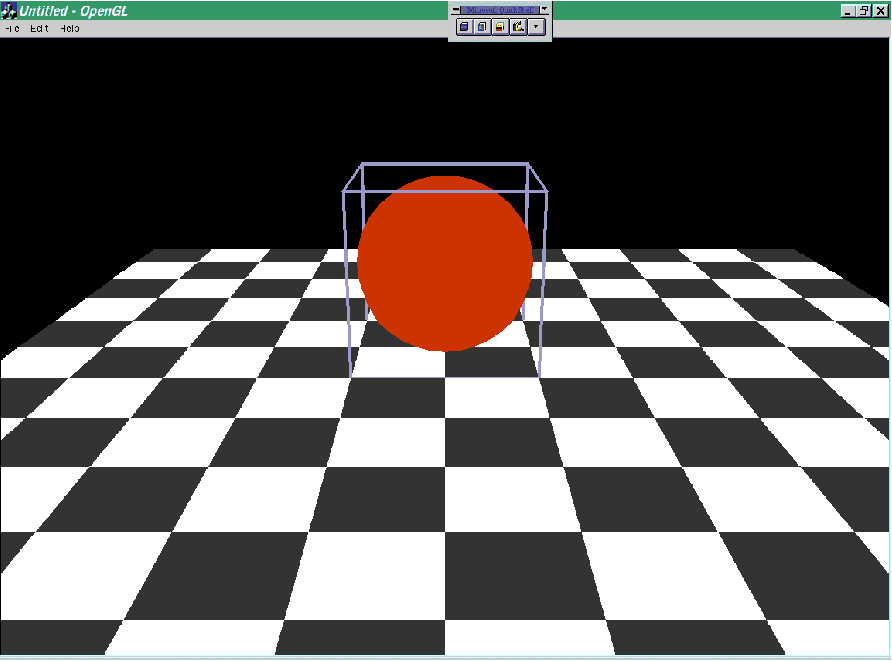
Figure 10 Default RenderScene output
After you've placed your models in the rendering pipeline, flush out the pipeline through a call to glFinish. Windows NT in particular will cache drawing calls, so if you want to make sure that the scene is rendered at some particular point, you'll need to flush the pipeline. The next call is to swap the buffers. If you don't have double-buffering enabled, then this call has no effect. If you do have double buffers, after this call the back buffer will become the front buffer and the scene will be visible.
The last routine is the PostRenderScene member function. If you've written any graphics routines, then you know that you have to time your rendering to the vertical retrace of the video monitor. To time things optimally, you want to always start your rendering just after a vertical retrace. If a retrace occurs when you're rendering or swapping buffers, you code will be forced to wait till the retrace ends. Thus, just after the call to SwapBuffers, there still might be some time before the next vertical retrace. This is the time when you want to perform any additional bookkeeping chores—after you've rendered, but before the next retrace starts. If you order it the other way, your code might take twice as long to render. As you write OpenGL code (or make the OpenGL window different sizes) you'll notice that at high refresh rates (say around the frequency of your monitor, typically about 60-75Hz), you're going great. Add a little more code or increase the window size and the rendering rate will typically drop to half that rate. You've just crossed over the line, and your code takes just a bit too long to loop before the next retrace occurs. For animated scenes, 24 frames/second is great, 15 is OK, and less than 7 is annoying. The moral of the story is to place things like the calculation of new positions, rotations, and collision detection in the PostRenderScene member function and not before you render your scene. Of course, if you are running on a multiprocessor machine, you could simultaneously render and calculate.
As you can see, there's a lot of coordination going on here, which is why there's a multitude of member functions to take care of the various subtasks that you might want to modify. With this basic structure you should never have to override the OnDraw member function. All you'll need to do is write your own member functions to take over the details, not the overall structure. That's it! A complete OpenGL rendering view that's ready for you to make your own. Now, how do you use this class? Well, let's take a look.
The intent of the COpenGLView class was not to have the class directly hooked into your application. It was designed so that you create a subclass based upon the COpenGLView class. This is relatively simple. The first step is to create a subclass from COpenGLView and modify it in some manner. Let's create a subclass called CMyView, and override the RenderStockScene and RenderScene member functions. You'll need to add the DECLARE_DYNCREATE(CMyView) macro; if you don't, objects derived from the CObject base class won't be created dynamically at runtime. All view classes should support dynamic creation because the framework needs to create them dynamically. The DECLARE_DYNCREATE macro is placed in the header file for the class, and this header file is then required for all CPP files that need access to objects of this class. If DECLARE_DYNCREATE is part of the class declaration, the IMPLEMENT_DYNCREATE macro must be included in the class implementation.
To make the distinction between the COpenGLView class and the CMyView class, I've added two new files to the project, a header and a source code file that contain the CMyView class. This demonstrates that all you need to do to use the COpenGLView class is to include the COpenGLView header in your file. The source code for the CMyView class looks like this:
 #include "stdafx.h"
#include "OpenGL.h"
#include "OpenGLDoc.h"
#include "MyView.h" // includes COpenGLview.h
IMPLEMENT_DYNCREATE(CMyView, COpenGLView)

// No stock scene
void CMyView::RenderStockScene()
{
       return; // NOP
}

void CMyView::RenderScene()
{
... details not important...
}
As you can see, there's not much to it—which is exactly how you want it.
The final step is to connect up the MyView class instead of the COpenGLView class. This occurs in the app source code; in this case it's in the OpenGL.cpp file. In the InitInstance member function of the app source, there will be a section that dynamically creates the document from a template that includes the view class. You can simply change the name of the view class in the template to CMyView and recompile.
To create a customized version of the COpenGLView class, I overrode the RenderStockScene member to turn off the stock scene, and then overrode the RenderScene member function to create a really cool 3D message utilizing some of the new 3D text features found in the Win32 API. You can see the results in Figure 11. The actual code that generates this scene is too complicated to go into here, although I do something very similar to this in my book if you're interested (OpenGL Programming for Windows 95 and Windows NT, 1996 Addison-Wesley). I added two additional member functions that take care of creating the text primitives so that OpenGL can render them. The functions aren't really that complicated, so you should be able to figure out how they work.

Figure 11 Custom RenderScene output
Once the COpenGLView class has been created, all you need to do is inherit from it and override the functions that you need. The 3D text scene only requires two function overrides, and one of those new functions is simply a naked return statement! Now, there is still a reasonably large learning curve to take advantage of OpenGL, but with the class presented here you should be able to take advantage of the groundwork and quickly create your own 3D scenes.
This article is reproduced from Microsoft Systems Journal. Copyright © 1995 by Miller Freeman, Inc. All rights are reserved. No part of this article may be reproduced in any fashion (except in brief quotations used in critical articles and reviews) without the prior consent of Miller Freeman.
To contact Miller Freeman regarding subscription information, call (800) 666-1084 in the U.S., or (303) 447-9330 in all other countries. For other inquiries, call (415) 358-9500.