John Lynn
Have you mastered all the ins and outs of the new TreeView control? Here John Lynn gives you a guided tour.
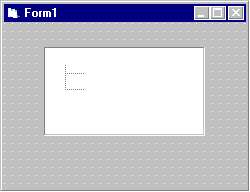
THE 32-bit TreeView control, one of Windows 95’s “common controls,” is a powerful way to present complex hierarchical data. Figure 1 shows what a TreeView control looks like when it’s first placed onto a form.
Figure 1. A TreeView control when it’s first placed onto a form.
Just like some of the other new custom controls, there are two ways to set the design time properties of a TreeView instance: with the tabbed dialog box or with the more traditional Visual Basic properties window. You can activate the tabbed dialog box (see Figure 2) by right-clicking on the control and selecting Properties from the pop-up menu, or you can select the Custom property in the traditional VB Properties window.
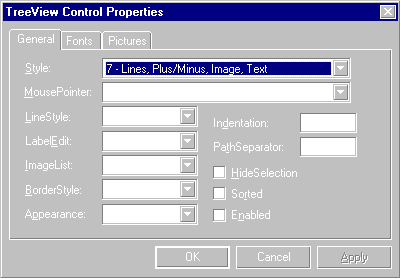
Figure 2. TreeView properties.
Some of the more interesting TreeView properties include indentation, which controls how far each new child object is indented when added to the tree; the nodes property, which I’ll discuss in depth in a later section; the sorted property; the SelectedItem property, which returns a reference to the currently selected node; and the style property, which can be set as follows:
0-Text only
1-Image and text
2-Plus/minus and text
3-Plus/minus, image, and text
4-Lines and text
5-Lines, image, and text
6-Lines, plus/minus, and text
7-(Default) Lines, plus/minus, image, and text
You can associate a small icon with each leg of your TreeView by assigning an ImageList control to the ImageList property of the TreeView control. But where is this ImageList property of the TreeView control? It doesn’t show up in the Properties window. This is the one case where you’ll need to view the properties through the tabbed dialog box, because it’s the only place where you can look at and assign the ImageList property.
An ImageList control is a keeper of images; just select one and place it on a form to use with the TreeView control. The ImageList control has a ListImages collection at its disposal, and the ImageList control can supply picture objects to any control that has a Picture property. The list of images is loaded into the control using one of several methods. One way is to use the ImageList Control Properties tabbed dialog box as shown in Figure 3. Or you can load pictures into the ImageList control programmatically using the control’s Add method in conjunction with the VB LoadPicture() function:
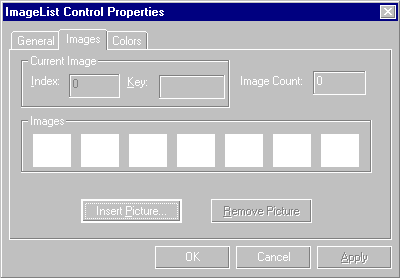
Figure 3. ImageList control properties.
Dim imgI As ListImage   ' Create Image variable.
Set imgI = ImageList1.ListImages.Add (, "open", _
    LoadPicture("bitmaps\outline\open.bmp"))
Set imgI = ImageList1.ListImages.Add (, "closed", _ LoadPicture("bitmaps\outline\closed.bmp"))
Did you notice that the first parameter to the Add method in this code fragment is missing? The first parameter of a ListImages collection is normally used to indicate the position in the collection at which the picture will be inserted. The default is set to add the picture to the end of the collection. The second parameter is used to name the image so it can be referred to by something other than an index number. In this example, I’ll call these images in the collection “open” and “closed,” because they represent an expanded (“open”) and a collapsed (“closed”) branch in the TreeView control. The ListImages’ Add method doesn’t allow named arguments.
Now that the images are loaded, let’s look at the manipulation of the TreeView control’s Nodes collection.
In order to set up a TreeView control, it helps to be familiar with the Node object and its properties and methods because the branches of the tree are nodes. Navigating a tree involves getting references to Node objects and then performing Node methods or manipulating Node properties once you arrive at a node to operate on. So, let’s cover some capabilities of Node objects in relation to the TreeView control.
You add a Node object to a TreeView control by using the Add method of the Nodes collection. There are several parameters to this Add method and, unfortunately, named arguments aren’t supported. Here’s a typical usage of the Add method:
Dim NewNode as Node
Set NewNode =   TreeView1.Nodes.Add(, , , "Node 1", _
     "closed")
Set NewNode =   TreeView1.Nodes.Add(, , , "Node 2", _
     "closed")
The Add method returns a reference to the newly added Node object, and this can be assigned to a Node object. After these two Add methods execute, the TreeView control will have two “root” nodes. These nodes will appear at the same level.
In this example, I’m using only two of six possible parameters in the call to the Nodes collection Add method-the two parameters that specify the text label and the picture for this node. I’m using the picture called “closed” that was previously added to the ImageList’s ListImages collection. Figure 4 shows what this tree looks like so far.
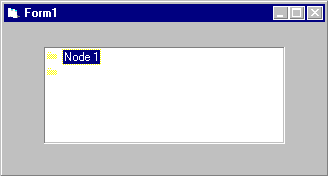
Figure 4. TreeView after adding two nodes.
By simply using some of the additional parameters of the Nodes collection’s Add method, you can add child nodes to the two just added:
Dim NewNode as Node
Set NewNode = TreeView1.Nodes.Add(1, tvwChild, , _
   "Node 1 Child 1", "closed")
Set NewNode = TreeView1.Nodes.Add(1, tvwChild, , _
   "Node 1 Child 2", "closed")
Set NewNode = TreeView1.Nodes.Add(2, tvwChild, , _
   "Node 2 Child 1", "closed")
Set NewNode = TreeView1.Nodes.Add(2, tvwChild, , _
   "Node 2 Child 2", "closed")
Node 1 and Node 2 now each have a couple of children. This was specified by using the first two parameters of the Add method: The first parameter is the relative and the second parameter specifies the relationship of this newly added Node object to the relative. Relationship choices are shown in Table 1.
Table 1. Add method parameters.
| Constant | Value | Description |
| tvwLast | 1 | The new node is placed after all other nodes at the same level of the relative specified as the first parameter. |
| tvwNext | 2 | The new node is inserted into the tree right after the relative specified as the first parameter. |
| tvwPrevious | 3 | The new node is inserted into the tree right before the relative specified in the first parameter. |
| tvwChild | 4 | The new node is a child of the relative specified in the first parameter, thereby starting a new indentation level. This is the default behavior. |
The first parameter is used to name a pre-existing “relative” in the tree that the new node will be added with respect to. The first parameter provides context for the Add operation, so that the new node can be added in exactly the right place. This parameter can be specified as an index value that represents the position in the tree of the relative, or as a key value. If the first parameter is omitted, the default behavior is to add the new node to the last position of the top node hierarchy.
If you know the index value of a pre-existing node, then it can be used when adding the new node. But beware, it’s tricky to find the index value of nodes in trees, because values are assigned at the same time that nodes are added to the tree. For instance, in the example tree constructed so far, the Node 2 node has an index of 2 (it was added second in the code), and the child node, Node 2 Child 1, has an index of 7! Other factors will affect the index values, such as the Remove method, which renumbers the index values each time it’s called to remove a node.
Using a key value instead of an index is a much more reliable method of referring to nodes in the TreeView Nodes collection. You can specify the key value for a node by using the third parameter of the Add method, as shown here:
Dim NewNode as Node
Set NewNode = TreeView1.Nodes.Add(, ,"n1" , "Node 1",_
   "closed")
Set NewNode = TreeView1.Nodes.Add(, , "n2", "Node 2",_
   "closed")
Set NewNode = TreeView1.Nodes.Add("n1", tvwChild, , _
   "Node 1 Child 1", "closed")
Set NewNode = TreeView1.Nodes.Add("n1", tvwChild, , _
   "Node 1 Child 2", "closed")
Set NewNode = TreeView1.Nodes.Add("n2", tvwChild, , _
   "Node 2 Child 1", "closed")
Set NewNode = TreeView1.Nodes.Add("n2", tvwChild, , _
   "Node 2 Child 2", "closed")
Because the first two parent nodes were added without regard to existing tree relatives, the Add calls for these nodes didn’t specify relatives in the first parameter. When adding their children, the keys from these parents are indicated in the first parameter.
The children’s keys aren’t specified on the Add call in this example. You can specify the keys here, or you can assign a key later by setting the particular Node object’s Key property. Regardless how the key is added, it must be a unique string in the collection; no two keys can have the same string value or a runtime error will result. Once the tree is constructed and populated with data, it’s time to think about how to control navigation of the tree and decide what to do when the branches are selected by the user of the application.
The TreeView control has an ample supply of events that can be used to react to changes in the tree, but you need to master the NodeClick event to control navigation through the tree. You can visit nodes by pointing and clicking with the mouse or by using the keyboard arrow keys (see Table 2). Moving to any node selects it, which sets the TreeView SelectedItem property and fires a NodeClick event. You can tell which node is selected because the node’s text label changes to the system highlight color.
Table 2. How user actions affect the TreeView control.
| User action | Results |
| Single-click on a TreeView node | - NodeClick event |
| - TreeView SelectedItem property set | |
| - Click event | |
| Single-click on a +/- | - Click event |
| - Outline expands/collapses | |
| Right/Left arrow key on a node that has children | - Outline expands/collapses |
| Double-click on a node | - NodeClick event |
| - TreeView SelectedItem property set | |
| - Click event | |
| - DblClick event | |
| Right-arrow to a node | - NodeClick event |
| - TreeView SelectedItem property set |
Regardless how the particular node is selected, the TreeView SelectedItem property returns a reference to the Node object that is showing as selected. Using that node reference, operations can be performed on the node, perhaps based on which key is pressed while the node is selected. A typical section of code to handle deleting a node, using the KeyDown event to determine which key was pressed, may look like this:
Private Sub TreeView1_KeyDown(KeyCode As Integer, _
    Shift As Integer)
If KeyCode = vbKeyDelete Then
    If TreeView1.SelectedItem.Index <> 1 And _
       TreeView1. SelectedItem.Children = 0 Then
       TreeView1.Nodes.Remove TreeView1.SelectedItem.Index
    End If
End If
The If statement checks to see if the currently selected node is the root node, which is normally at index = 1, before deleting the node. It also checks to make sure that there are no children of this node that could get orphaned when performing the delete. The Then statement uses the SelectedItem property to refer to the currently selected Node object whose index is obtained via the Index property. This index value is used as a parameter to the Nodes collection’s Remove method.
In summary, to create a navigable TreeView control, complete with images and data nodes, you must follow these steps:
Load bitmap images into the ImageList control that the TreeView control is associated with using one of the methods described earlier.
Set the ImageList property of the TreeView control to point to the ImageList control in step 1.
Set other properties of the TreeView control, such as Style and Sorted. Intrinsic constants, which are available to assign to properties, allow you to do things like TreeView1.Style = tvwTreelinesPictureText to set the style of the TreeView control to include treelines, pictures, and text.
Populate the tree using node objects.
Use the TreeView control’s events to control tree navigation. s
John Lynn works at a specialty chemical company as a data access developer, using Visual Basic, Access, and Microsoft BackOffice products including SQL Server, SNA Server, and Internet Information Server. 76001.2433@compuserve.com.

To find out more about Visual Basic Developer and Pinnacle Publishing, visit their website at: http://www.pinppub.com/vbd/
Note: This is not
a Microsoft Corporation website.
Microsoft is not responsible for its content.
This article is reproduced from the February 1997 issue of Visual Basic Developer. Copyright 1997, by Pinnacle Publishing, Inc., unless otherwise noted. All rights are reserved. Visual Basic Developer is an independently produced publication of Pinnacle Publishing, Inc. No part of this article may be used or reproduced in any fashion (except in brief quotations used in critical articles and reviews) without prior consent of Pinnacle Publishing, Inc. To contact Pinnacle Publishing, Inc., please call (800) 788-1900 or (206) 251-1900.