George Shepherd and Scot Wingo
George Shepherd develops mapping software for Orbital Software and delivers training courses for DevelopMentor. Scot Wingo is cofounder of Stingray Software, producing MFC Extension class libraries. George and Scot wrote MFC Internals (Addison-Wesley, 1996).
QI've heard that Visual Basic® 5.0 has a new extensibility model. What is it and how can I use it?
AThe latest version of Visual Basic does expose a new object model called the Extensibility Model. Simply put, the Extensibility Model lets you plug tools and utilities into the Visual Basic environment seamlessly. This month, we'll give you an overview of what the Visual Basic Extensibility Model comprises and then examine how it works by building a Visual Basic add-in that converts decimal numbers to hex format.
These days many applications maintain their own object models. For example, Microsoft® Excel has an object model that exposes the application, worksheets, and charts and makes the entire application programmable with languages like Visual Basic. Now the Visual Basic environment supports a similar model called the Visual Basic Extensibility Model.
The Visual Basic Integrated Developer Environment (IDE) is composed of several easily identifiable elements like menus, toolbars, forms, and code modules. The Visual Basic Extensibility Model represents these components as collections of Visual Basic objects. Visual Basic exposes each of these through the Extensibility Model.
At the top of the Extensibility Model lies the Visual Basic IDE itself, represented by an object named VBE. If you can somehow get to this object (we'll show you how in a moment), you can manipulate many of the elements in the Visual Basic IDE programmatically. For example, the VBE object contains collections of projects (represented by VBProject objects), windows (represented by Window objects), code windows (represented by CodePane objects), and menu bars and toolbars (represented by CommandBar objects). Given a VBE object, you can enumerate through all the various elements or you can just manipulate the active one. For instance, if you get the active CodePane, you can use it to retrieve the actual source code for a module (represented by the CodeModule object) and the CodeModule methods to insert and delete lines of code programmatically.
That's a description of the Visual Basic Extensibility Model in its raw state. The most practical way to use the functionality exposed by the Extensibility Model is through Visual Basic add-ins.
Visual Basic add-ins are ActiveX™ DLLs or EXEs that implement a COM interface named IDTExtensibility and are registered within the VBADDIN.INI file. Add-ins connect themselves to the Visual Basic IDE programmatically and become part of the IDE. In addition, add-ins can be activated through menu commands, toolbar buttons, or through Windows events. Add-ins are useful for things like automating repetitive or tedious tasks and responding to various IDE-based events. By employing add-ins and the Extensibility Model effectively, you can add functionality to the Visual Basic IDE that its creators never dreamed of.
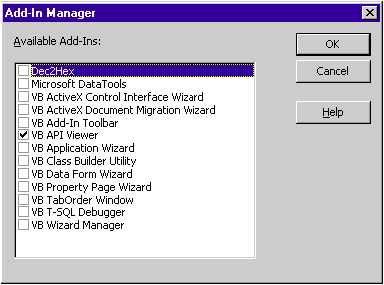
To get a good feel for what a Visual Basic add-in is and how it works, fire up Visual Basic 5.0, pull down the Add-Ins menu, and select Add-In Manager. This will give you the Add-In Manager dialog box shown in Figure 1.

Figure 1 The Visual Basic Add-In Manager
The Visual Basic Add-In Manager reads a file named VBADDIN.INI to find out which add-ins are stored on a particular computer and displays them in the dialog box. There are basically four types of extensions that you can add to Visual Basic: add-ins, wizards, utilities, and builders. Add-in is a generic term referring to a program that performs very specific tasks within the IDE. Add-ins are usually activated in response to an event such as opening a form. A wizard is a program that leads users through a task step-by-step. A utility is an add-in that may be run with Visual Basic or may be run by itself—the Visual Basic API Viewer is an example of a utility. A builder add-in is useful for viewing or setting the properties of a control or the properties that several controls have in common. In general, builders aren't used as add-ins anymore.
Although there are many types of add-ins, two features distinguish add-ins from other ActiveX components. First, an add-in component is listed in VBADDIN.INI. Second, an add-in component implements an ActiveX interface named IDTExtensibility. With this in mind, let's see what it takes to create a Visual Basic add-in.
Creating add-ins is fairly straightforward in Visual Basic. To illustrate, we'll create an add-in for converting decimal numbers to hex numbers. The new functionality will be available via a menu item under the Add-Ins menu within Visual Basic.
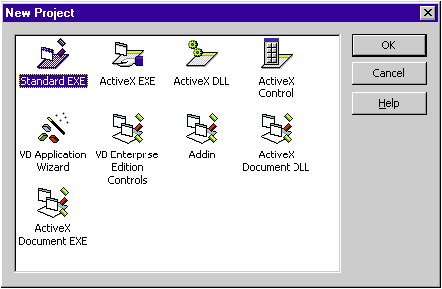
The easiest way to create an add-in is to start a new project. Selecting File|New yields the dialog box shown in Figure 2. Although one of the options in the dialog box is specifically for creating an add-in project, you can also use ActiveX EXE, ActiveX Document DLL, ActiveX Document EXE, or ActiveX DLL to create your add-in project. Remember, the difference between a regular ActiveX component and a Visual Basic add-in is that the add-in component is registered within VBADDIN.INI and has a class that implements IDTExtensibility.

Figure 2 Visual Basic's New Project dialog
Selecting Addin from the new project dialog generates an ActiveX EXE with the distinguishing features already in place. If you select one of the other ActiveX project types, you'll need to add these elements by yourself. However, that's no big deal—the IDE does most of the work. To house our hex converter add-in inside a DLL, we select the ActiveX DLL project type so that Visual Basic generates an ActiveX DLL project containing a single class.
The first step in writing an add-in using Visual Basic is to bring in the libraries for supporting the Extensibility Model. To do this, select References from the Project menu. You'll get a dialog box representing all the different libraries you may bring in. Select the Microsoft Office 8.0 Object Library box and the Microsoft Visual Basic 5.0 Extensibility references. These libraries provide various definitions and declarations that you must have to use the Extensibility Model (like Command Bars).
When you create a new project, Visual Basic gives it the default name Project1. Now is a good time to use the project properties box to change the name of the project. For example, a good name for the decimal-to-hex conversion add-in might be Dec2Hex. Either select Properties from the Project menu or right-click on the project item in the Visual Basic Explorer to get to the property page. Once your project is properly named, you can add a user interface to it by tacking on a form.
Visual Basic does most of the work when you create an add-in. This includes building a Visual Basic template for the connection class (which implements the IDTExtensibility interface). However, the connection class that Visual Basic generates for you expects to see a form in your project named frmAddIn. To add this specific form to the project, select Add Form from the Project menu and select AddIn form from the dialog box. Doing so adds the form frmAddIn to your project. It's a generic Visual Basic form that includes some boilerplate code used by the add-in for showing and hiding itself.
Once the add-in has a form, you need to add a connection class—the class that implements IDTExtensibility. Fortunately, there's a Visual Basic template for the connection class as well. Selecting Add Class Module from the Project menu performs this step. Visual Basic gives you several options, including creating a generic Visual Basic class, using the Visual Basic Class Builder, and creating an add-in class. Make sure that you include an add-in class.
Visual Basic adds a new class to your project and names it Connect. By having Visual Basic write the connection class for you, the connection class comes with the required IDTExtensibility interface already implemented. When managing add-ins, Visual Basic expects to see this interface implemented by all ActiveX components claiming to be add-ins.
The IDTExtensibility interface includes four functions: OnConnection, OnDisconnection, OnStartupComplete, and OnAddInsUpdate. Visual Basic treats these function calls as events. Here's how each of these functions is used by Visual Basic.
Visual Basic calls OnConnection whenever an add-in is connected to the IDE. That is, whenever you activate the Add-In Manager, check the box next to the add-in and press OK. Visual Basic tries to connect that add in, calling its IDTExtensibility OnConnection method. Figure 3 shows the OnConnection code generated by Visual Basic.
Figure 3 Default OnConnection
Private Sub IDTExtensibility_OnConnection(ByVal VBInst As Object, _
                                   ByVal ConnectMode As vbext_ConnectMode, _
                                   ByVal AddInInst As VBIDE.AddIn, _
                                   custom() As Variant)

   On Error GoTo error_handler

   'save the vb instance
   Set VBInstance = VBInst

   'this is a good place to set a breakpoint and
   'test various addin objects, properties and methods
   Debug.Print VBInst.FullName

   If ConnectMode = vbext_cm_External Then
       'Used by the wizard toolbar to start this wizard
       Me.Show
   Else
       Set mcbMenuCommandBar = AddToAddInCommandBar("My AddIn")
       'sink the event
       Set Me.MenuHandler = VBInst.Events.CommandBarEvents(mcbMenuCommandBar)
   End If

   If ConnectMode = vbext_cm_AfterStartup Then
       If GetSetting(App.Title, "Settings", "DisplayOnConnect", "0") = "1" Then
           'set this to display the form on connect
           Me.Show
       End If
   End If

   Exit Sub

error_handler:

   MsgBox Err.Description

End Sub
Visual Basic calls OnConnection when passing in several parameters. The first parameter is an object representing the running instance of Visual Basic (necessary for accessing elements of the IDE). The second parameter is a number indicating the context in which the add-in started. These contexts are:
0. Add-in was started after the initial Open Project dialog box was shown.
1. Add-in was started before the initial Open Project dialog box was shown.
2. Add-in was started externally by another program or component.
The third parameter is the instance of the add-in. The fourth parameter is an array of variant expressions to hold user-defined data.
The add-in connection class written by Visual Basic declares two interesting variables at the top. The first is a variable of type VBIDE.VBE named VBInstance. This represents the Visual Basic IDE and is the key to driving the IDE programmatically. The second variable is of type Office.CommandBar and named mcbMenuCommandBar. mcbMenuCommandBar represents the main toolbar within the IDE.
The OnConnection code written by Visual Basic first sets VBInstance to the Visual Basic instance passed in as a parameter. If the add-in was started externally by another program or component, it shows the form on the screen. Otherwise, the add-in tacks a menu item onto Visual Basic's Add-In menu so that users can activate this add-in.
Before finishing the IDTExtensibility interface, let's take a quick look at how this is done within a function named AddToAddInCommandBar (inserted into the project as part of the Connect class generated by Visual Basic).
Visual Basic's toolbars and menus are represented by an abstraction named the Command Bar. The Command Bar type is defined in the Microsoft Office 8.0 library and is made available by adding the Office 8.0 library to the projects reference list (select References from the Project menu).
The key here is that the Visual Basic IDE manages a collection of these Command Bars. If you can somehow get the object representing the Visual Basic IDE, you can access any of the Visual Basic Command Bars. Remember that OnConnection caches the Visual Basic IDE object (passed in as the first parameter to OnConnection) inside the global variable named VBInstance. Figure 4 shows the code Visual Basic adds for tacking an item onto the Add-Ins menu.
Figure 4 Manipulating the Add-Ins Menu
Function AddToAddInCommandBar(sCaption As String) As Office.CommandBarControl
  Dim cbMenuCommandBar As Office.CommandBarControl  'command bar object
  Dim cbMenu As Object

  On Error GoTo AddToAddInCommandBarErr

  'see if we can find the Add-Ins menu
  Set cbMenu = VBInstance.CommandBars("Add-Ins")
  If cbMenu Is Nothing Then
     'not available so we fail
     Exit Function
  End If

  'add it to the command bar
  Set cbMenuCommandBar = cbMenu.Controls.Add(1)
  'set the caption
  cbMenuCommandBar.Caption = sCaption

  Set AddToAddInCommandBar = cbMenuCommandBar

  Exit Function

AddToAddInCommandBarErr:

End Function
AddToAddInCommandBar accesses the Add-Ins menu through the line
Set cbMenu = VBInstance.CommandBars("Add-Ins")
Remember, the IDE maintains a collection of Command Bars; the code above simply picks out the Command Bar named Add-Ins to get the Add-Ins menu. The function then goes on to add a single item (defined by the string parameter) to the menu. When users select this item, the add-in executes a subroutine named MenuHandler_Click that just shows the add-in. Again, this is code that Visual Basic added by inserting an AddIn class to the project. You can use this technique to modify any other menu items in the Visual Basic IDE.
The other three methods within the IDTExtensibility interface are OnDisconnection, OnStartupComplete, and OnAddInsUpdate. Visual Basic calls OnDisconnection whenever the add-in is disconnected from the Visual Basic IDE (usually through the Add-In Manager dialog box). Visual Basic calls OnStartupComplete whenever the startup of the Visual Basic IDE is complete. Finally, Visual Basic calls OnAddInsUpdate when changes to the VBADDIN.INI file are saved.
The final change to the class module includes a change to one of the attributes. For the correct name to be added to the list of add-ins in the Add-In Manager dialog, the connection class's VB_Description field needs to hold the appropriate name. For example, this line in the CONNECT.CLS file
Attribute VB_Description = "Dec2Hex"
should be changed to something like this:
Attribute VB_Description = "Dec2Hex"
You need to change this line manually in a text editor because you can't get to this property via the property page.
The only remaining element you need to add to the project is the AddIn module. The main job of the AddIn module is to make the correct entry in the VBADDIN.INI file so the new add-in is displayed properly within the Add-In Manager. To add the new module, select Add Module from the Project menu and choose the AddIn module.
An AddIn module is nice and compact—all it does is declare the Windows WritePrivateProfileString API function for use by a single function named AddToINI. This code shows the AddToINI function generated by Visual Basic:
Sub AddToINI()
  Dim ErrCode As Long
  ErrCode = WritePrivateProfileString("Add-Ins32",
                                             "MyAddIn.Connect",
                                      "0",
                                      "vbaddin.ini")
End Sub
AddToINI wraps a single call to WritePrivateProfileString, which adds an entry to the file VBADDIN.INI. Remember, Visual Basic consults VBADDIN.INI every time someone invokes the Add-In Manager to add entries to the dialog box. The first parameter is the section within the INI file. The second parameter is the name of the connection object. The default name is MyAddIn.Connect. You'll need to change this to reference the names specific to your project using the format <project name>.<addin class name>.
Visual Basic adds this function to your project as a convenience. While you're developing the add-in, all you need to do to add the correct INI file entry is to call AddToINI—you can even do it from the Immediate window. If you decide to distribute your add-in, you'll probably want to update the INI file from within a setup script.
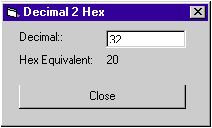
At this point, you've got a working Visual Basic add-in shell. It doesn't do much except show an empty form. Finishing the add-in is just a matter of filling out the rest of the application. For example, the decimal-to-hex conversion form might look like the dialog box shown in Figure 5.

Figure 5 The Decimal-to-Hex conversion dialog
The decimal text box responds to changes by converting the value within it to hex (using the Visual Basic Hex function) and updating the hex field in the dialog box. For example, the decimal value text box might respond to edit changes like this:
Private Sub DecimalValue_Change()
   HexValue.Caption = Hex(Val(DecimalValue.Text))
End Sub
Because the add-in is connected to the running instance of Visual Basic, you may actually have the add-in turn around and perform such tasks as updating the active code pane.
Making the Visual Basic IDE programmable opens up many possibilities for customizing the Visual Basic development environment with add-ins. While the example we looked at is somewhat trivial, it illustrates the fundamentals behind using the Visual Basic IDE for writing a Visual Basic add-in.
Have a question about programming in Visual Basic, Visual FoxPro™, Microsoft Access, Office or stuff like that? Send your questions via email to Dave Edson: davee@microsoft.com.
This article is reproduced from Microsoft Systems Journal. Copyright © 1997 by Miller Freeman, Inc. All rights are reserved. No part of this article may be reproduced in any fashion (except in brief quotations used in critical articles and reviews) without the prior consent of Miller Freeman.
To contact Miller Freeman regarding subscription information, call (800) 666-1084 in the U.S. and Canada, or (303) 678-0439 in all other countries. For other inquiries, call (415) 905-2200.