Visual InterDev™ introduced a new concept in ActiveX™ controls called the design-time control (DTC). A DTC is an ActiveX control, complete with .ocx extension, but it never runs on a client system. Instead, a DTC runs within the application design tool the developer uses and performs a task for the developer. The DTCs included with Visual InterDev run in the Visual InterDev environment on a developer's workstation. A DTC will typically generate HTML and Active Server Pages (ASP) code that is inserted into an ASP page by the control.
Most articles that cover DTCs skim the surface by showing a simple example that makes use of the DTC. I'll start from the basics by adding an ODBC data connection, then move into connecting the ASP to the data connection by using a DTC. I'll also look behind the scenes at the code generated by the DTC and briefly discuss how it works.
The DTCs that are part of Visual InterDev were created with Visual
Basic® 5.0. They make use of the DTC SDK (http://www.microsoft.com/workshop/prog/sdk/dtctrl) and the tools it provides. You can create a DTC in any language that can use ActiveX components and can generate ActiveX controls.
The first step in using a DTC is usually to create a data connection in your Web project. A DTC that uses a database will require a data connection as its link between Visual InterDev and the database. The data connection is simply a link from Visual InterDev to an ODBC 3.0 data source. The data connection is similar to a Visual Basic data control in that both of them point to a database and are used by other controls as links to the database. Each application can have multiple data connections, each pointing to a different database. The data source will be used by the OLE DB ASP code generated by the DTC.
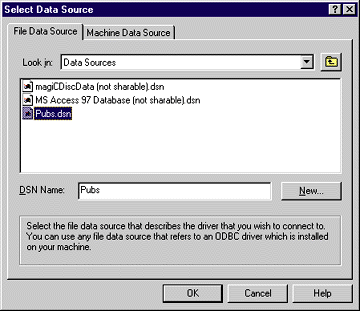
I suggest that you create a new project for this example and work through the steps within that project before moving on to a production-type application that is more complex. Adding a data connection is simple enough-right-click the project name or the global.asa file and select Add Data Connection from the context menu. This displays the Select Data Source dialog shown in Figure 1.

Figure 1: Selecting a Data Source
The Select Data Source dialog box allows you to choose an existing
data source or create a new one. You use either a file or machine data source. In almost every case, you will want to use a file data source because of its many advantages. First, a file data source stores the file specifications in a .dsn file. If you want to use the same data source for both Visual InterDev and a Visual Basic-based application, then you can place a file data source on a share located on the server and allow all of your developers to access it.
Second, a file data source works well with ASP applications. When
you create or select a file data source,
Visual InterDev will read the file and add the connection information to the global.asa file. Once the connection is in the project, you don't need the file data source any longer. The global.asa file contains all the connection information you need in the application.
Third, a file data source is much easier to use. You can edit the data source file with any text editor. You can also use the data connection properties in Visual InterDev to modify the data source. Visual InterDev will automatically update the global.asa file with the changes.
In this step, I'll create a new data source by clicking the New button. This will display the Create New Data Source dialog shown in Figure 2. From the list of database drivers shown in this dialog, select the driver for the database you will use. If the appropriate driver is not listed, you may need to install it before continuing. Visual InterDev and ASP require that you use a driver that supports ODBC 3.0 or later. Visual InterDev ships with the right drivers for SQL Server™, Microsoft® Access, and Oracle. The drivers must be installed on both the Web server running Internet Information Server (IIS) and on each developer workstation that is running Visual InterDev. Visual InterDev uses the local driver on the workstation during design mode, while the ASP engine on IIS will use the driver on the Web server. In my sample I'm using SQL Server and will select the Pubs sample database that ships with Microsoft SQL Server.
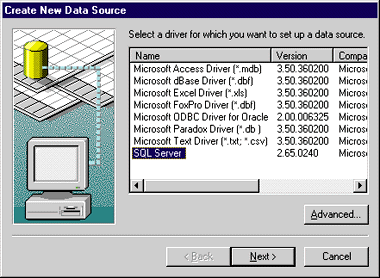
Figure 2: A New Data Source
Now that you have selected the driver for the data connection, you need to name it. Enter the name in the dialog shown in Figure 3 and click the Next button. On the last step of the wizard, you can review your entries, then click Finish. Once you click the Finish button, the wizard terminates and you will see the dialog shown in Figure 1 with your new data source in the list. Click the data source name once to select it, then click OK to add the connection to your project. If necessary, you should also login at this time (see Figure 4).
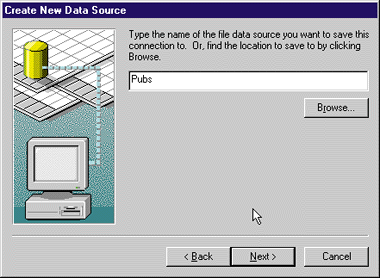
Figure 3: Naming the Data Source
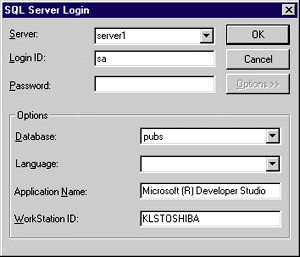
Figure 4: Selecting the Data Source
Now that I have a data connection in my project, I'll create an ASP page and use the Data Range Header DTC to generate the code to connect my ASP page to the data connection. For the first sample, I am going to create a page that pulls data from a SQL Server database and places the results in an HTML table. This simple page will demonstrate how the Data Range Header and Data Range Footer controls work. After the page is working, I will walk you through the various options and some things to watch out for.
To start the page, I created a new ASP page and then opened it in the FrontPage® editor included with Visual InterDev. I added the format shown in Figure 5 along with an HTML table. After I closed FrontPage, Visual InterDev updated the ASP file as shown in Figure 6. You can see the HTML code that generates the page in the browser. I generated the table code with FrontPage so I could use its GUI features to define the table quickly. The table definition must have two rows-the first row is the header for each column, while the second row will contain the detail code.

Figure 5: Sample Web Page Format
After you have updated the file in the FrontPage editor, close the editor and save the file. If the file is still open in the Visual InterDev source editor, Visual InterDev will prompt you to update that editor with the changes made in FrontPage. Answer Yes to this question.
Now you can add the DTC to your file. Create a blank line between the two rows in the table as shown in Figure 6. Right-click the blank line between the table rows and choose Insert ActiveX Control. This will display the Insert ActiveX control dialog box.
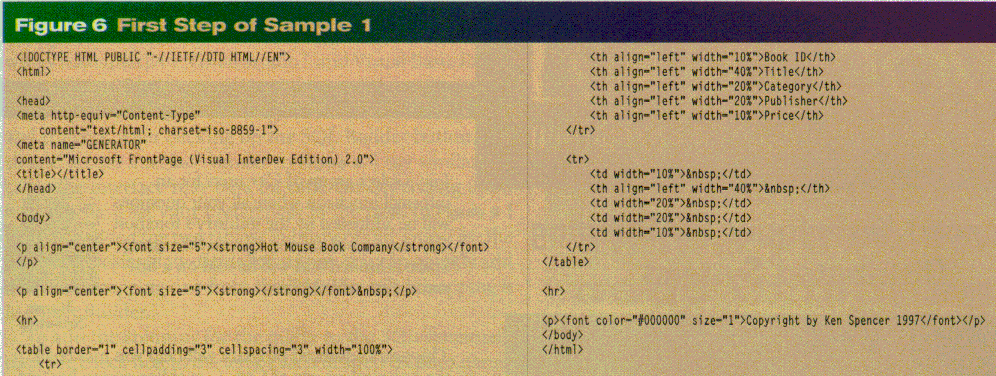
Figure 6: First Step of Sample 1
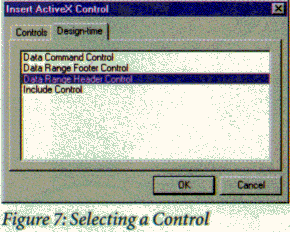
Figure 7 shows the Insert ActiveX Control dialog with the Design-time tab selected, although you can also insert design-time controls from the Controls tab. The only difference in these two tabs is that the Design-time tab picks up the registry entry that identifies a DTC and shows only those controls. The Controls tab displays all controls on your system, which is usually quite a list. For this sample, select the Data Range Header control.
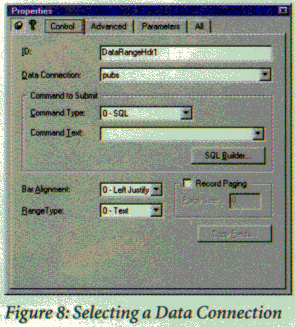
Now that you have activated the Data Range Header control, you can begin to set its options. The first step is to choose a data connection from the Data Connection list, as shown in Figure 8. You can see that the data connection Pubs has been created in the list.
What happens if you activate a DTC that needs a data connection, but forgot to add the data connection to your project? Most developers will close the control, add the data connection, then edit the control and select the new data connection. You don't need to go through those
extra steps. If you forgot to add the data connection, simply click on the FileView tab, right-click the global.asa, and add the data connection. After that you can select the data connection from the list in the DTC interface.
Before building a query, let's finish setting the options for the DTC. Select 2-Table from the Range Type list. This will alert the control to insert the correct code for an HTML table into your ASP file. If you don't select this option, the DTC will insert the wrong code and your application will not work correctly. The other options are 0-Text and 1-Form. The Text option will
generate output for plain HTML text, while the Form option will output HTML and ASP code to generate an HTML-type form. The Form option is normally used when you use the Data Range Header control to generate a page for data entry.
Next select 0-SQL from the Command Type list. For this step you will use a simple SQL command. Later, you will turn this SQL into a stored procedure and change the DTC properties to use it instead of the SQL statement.
Now comes the fun part. Click the SQL Builder button to start Query Builder. Query Builder is part of the Visual Database Tools included with Visual InterDev, Visual Studio™, and Visual Basic Enterprise Edition. It's a powerful tool that can be used to generate all types of SQL, including stored procedures, views,
and triggers. After clicking on the SQL Builder button, you should see an interface similar to Figure 9. I say similar because the interface may be a bit different depending upon how you have set your preferences in the past. In Figure 9 I have also added the two tables (Publishers and Titles) for the query and selected the fields for output. You can quickly add a table by dragging one from the Data View and dropping it in Query Builder.
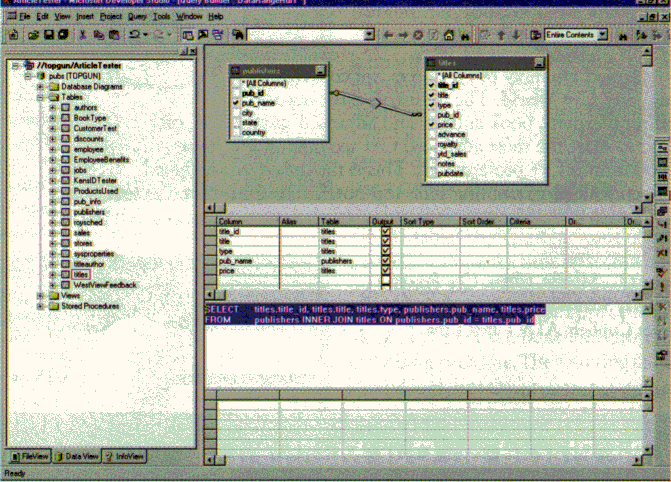
Figure 9: Creating a SQL Query in Query Builder
To add the columns for the query to the SQL statement, click the check box to the left of each desired column name. Notice that the inner join is built automatically by Query Builder. Now close Query Builder and answer Yes to the
Save prompt. This will update the DTC with your new SQL statement. You can redisplay the property page for the
control by right-clicking its name on the designer and choosing Properties.
The ID field for the DTC is used as the name for the control in your code. You can change the ID to the name you want to use. I like to use the standard Visual Basic naming conventions to make code clearer. For instance, you might want to call this control dtcBooks, as the recordset returned by the query will contain books from the Titles table. The ID becomes meaningful in your code as it is the name not only for the control but also for the recordset returned from the database. The DTC properties page at this point will look like Figure 10.
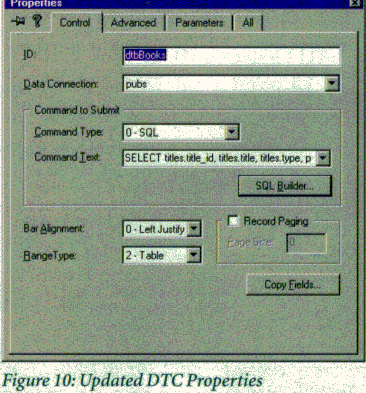
Now click the Copy Fields button. This will display the Copy Fields dialog shown in Figure 11.
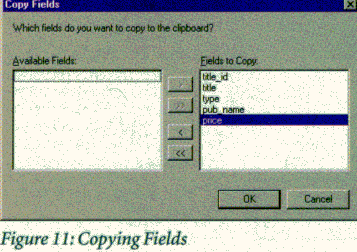
The Copy Fields Dialog will take the fields in the recordset for the DTC and place them on the clipboard. To access the fields you can paste the clipboard contents into your file. Double-click the fields one at a time to add them to the Fields to Copy list. Make sure you double-click the fields in the order that you are going to use them. For instance, in my sample I double-clicked the fields as shown in Figure 11. This places them on the clipboard in the order that you will use them in the table, making it easy to move the fields into your output table.
Now close the DTC. It will automatically generate the ASP code in your file. Your code should resemble that in Figure 12. The DTC code is placed between the HTML <METADATA> tags ending with startspan and endspan. You should never directly edit the code for a DTC in any way. If you do and then edit the control with the DTC editor, your changes will be destroyed. This isn't a bug, but one of the key design benefits of a DTC-you do not have to manually modify the code because the control does it for you.
Figure 12: Sample with DTC Code
<!DOCTYPE HTML PUBLIC "-//IETF//DTD HTML//EN">
<html>


<head>
<meta http-equiv="Content-Type"
content="text/html; charset=iso-8859-1">
<meta name="GENERATOR"
content="Microsoft FrontPage (Visual InterDev Edition) 2.0">
<title></title>
</head>

<body>

<p align="center"><font size="5"><strong>Hot Mouse Book Company</strong></font></p>

<p align="center"><font size="5"><strong></strong></font> </p>

<hr>

<table border="1" cellpadding="3" cellspacing="3" width="100%">
    <tr>
        <th align="left" width="10%">Book ID</th>
        <th align="left" width="40%">Title</th>
        <th align="left" width="20%">Category</th>
        <th align="left" width="20%">Publisher</th>
        <th align="left" width="10%">Price</th>
    </tr>

<!--METADATA TYPE="DesignerControl" startspan
    <OBJECT ID="dtcBooks" WIDTH=151 HEIGHT=24
     CLASSID="CLSID:F602E721-A281-11CF-A5B7-0080C73AAC7E">
        <PARAM NAME="_Version" VALUE="65536">
        <PARAM NAME="_Version" VALUE="65536">
        <PARAM NAME="_ExtentX" VALUE="3986">
        <PARAM NAME="_ExtentY" VALUE="635">
        <PARAM NAME="_StockProps" VALUE="0">
        <PARAM NAME="DataConnection" VALUE="pubs">
        <PARAM NAME="CommandText" VALUE="SELECT titles.title_id, titles.title, titles.type, publishers.pub_name, titles.price FROM titles INNER JOIN publishers ON titles.pub_id = publishers.pub_id">
        <PARAM NAME="RangeType" VALUE="2">
    </OBJECT>
-->
<%
fHideNavBar = False
fHideNumber = False
fHideRequery = False
fHideRule = False
stQueryString = ""
fEmptyRecordset = False
fFirstPass = True
fNeedRecordset = False
fNoRecordset = False
tBarAlignment = "Left"
tHeaderName = "dtcBooks"
tPageSize = 0
tPagingMove = ""
tRangeType = "Table"
tRecordsProcessed = 0
tPrevAbsolutePage = 0
intCurPos = 0
intNewPos = 0
fSupportsBookmarks = True
fMoveAbsolute = False

If IsEmpty(Session("dtcBooks_Recordset")) Then
    fNeedRecordset = True
Else
    If Session("dtcBooks_Recordset") Is Nothing Then
        fNeedRecordset = True
    Else
        Set dtcBooks = Session("dtcBooks_Recordset")
    End If
End If

If fNeedRecordset Then
    Set pubs = Server.CreateObject("ADODB.Connection")
    pubs.ConnectionTimeout = Session("pubs_ConnectionTimeout")
    pubs.CommandTimeout = Session("pubs_CommandTimeout")
    pubs.Open Session("pubs_ConnectionString"), Session("pubs_RuntimeUserName"), _
        Session("pubs_RuntimePassword")
    Set cmdTemp = Server.CreateObject("ADODB.Command")
    Set dtcBooks = Server.CreateObject("ADODB.Recordset")
    cmdTemp.CommandText = "SELECT titles.title_id, titles.title, titles.type, _
        publishers.pub_name, titles.price FROM titles INNER JOIN publishers ON _
        titles.pub_id = publishers.pub_id"
    cmdTemp.CommandType = 1
    Set cmdTemp.ActiveConnection = pubs
    dtcBooks.Open cmdTemp, , 0, 1
End If
On Error Resume Next
If dtcBooks.BOF And dtcBooks.EOF Then fEmptyRecordset = True
On Error Goto 0
If Err Then fEmptyRecordset = True

If Not IsEmpty(Session("dtcBooks_Filter")) And Not fEmptyRecordset Then
    dtcBooks.Filter = Session("dtcBooks_Filter")
    If dtcBooks.BOF And dtcBooks.EOF Then fEmptyRecordset = True
End If

If fEmptyRecordset Then
    fHideNavBar = True
    fHideRule = True
End If

Do
    If fEmptyRecordset Then Exit Do
    If Not fFirstPass Then
        dtcBooks.MoveNext
    Else
        fFirstPass = False
    End If
    If dtcBooks.EOF Then Exit Do
%>
<!--METADATA TYPE="DesignerControl" endspan-->

    <tr>
        <td width="10%"> </td>
        <th align="left" width="40%"> </th>
        <td width="20%"> </td>
        <td width="20%"> </td>
        <td width="10%"> </td>
    </tr>
</table>

<hr>

<p><font color="#000000" size="1">Copyright by Ken Spencer 1997</font></p>
</body>
</html>
Next, place the mouse cursor after the <TR> tag just after the endspan statement and press Return to add a blank line. Paste the contents of the clipboard into the file. You should see the following code inserted into your page:
<%= dtcBooks("title_id") %><br>
<%= dtcBooks("title") %><br>
<%= dtcBooks("type") %><br>
<%= dtcBooks("pub_name") %><br>
<%= dtcBooks("price") %><br>
This code was placed on the clipboard using Copy Fields in the DTC. This syntax references the ADO recordset that contains the results of your query. Remember the ID field that you changed earlier? Notice how dtcBooks is now the recordset name. This is why it is important to give DTCs descriptive names when you insert the control. This syntax is much clearer than seeing default names everywhere you use a column from the recordset.
How do you get this code into your HTML table? Highlight each one of the pasted lines, one at a time up to, but not including, the <BR> tag. Drag the highlighted text to the appropriate place in the HTML table and drop it. Do this for each line. The resulting table should look like this:
<tr>
<td width="10%"><%= dtcBooks("title_id") %>
</td>
<th align="left" width="40%">
<%= dtcBooks("title") %> </td>
<td width="20%"><%= dtcBooks("type") %>
</td>
<td width="20%"><%= dtcBooks("pub_name") %> </td>
<td width="10%"><%= dtcBooks("price") %> </td>
</tr>You can now delete the lines with the <BR> tags above the <TR> tag.
The only thing left to do with this simple page is to insert the Data Range Footer control. This DTC is simple to insert and does not require the setting of any properties. There is, however, one nuance that you should be aware of: right now your file looks like Figure 12, with the modifications made to add the database output to the table definition as shown in the last bit of code. To insert the Data Range Footer control, highlight the </TABLE> tag at the end of this table. With this line still highlighted, right-click the </TABLE> tag and choose Insert ActiveX Control. Select the Data Range Footer control, then immediately close the ActiveX Control Designer. The section of your file from the second row of the table through the end should look like Figure 13.
Figure 13: Data Range Footer Inserted
<tr>
    <td width="10%"><%= dtcBooks("title_id") %> lt;/td>
   <th align="left" width="40%"><%= dtcBooks("title") %> </th>
    <td width="20%"> <%= dtcBooks("type") %></td>
    <td width="20%"> <%= dtcBooks("pub_name") %></td>
    <td width="10%"> <%= dtcBooks("price") %></td>
</tr>

<!--METADATA TYPE="DesignerControl" startspan
    <OBJECT ID="DataRangeFtr1" WIDTH=151 HEIGHT=24
     CLASSID="CLSID:F602E722-A281-11CF-A5B7-0080C73AAC7E">
        <PARAM NAME="_Version" VALUE="65536">
        <PARAM NAME="_ExtentX" VALUE="3969">
        <PARAM NAME="_ExtentY" VALUE="635">
        <PARAM NAME="_StockProps" VALUE="0">
    </OBJECT>
-->

<%
Loop
If tRangeType = "Table" Then Response.Write "</TABLE>"
If tPageSize > 0 Then
    If Not fHideRule Then Response.Write "<HR>"
    If Not fHideNavBar Then
%>
    <TABLE WIDTH=100% >
    <TR>
        <TD WIDTH=100% >
            <P ALIGN=<%= tBarAlignment %> >
            <FORM <%= "ACTION=""" & Request.ServerVariables("PATH_INFO") &
             stQueryString & """" %>
             METHOD="POST">
                <INPUT TYPE="Submit" NAME="<%= tHeaderName & "_PagingMove" %>"
                 VALUE="   <<   ">
                <INPUT TYPE="Submit" NAME="<%= tHeaderName & "_PagingMove" %>"
                 VALUE="   <    ">
                <INPUT TYPE="Submit" NAME="<%= tHeaderName & "_PagingMove" %>"
                 VALUE="    >   ">
                <% If fSupportsBookmarks Then %>
                    <INPUT TYPE="Submit" NAME="<%= tHeaderName & "_PagingMove" %>"
                     VALUE="   >>   ">
                <% End If %>
                <% If Not fHideRequery Then %>
                    <INPUT TYPE="Submit" NAME="<% =tHeaderName & "_PagingMove" %>"
                     VALUE=" Requery ">
                <% End If %>
            </FORM>
            </P>
        </TD>
        <TD VALIGN=MIDDLE ALIGN=RIGHT>
            <FONT SIZE=2>
            <%
            If Not fHideNumber Then
                If tPageSize > 1 Then
                    Response.Write "<NOBR>Page: " & Session(tHeaderName &
                        "_AbsolutePage") & "</NOBR>"
                Else
                    Response.Write "<NOBR>Record: " & Session(tHeaderName &
                        "_AbsolutePage") & "</NOBR>"
                End If
            End If
            %>
            </FONT>
        </TD>
    </TR>
    </TABLE>
<%
    End If
End If
%>

<!--METADATA TYPE="DesignerControl" endspan-->

<hr>

<p><font color="#000000" size="1">Copyright by Ken Spencer 1997</font></p>
</body>
</html>
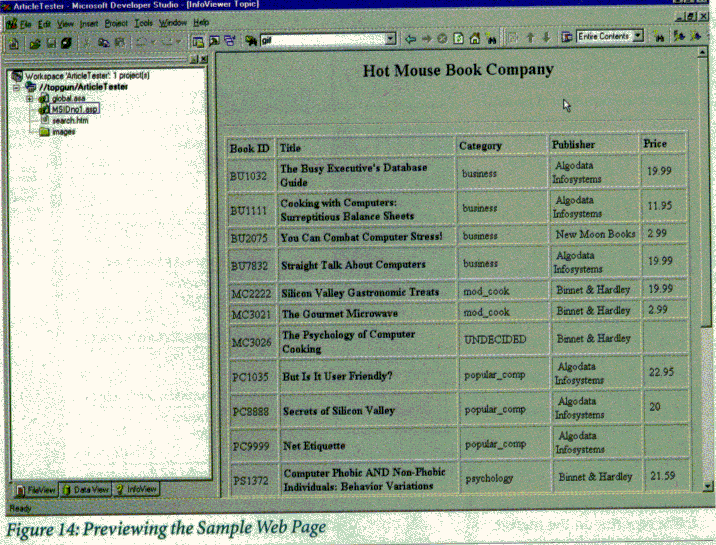
This will complete the page for now. At this point the page should run, so let's try it in a browser. Right-click the page in FileView and choose the Preview command. You should see a display similar to that in Figure 14.
Now let's talk about what has happened so far. You can see the ASP and ADO code that was generated when you inserted the DTC. What does the control code really do?
At a high level, the Data Range Header and Data Range Footer controls insert all the code you need to manage the output of a recordset. This includes creating variables and setting their values, determining if the code needs to generate a recordset, managing the error status of the database query, handling the empty recordset case, and displaying the proper controls for the user to navigate through the database. The amount of code generated and its structure will change depending on which options you choose when you set the properties for the control.
Some of the variables created by the control are easy to figure out and relevant to the ASP and HTML code. For instance, when you chose the Range Type option in the properties page for the Data Range Header, this caused the following line of code to be generated by the Data Range Header control:
tRangeType = "Table"The Data Range Footer control uses the tRangeType variable to output the correct HTML syntax. This If statement checks tRangeType and outputs a </TABLE> tag to terminate the table if the range type is Table:
If tRangeType = "Table" Then Response.Write "
</TABLE>"
This is why you needed to highlight
the </TABLE> tag before inserting
the Data Range Footer control. If
you did not highlight the </TABLE> tag, then you would end up with two
</TABLE> tags and the page would not work correctly. You should not
be concerned about any DTC code,
except for the implications it has on how you should write your own page. The rRangeType variable is a good
example of this.
What happens if you edit the properties of the DTC with the property page for that control? When you close the property page and the DTC editor, the DTC will regenerate its code in your page. For instance, let's change the Data Range Header control. Change the control so that the HTML page contains no more than six records at any one time and will let the user page through the data, both forward and backward. All of this is handled automatically by the Data Range Header and Data Range Footer controls.
First, right-click inside the Data Range Header code in your ASP page and choose Edit Design-time control. This opens the Data Range Header property page just as when you inserted the control as shown in Figure 8.
To set up record paging, you need to check the Record Paging box. But first, you need to select a cursor type that supports server-side cursors. The two types of cursors that will work for paging are Keyset and Static. To set the cursor type, click the Advanced tab and select one of these from the list of cursors. The cursor type controls the recordset on the database server. Either Keyset or Static cursors are required for record paging because the database server must keep the recordset open to allow the user to move forward or backward a certain number of rows. For instance, when the user clicks the Next button to page forward, the ASP code will execute a MoveNext method to advance the user through
the recordset.
Each database server supports different types of cursors. Both cursors supported by the Data Range Header control will work with Microsoft SQL Server, but they will not necessarily work with another database. You should check the documentation for your database server to determine what types of cursors are supported by the database.
And now, back to the sample. Figure 15 shows just the code for the Data Range Header after I made the changes, selecting the new cursor type and record paging. Notice how much different the code looks from its state when I first inserted the control?
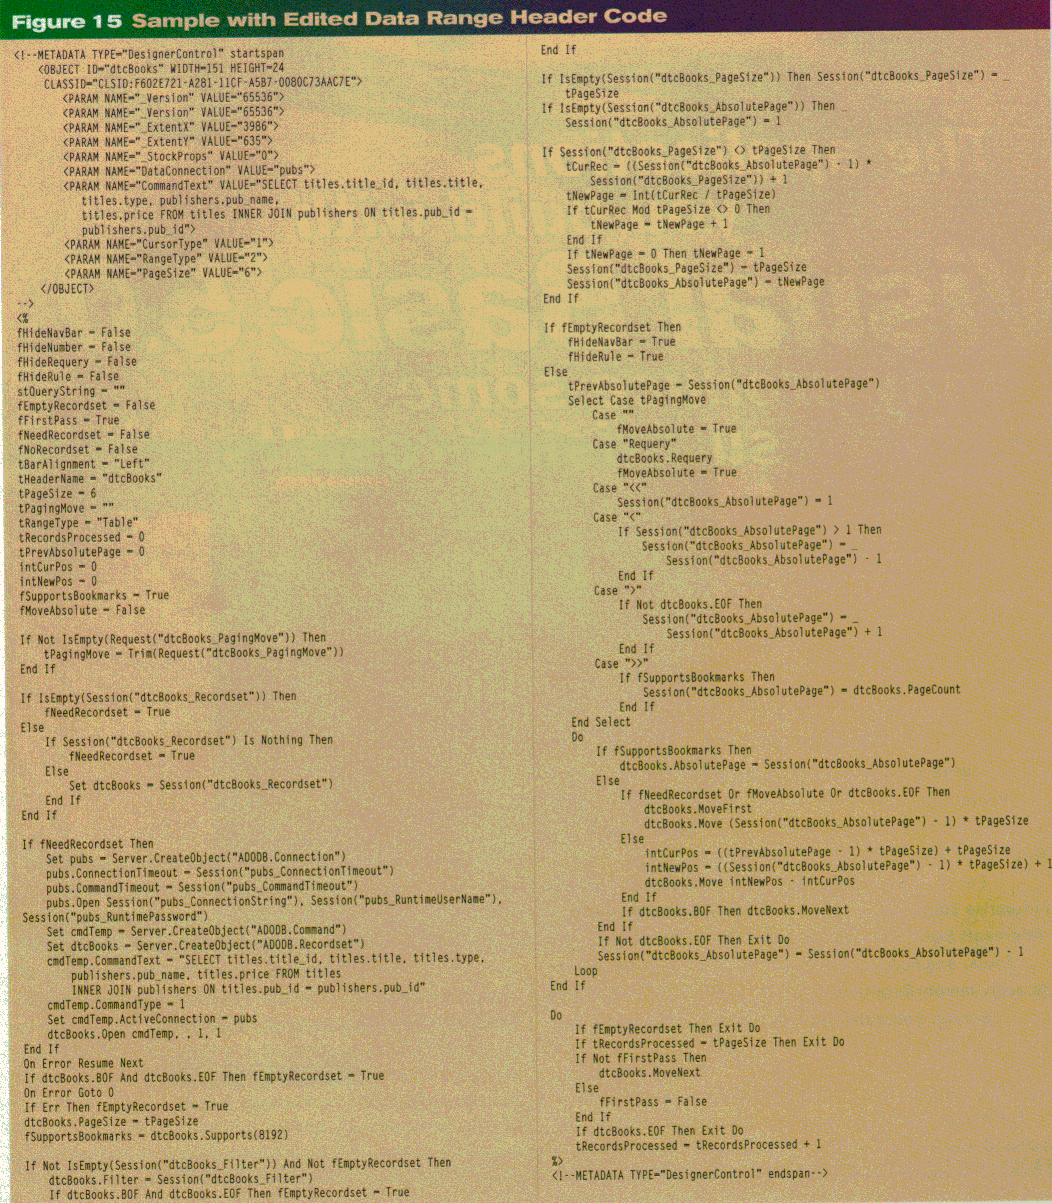
Figure 15: Sample with Edited Data Range Header Code
The changes to the Data Range Header properties page drastically changed the code generated by the control. The new code must handle the paging modes for the file (first record, next page, previous page, last record, and requery). The DTC code tries to gracefully degrade depending on the features of the database being used. For instance, if the user tries to move the page forward one page and your database supports bookmarks, the following code is executed:
If fSupportsBookmarks Then
    dtcBooks.AbsolutePage = Session("dtcBooks_AbsolutePage")
If your database does not support bookmarks, then this code will execute:
intCurPos = ((tPrevAbsolutePage - 1) * tPageSize) + tPageSize
intNewPos = ((Session("dtcBooks_AbsolutePage") - 1) * tPageSize) + 1
dtcBooks.Move intNewPos - intCurPos
The code that controls the looping to process the recordset starts with the last doºloop near the end of the Data Range Header code. This doºloop is complete except for the Loop statement, which should be at the end of the code. The Loop statement is actually provided by the Data Range Footer control when it is inserted. Note also that the Data Range Footer DTC can recognize changes to the Data Range Header control. Here the footer control automatically inserts code that places recordset navigation buttons at the bottom of the page.
What happens if I want to use a stored procedure instead of a SQL statement? Query Builder and Visual InterDev will help make this change. It's actually easy to change the existing SQL statement into a stored procedure. You can use Query Builder to create the stored procedure from the SQL statement, then use the DTC editor to change the code in the page so it uses the stored procedure.
First, edit the Data Range Header control by right-clicking in the Data Range Header code and choosing Edit
Design-time control. Next, click the SQL Builder button
to start Query Builder. Change the SQL in the SQL pane to the following:
Create Proc GetTitles as SELECT titles.title_id,
    titles.title, titles.type, publishers.pub_name,
    titles.price FROM titles INNER JOIN publishers
    ON titles.pub_id = publishers.pub_id
This is the original SQL statement, with "Create Proc GetTitles as" added to the front. This syntax tells SQL Server to create a new stored procedure with the name GetTitles.
Now click the Run button. When you get the message informing you that Query Builder can't process the SQL statement, select the Yes prompt to continue. Query Builder is just complaining that it can't parse the statements to update the other panes of the display. You should now get a small
dialog informing you that the query completed successfully. Click OK to close it. Now your stored procedure has been created. You can see it by expanding the Stored Procedures folder in DataView.
Close Query Builder to return to the DTC editor. You can answer either Yes or No to the Update dtcBooks question. Right-click the DTC object and choose Properties. Select 1-Stored Procedure from the Command Type list, then select your stored procedure from the Command Text list. That's it. Now you can test your page and it should behave the same as it did with the SQL statement.
The DTC concept allows you to build and use powerful blocks of code in your applications. You can extend applications such as the sample provided here by adding parameters, parameterized stored procedures, update and delete queries, and more. You can also create your own DTC control in Visual Basic to add custom features to Visual InterDev and your Web applications.
Microsoft has posted the DTC SDK on their Web site at http://www.microsoft.com/workshop/prog/sdk/dtctrl. Experiment with the DTCs that ship with Visual InterDev and explore the DTC SDK. Microsoft has also partnered with several leading ISVs to create a gallery of additional DTCs that extend the functionality of Visual InterDev. You can find these DTCs at http://www.microsoft.com/vinterdev. DTCs are one of the most powerful features of Visual InterDev and you should take advantage of them.