Microsoft® Outlook™ is the new personal information manager (PIM) that is part of
Office 97. Outlook includes all the familiar PIM functionality you’ve come to expect, such as to-do list maintenance, schedule management, and address book/contact tracking. In addition, Outlook can act as a surrogate for the Microsoft Exchange mail client, so you get advanced messaging capabilities. By publishing certain forms (message templates) in public folders on a Microsoft Exchange Server, Outlook also becomes a groupware tool. This allows groups of users to arrange meetings, share schedules and lists of information such as contacts or job candidates, hold discussions, and exchange mail.
In this article, I’ll take a look at how you can customize Outlook. You’ll get a sampling of a few different Outlook programming topics, such as creating new data, using prebuilt event procedure templates, the Outlook object model, and more. Along the way, I’ll throw in some practical examples so you can become productive quickly when programming Outlook.
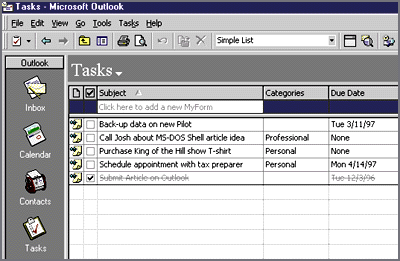
You need some basic knowledge of Outlook and how its components fit together in order to start programming. Two views are used to organize and present the information you work with in Outlook. The Explorer view gives you access to each of the folders that make up Outlook—Inbox, Task, Contacts, Calendar, Journals, and Notes folders (see Figure 1). The display can be customized on a folder-by-folder basis, such as by specifying which columns are shown in the Explorer view (you can add local folders, such as My Documents, to the Explorer view). Selecting any folder from the Outlook bar displays a list of the folder’s contents, known as items. More about items later.

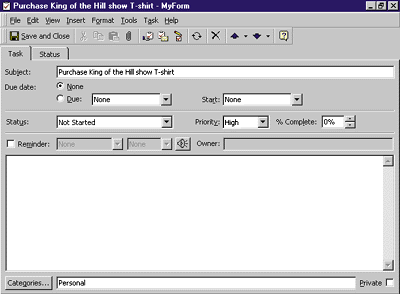
The second view, known as the Inspector view, is used to display item detail one item at a time. Items in the Inspector view are shown on a form (see Figure 2). While you open items in the Explorer view, you work with these items in the
Inspector view. Here, you can read or respond to mail, or
enter information about a new sales contact or your activities for the day.
Outlook gives you ample opportunity to customize its
interface without programming. The Explorer view can be customized by adding or removing columns, or by changing the sort order of the items that appear in the view. For
example, you can build a view that shows a discussion thread among a group of users. In the Inspector view, significant form-building capabilities are provided through the addition of the Outlook Forms module. Fields can be added, removed, and rearranged on a form. Custom fields can be added, and calculation and validation formulas can be specified for a field. You can add ActiveX™ controls to any form, and the familiar (to Visual Basic® users) forms toolbox provides all of the basic controls you may want to add. Finally, you can automate some processes by building user-defined actions and properties.
You can program Outlook almost exclusively via its lightweight object model. Naturally, its object model is available from external applications that support COM programming, such as Visual Basic or Visual Basic for Applications. From within Outlook, however, you program its object model using VBScript. If your objective is to customize Outlook behavior, such as to provide special behavior when a message is received or when a new entry is made to the Contacts folder, then you should brush up on your VBScript skills. In contrast, using Visual Basic or Visual Basic for Applications will give you access to Outlook data and functionality without running Outlook as a standalone app.
A third approach for developing Outlook solutions is possible only if you specify Microsoft Word 97 as your mail editor with the WordMail option. In this scenario, you have access to Word’s Visual Basic for Applications editor when you work with mail in Outlook. By adding a reference to the Outlook object library, you can program Outlook with
Visual Basic for Applications through Word while the mail editor is opened.
For this article, I’ll focus on customizing Outlook with VBScript. If you’re new to VBScript, check out Microsoft’s Site Builder on the Web (http://www.microsoft.com/sitebuilder), which includes a tutorial and a function reference. Programming Outlook is primarily a function of managing its data items. The item is particularly significant to VBScript because it provides the overall context for any scripting code in Outlook, especially when specifying Outlook event procedures. This doesn’t mean you can’t code intra-item behavior (such as creating a task item from a message item) from within Outlook. The point is that your VBScript projects are hosted by a specific item. I’ll show you how this works later.
In addition to providing a context for the code you write, the item plays a major role in any Outlook programming effort. The Outlook object model is designed primarily around a few major item objects such as MailItem, ContactItem, AppointmentItem, and so on. Though a few worker objects are included in the library, most of the functionality in the Outlook model is related to the items. Obviously, these item objects are your primary tools for programming Outlook with Visual Basic or Visual Basic for Applications.
As I mentioned earlier, an item provides the context for an Outlook script. Your project most likely will focus on a specific item in Outlook. Let’s call this target your host item. For example, if your application creates records in the Contacts folder based on responses to a mail message, then the message will be your host item. Once you have chosen your host item, you open the form that displays the item. For example, to customize some aspect of the contact item, you open the Contact form. To open an Outlook form, choose the appropriate item from the Outlook bar, then choose File | Open from the menu.
To program the item, you must switch to design mode for the form by selecting Tools | Design Outlook Form from the menu. You’ll see the word Design appear in parentheses on the title bar of the item window. From design mode, you can customize the item by manipulating user-interface components such as fields, buttons, and tabs. Keep in mind that the code you write may require customizing the Outlook user interface itself. Check the help file for information on customizing these elements.
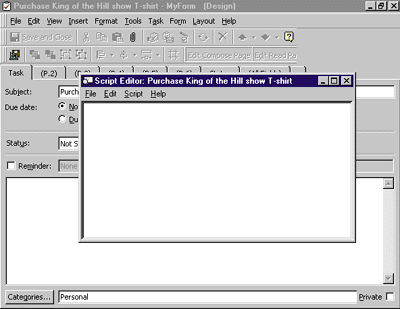
Choose Form | View Code from the menu to open the script editor (see Figure 3). If you’ve used VBScript to harness ActiveX controls with HTML or with the ActiveX Control Pad, then you won’t be surprised by its bare-bones functionality. The Outlook script editor comes with very few bells and absolutely no whistles. The Edit menu gives you Cut, Copy, Paste, Goto Line, Undo, and Selection capabilities. You can close the editor from the File menu. From the Script menu, you can run any nonproceduralized code in the script, stop a script from running, or create a template for an event procedure.
You can significantly enhance your development efforts in Outlook with VBScript by downloading and installing the Microsoft Script Debugger at http://www.microsoft.com/workshoop/prog/scriptie/scriptie.htm. The Script Debugger provides a debugging environment for Microsoft HTML scripting languages like VBScript and JScript™.
Though there may not be extensive support for writing scripts in Outlook, running and testing your code is simple. When you’re ready to test your VBScript applet, all you do is toggle out of design mode by choosing Tools | Design Outlook Form from the Item menu. You’ll notice that the word Design disappears from the title bar of the item window.
You test your script by changing properties, forwarding or sending items, or adding data. If you leave the editor open when you switch out of design mode, it will automatically enter run mode and stay that way until you either close the item or manually re-enter design mode. To test any code not written into a function or subroutine, press F5 from the script editor to execute it. Keep in mind that if you need to close the item before you can test your code (for example, if you wrote code that processes mail items when they’re opened), you must answer yes when prompted to save your changes. Doing so will save the code for the item that was open when you started the script editor.
The first thing you should understand when working with the script editor is the significance of the item context within each script. I mentioned earlier how each script you write in Outlook is hosted by a specific item. What makes this significant is the ease with which you can access and modify an item’s field values, which Outlook regards as properties. Since the host item is the default, you needn’t precede a property by its object name in an Outlook script, and you needn’t wrap a series of properties with the With…End With construct. All you do to access the value of a property of the current item is specify the name of the property where it is needed.
As an example of how you would refer to an item’s properties in code, let’s use a message item. The following code demonstrates valid methods for working with the item’s properties:
msgbox SenderName
CC = "Hank Hill"
BCC = "Blind: " & CC
Importance = Importance + 1
Probably one of the most practical and easy-to-implement applications in Outlook is assigning special behavior. For example, you could specify that messages received from a particular sender be assigned a certain priority. To accomplish this, you follow the event-driven programming model by attaching code that you write to event procedures. This is identical to the approach you would take with Visual Basic.
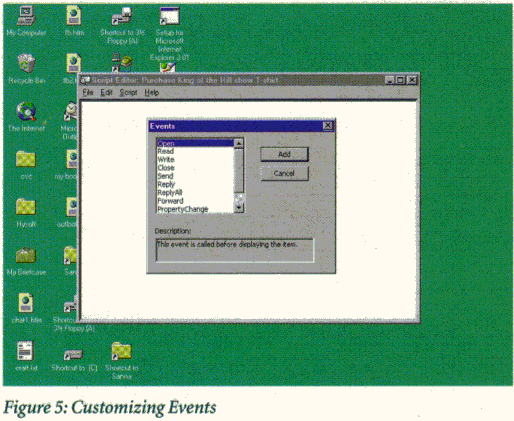
In Outlook, the events to which you attach code are associated with the item that is open on the form. You build these custom event actions by writing code within an event procedure in the Outlook script editor. You can let the script editor generate a simple template for any of the 11 events (listed in Figure 4) that you want to customize with code. This template is generated by choosing the appropriate event from the dialog box that is displayed when you choose the Script | Event command (see Figure 5).
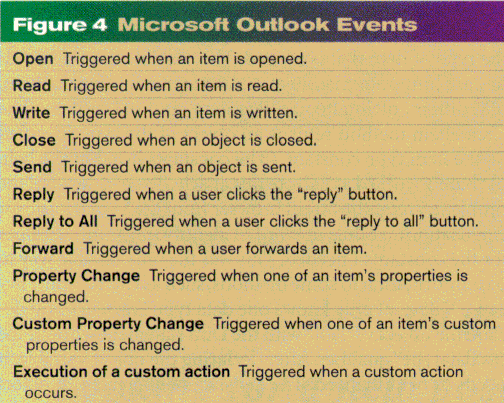
The majority of the event procedures shown in Figure 4 are simple, with no data being written back to the event procedures. Simple event procedures are Read, Write, Close, Send, and Open. Event procedures that require a bit more understanding are Reply, ReplyAll, Forward, PropertyChange, CustomPropertyChange, and CustomAction. Figure 6 shows the template code created for each of the 11 events by the script editor.
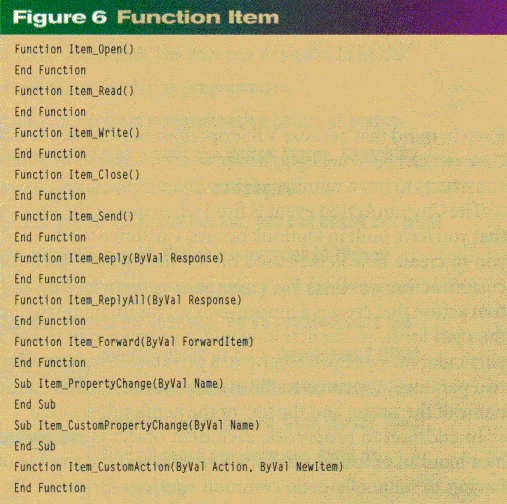
The cleverly named Reply and ReplyAll events occur when you choose Reply or Reply to All while you are reading a message in Outlook. The Reply and ReplyAll event procedures are similar in that they both receive the subject of the reply message as the only parameter in the event procedure. Let’s say that the subject of the message you are replying to is “Make Money on the Internet Without a Computer!” The parameter for the Reply and ReplyAll would have a value of “RE: Make Money on the Internet Without a Computer!” after you choose Reply or Reply All from the Compose menu. The subject property is the default for all items, so you’ll see it used throughout the object model. As you can see in Figure 6, the parameter for Reply and ReplyAll is named Response.
The Forward event procedure is similar to Reply and ReplyAll in that you’re given access to the subject of the forwarded message. With Forward, the subject is available from the procedure’s only parameter. Outlook automatically prefixes the subject of the forwarded message with the characters “FW:” to create the new message’s subject.
The PropertyChange event is fired whenever a value for an item changes. The PropertyChange event is closely related to the CustomPropertyChange event, which is fired whenever a property (or field) value on the current item changes. You create new fields by choosing the New button, which can be found at the bottom of the Field Choose toolbox. PropertyChange and CustomPropertyChange both use a single parameter that is written when the event is fired. This parameter holds the name of the property whose value has changed. By evaluating the Name parameter of the event procedure, you can execute code based on both the field that changed and its new value.
To use the event procedure and parameter properly, you would generally test the Name parameter for the name of the field you’re interested in. The following code snippet shows an example in which the reminder option would be turned on whenever the priority field changes to High.
Sub Item_PropertyChange(ByVal Name)
'Field name for Priority is Importance
if name = "Importance" then
'Importance values are Low = 0, Normal = 1, High = 2
if Importance = 2 then
ReminderSet = True
End if
End if
End Sub
Keep in mind that because VBScript does not support Select Case switch constructs, you’ll have to use a series of If...ElseIf constructs to test a number of properties of the item.
The CustomAction event is fired when one of the actions that you have built in Outlook occurs. Custom actions allow you to create new items based on the item from which the custom action was fired. For example, you might create a custom action that creates a journal entry. This might be part of the mail form, so the action would give you a way to log a particular message you receive in a private journal area. The two parameters written to the event procedure give you the name of the action and the text of the item’s subject area.
In addition to properties, each item object is supported by a handful of useful methods that save you the trouble of having to manually code common routines for items. Examples of some methods include ReplyAll, GetAssocAppt (which retrieves the appointment item associated with a meeting request), and MarkComplete (which handles all of the busywork involved in finishing a task). In addition to accessing an item’s properties and firing methods, your VBScript-based script can include any helper routines you’ll need to support other code. You can support event procedures by writing any functions or subroutines you need. For example, you might need to build separate routines to process the PropertyChange event for each of the fields of the item you’re interested in.
So far I’ve shown you how to work with existing items, but your project might call for you to create new items. This might be the case if you want to automatically generate a message to your manager when you save your business reimbursement form.
You create items with the CreateItem method, which can be called from an Outlook application object. The CreateItem method requires an ItemType argument, which determines the type of item that is created. The possible argument values are olAppointmentItem, olContactItem, olJournalItem, olMailItem, olNoteItem, olPostItem, and olTaskItem. The CreateItem method returns an object of the type specified by the item type constant. (The constants listed in the help file barely worked as I wrote this article. To work around the problem, I used the object browser from the Visual Basic for Applications module in Word to identify the numeric values for the constants I needed. This was the only reliable way to pass information to some methods, such as CreateItem.) Because VBScript only knows one data type (variant), you declare the object variable with the Dim statement without the “as datatype” qualifier. After declaring the object variable, it needs to be initialized. The Set statement creates an object reference for the variable.
Once the item object is created, you can manage the item via the set of properties, events, and methods specific to it. For example, the Task object has properties such as StartDate, Subject, and TotalWork and methods like MarkComplete. The item object also gives you access to any attachments associated with an item, and provides you with the capability to mail any item. The following code shows an example of creating a Task object for the purpose of creating a Task item, assigning it some properties, and then saving the new item.
Dim objTask
Set objTask = Application.CreateItem(olTaskItem)
ObjTask.Subject = "Give Sanna Fat Raise"
ObjTask.DueDate = "3/17/97"
ObjTask.Save
When the code is run, a new Task item will appear in the Explorer view of the Tasks folder.
Another function of your project may be to locate and work with some item in one of the user’s folders or a public folder. For example, you may need to access all Task items completed in the last month as part of an application that automatically generates a status report.
There are a few ways to access external items. The easiest way is to use the Find method, which is applied to the Items collection object. This collection object is derived from a specific folder object that you create. You can retrieve a folder object by using the GetDefaultFolder method with the Application object. You must be sure to create the appropriate type of folder object that will store the type of item you’re interested in. For example, if you want to access a Journal item, you must pass in the correct parameter to the GetDefaultFolder method. You can also use the Folders collection object to access any existing folder in the system.
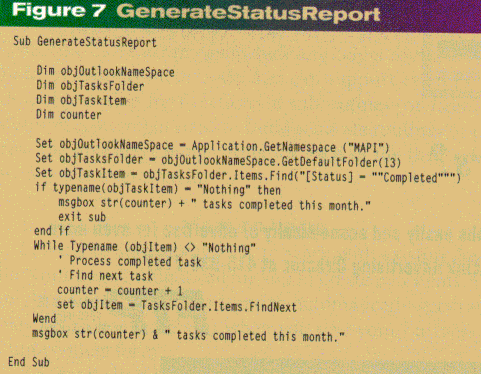
Using the Find method is simple once you’ve created the objects you’ll need to access the correct item folder. To specify the item to return, you pass in search criteria as a string. The search criteria is passed in the form of property1=value, property2=value, and so on. If Outlook is able to find an item that matches the search criteria, you’ll receive a returned object representing the item. You can trap for the not found condition by using the TypeName function to see if the object has been initialized, something the Find method will do for you. Once you’ve found the item, you can use the FindNext method (without the search parameter) to find other items matching the same criteria. Figure 7 shows an example of this type of application.
Another implementation of the Find method is used to access the value of a user-defined property. In Outlook you can create a custom property to store any data. To access the value of a custom property in code, you can use the Find method with the UserProperties property of an item. Simply pass in the name of the property you’re interested in, and the value of the property is returned.
You may be wondering by now how you determine the name of the different properties for each item, particularly since the label shown on the form is not necessarily the name of the property. Well, a diagram of the Outlook object model certainly can help. While it’s too intricate to reproduce in its entirety here, this diagram is available as a Visio document at http://www.microsoft.com/outlookdev/techinfo/mapoutl8.vsd. An easy alternative is using the PropertyChange event procedure described earlier. The name of the property whose value has changed is written back to the
event procedure as its only parameter. Open the script editor and create a PropertyChange event procedure. Within the procedure, just follow the msgbox statement with the
parameter name, save the form, change the property and, based on your trapping technique, you’ll have the internal name of the property.
So far you’ve learned about customizing a specific item, you’ve seen how to access the script editor from a specific item, how to write code, and how to test the functionality you’ve built.
However, this new functionality is associated only with the item with which you have been working. For example, if you choose a mail message from a coworker as a host item for coding your application, then your application is available only to that mail message. If you want the functionality you’ve built to be available for all items associated with the form, such as all mail messages or tasks, you must publish the form in your Personal directory and then specify that form as the default form for the folder. To make the form available to all users in your organization, publish it as the default form in the appropriate public folder.
One last area of interest is programming Outlook from an external application. First, you need an application object, then you can work with data in any folder in the system. In addition to items in folders, the application object gives you access to a few other useful objects. For example, the Explorer object gives you access to Outlook’s CommandBars. Starting with Visual Basic for Applications 5.0, CommandBar objects are used to manage application menus, toolbars, and shortcut menus. By accessing an Outlook application’s CommandBars via the Explorer object, you can add custom toolbars, menus, and buttons to the application.
When the following code is run
Dim objOutlook As ObjectDim objInspector As ObjectDim objCBar As CommandBarSet objOutlook = CreateObject("Outlook.Application")Set objInspector = objOutlook.ActiveExplorerFor Each objCBar In objInspector.CommandBarsDebug.Print objCBar.NameNextthe name of each CommandBar in the current Outlook application will be printed to the Immediate window of the
tool you’re using to run it. In addition to ommandBars, the Application object can be used to set the current view
in the application (Explorer or Inspector view), retrieve and set information about Outlook folders, and manage
the quirky Assistant.Wrapup
I hope this brief preview gives you an idea of what is possible when building solutions with Outlook,
as well as how much work is involved. As soon as you think you’re ready, dive in—you’ll find it’s easy to implement
custom functions and features in Outlook. For more information and samples, check out the official Outlook
developers site—http://www.microsoft.com/outlookdev.