by Brian Johnson
The first iteration of HTML scripting in Internet Explorer 3.0 gave us the ability to control ActiveX objects and parts of the browser interface. Even so, the pages themselves remained static; the only way to change the HTML was to reload a page or frame. In Internet Explorer 4.0, the object model for scripting has grown up, giving developers an amazing amount of control over what's happening on the page. Keep in mind however, that the premise of this column is to explore Microsoft products; not everything we do here will translate well to other browsers.
If you've played with the Internet Explorer Scripting Object Model before, you probably noticed what was missing. For example, you could script a mouse click for an intrinsic or ActiveX control, but you couldn't map anything to a standard page element like an <H1> tag. Now you can. All the HTML elements you're accustomed to are now objects in the Dynamic HTML Object Model. This means you can script events associated with page elements. Among the most useful of these events are mouse clicks and mouse-overs.
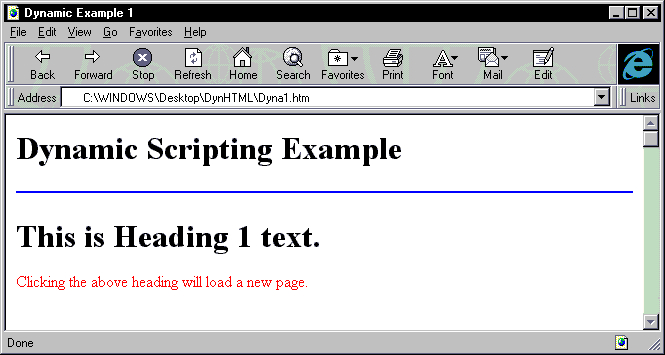
Figure 1: The Dynamic HTML Object Model lets you link page elements to events such as mouse-clicks.
To get started, I'll use a simple example. Suppose you want to create a link from a mouse click on an <H1> element (see Figure 1). To script the event, simply identify the element using the ID attribute, then write a script with an onClick event, just as you would for a button or an ActiveX control:
<H1 ID=MyH1>Click on me!</H1>

<Script LANGUAGE=VBScript>
<!--
Sub MyH1_onClick()
  self.location.href ="http://www.informant.com"
End Sub
-->
</Script>
Pretty simple stuff. If that's all that you wanted to do, you could script it in-line:
<H1 onClick=
  "self.location.href = 'http://www.informant.com'">
  Click me!</H1>
This example isn't particularly useful, but it does give you an idea of how elements in HTML can now "go live" in Dynamic HTML. The really cool stuff comes into play when you mix the new Dynamic HTML Object Model with cascading style sheets.
<STYLE TYPE="text/css">
<!--
.redHTML {color: red}
.blueHTML {color: blue}-->
</STYLE><H1 ID=MyH1 class=redHTML>Click on me!</H1><Script LANGUAGE=VBScript><!--Sub MyH1_onClick()  If MyH1.className ="redHTML" Then
    MyH1.className = "blueHTML"
  Else
    MyH1.className = "redHTML"
  End If
End Sub
-->
</Script>
Figure 2: This code changes the appearance of a heading, before the viewer's eyes.
Cascading style sheets (CSS) let you control the display of text inside the browser, and will work in the newest versions of browsers other than IE. Cascading refers to the way style sheets are interpreted by the browser. Styles can be linked to a page, embedded using the <STYLE> tag, or defined in-line. In a situation where more than one style is defined, rules of hierarchy are applied to determine which style is used when the page is first rendered in the browser.
If you haven't yet used styles, don't worry; they're straightforward. As you know, an element in HTML is defined by the tags that surround it. For example, a paragraph is text set off with a <P> </P> tag pair, with the text in-between. When no style is designated for the <P> tag, the display of the paragraph is set by the browser. You can use FONT and COLOR attributes to define your paragraph, but control over the actual display of text is pretty limited. However, style sheets let you define all sorts of attributes for a given HTML element, including font family, font style, background color, and so on. An embedded style sheet that changes the appearance of a paragraph would look like this:
<STYLE TYPE="text/css">
<!--
P {color: blue; font-family: Garamond, Times, serif}
-->
</STYLE>
The STYLE tag is used in this case, and the style is placed inside a comment to hide it from browsers that don't support CSS. The <P> tag is set to display in blue, using a Garamond font. If this font isn't available on the viewer's machine, Times is used. If that's not an option, the paragraph employs the generic serif font on the user's machine.
In addition to assigning styles to existing page elements, you can define your own elements - and display text on the page using these. If you want to create a custom style for your document, simply create a new style and use it as an element in your pages:
<STYLE TYPE="text/css">
<!--
.myred {color: red}
-->
</STYLE>
To use this custom style in your HTML, specify the new class name in the CLASS attribute of the element you want to change:
<P CLASS=myred>This is red text.</P>
With the CLASS attribute set to the style myred, the color of the text in the paragraph is red.
Remember the old commercial where a guy eating a candy bar runs into a guy spooning gobs of peanut butter into his mouth? (Must have been a programmer.) Their crash results in the observation that peanut butter tastes better with chocolate, and vice versa. It's the same with the Dynamic HTML Object Model and CSS. CSS lets you control how things look on the page - a very cool tool indeed. The Dynamic HTML Object Model lets you capture mouse clicks and movement over page elements. Put these two together and you have the ability to change the appearance of text on the page, based on the position and state of the mouse over an element - in other words, Dynamic HTML.
Using what I've demonstrated so far, you can probably guess how to change the appearance of text through scripting. In this first code example, I'll use a mouse click on an <H1> element to change the appearance of the <H1> text, right before the viewer's eyes (see Figure 2).
In the example, the class for the <H1> element is set to redHTML. When the page is first rendered in the browser, the text is red. The <H1> element is assigned the ID MyH1. The onClick event for this element is captured in the page's script, and an If...Then...Else block is used to determine the className that's currently assigned. The className is then changed to the alternate style, based on the current one.
Now that you understand how CSS goes with the new Dynamic HTML Object Model, let's look at how we can use this technology to create useful, dynamic content.
I've always been jealous of Macromedia Director/Shockwave's ability to create page elements that change according to mouse location and movement. Dynamic HTML can create the same effect by capturing mouse messages over an HTML element, then changing that element's style. The two events used to accomplish this are onMouseOver and onMouseOut.
<STYLE TYPE="text/css">
<!--
.hilight {color: red; style: bold}
--B
</STYLE>

<A HREF="http://www.microsoft.com" id=MyLink1>Microsoft</A>

<Script LANGUAGE=VBScript>
<!--
Sub MyLink1_onMouseOver()
  MyLink1.className ="hilight"
End Sub

Sub MyLink1_onMouseOut()
  MyLink1.className=""
End Sub
-->
</Script>
Figure 3: This code changes and restores appearance, based on mouse input.
The onMouseOver event is generated when the user passes the mouse pointer over a page element. The onMouseOut event is generated when the pointer passes out of that element's location. Using these two events, we can change and restore the appearance of an element (see Figure 3).
When the mouse passes over the element with the ID MyLink1, the onMouseOver event is generated, and the class assigned to the element is hilight. When the mouse leaves the element, the className property is set to nil, which resets the element's display to its default appearance. This little script makes your pages more dynamic, because viewer can see a change as they interact with the page. More importantly, this change can serve a purpose that's not just cosmetic. If your page is filled with closely spaced links, viewers can see, without clicking, which link is selected. This helps prevent users from wasting time by following the wrong link (see Figure 4).
You can also write this code in-line. To create the same effect as the one above, add the code to the <A> tag:
<A HREF="http://www.microsoft.com"
  onMouseOver="className='hilight'"
  onMouseOut="className=''">Microsoft</A>
Notice that you don't even need to specify an ID for the anchor. Taking the idea of in-line code just one step further, we can skip the style sheet and specify the style change:
<A HREF="http://www.microsoft.com"
  onMouseOver="style.color='red'"
  onMouseOut="style.color=''">Microsoft</A>
These simple events can make your pages fairly dynamic. One of the great things about Dynamic HTML is that users are already used to this sort of interactivity, thanks to CD-ROM software. When you add these tags, they likely won't even notice - unless they know a little about HTML.
The styles properties changed in the last couple of examples have been simple. The CSS specification provides many properties that can be changed dynamically through HTML. One of these is the Display property, which lets you turn whole sections of HTML on or off. Combine this with an onClick event, and you have code that can create, for example, collapsing outlines.
To create a section of text that can be toggled between visible and invisible, tie the display property to an onClick event (see Figure 5). This code lets you toggle the section of text with the ID subj1 on and off by clicking the text in the heading just above it. This code lets you get rid of outlines that link to sections of a document comprised of other documents. Rather than having a user click on a subject and wait for a new page, the text will appear immediately. When the user is done with the section, clicking on the heading will again hide the text.
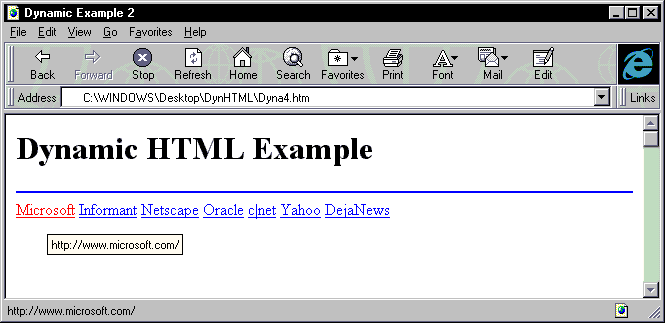
Figure 4: Highlighting the currently selected link can help the user navigate more accurately.
<H1 ID=Head1>This is heading 1</H1>
<SPAN ID=subj1 style="display:'none'">
<P>This is the body text</P>
</SPAN>
<Script Language=VBScript>
<!--
Sub Head1_onClick()
  If subj1.style.display = "none" Then
    subj1.style.display = ""
  Else
    subj1.style.display = "none"
  End If
End Sub
-->
</Script>
Figure 5: This code renders text visible and invisible.
I've tried to give you a little taste of Dynamic HTML. To comprehend all that's possible, you'll need to look at the documentation for the new Dynamic HTML Object Model. You can find this in Microsoft's Internet SDK for Internet Explorer 4.0, and on Microsoft's Sitebuilder Web site. Also, at these same sources, read all the CSS documentation you can find.
Brian Johnson is a free-lance writer and programmer in Orlando, FL. He's co-author of VBScript Unleashed [SAMS, 1996]. You can e-mail him at brianjay@gate.net.