by Rick Dobson
One of the best ways to share your Access data with others is to put the information on the Web. Visitors to a Web site don't even need to have Access installed on their computer to view the data. The Publish To The Web wizard can publish Access 97 database objects to Web servers using any of three different methods.
The wizard offers two ways to handle dynamic publishing of database objects to the Web. One technique uses HTX/IDC technology, and the other relies on Active Server Pages (ASP). Dynamic publishing is like putting a mirror on the Web server that instantly reflects changes to the underlying database objects. If you want site visitors to see any changes to the database immediately, then you'll want to use either of the dynamic publishing formats. In a future article, we'll focus on the HTX/IDC technique.
Power users and departmental gurus should consider publishing database objects via the static HTML route, the easiest of the three techniques. Static publishing is like putting a snapshot of a database object on your Web server. You can publish a table, query, or form as a datasheet or the Web version of a printed report. For example, this technique is useful for publishing reports that provide data revisions at regular intervals (say, monthly or quarterly), rather than displaying the most recent change to the database between reports.
In this article, we'll present the basics of static Web publishing using Access 97. You'll see how to publish datasheets and printed reports. Our examples and recommendations will guide you around the pitfalls so you can successfully put this technique to work with a minimum amount of effort.
Visit www.cabinc.win.net to see working online examples of the Web pages we describe in this article. The Publish To The Web wizard generated all pages at the site in the exact manner we'll describe.
You invoke the Publish To The Web wizard by choosing File | Save As HTML from the main menu. The wizard's first window asks if you want to use a profile. If you find yourself repeatedly making a nearly identical set of wizard screen selections, you'll save time and effort by creating a profile.
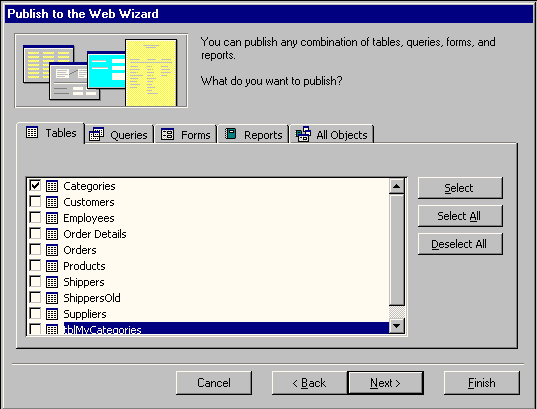
The wizard's second window is very important: It lets you pick the database object you want to publish. For our first example, we selected for publication the Northwind database's Categories table, as shown in Figure A.
Figure A
The second Publish To The Web wizard window lets you select database objects for publication to the Web.
Notice that you can select from any of four database object types. When publishing statically, you'll use the datasheet (Tables) representation for queries and forms that should look like a table. A datasheet appears by default as a single scrollable window. The Reports format automatically includes pagination that matches the printed report.
You must complete only two other wizard windows to statically publish a datasheet. First, in the window that asks for a default format to create, choose Static HTML, as shown in Figure B. Second, if the data will reside on a local intranet, you need to designate a folder that your Web server shares for reading. Figure B also shows the beginning of an address that points to a subfolder of the WWWROOT folder in the WEBSHARE directory on a computer named CAB536; the computer runs a Personal Web Server from its WEBSHARE directory. Make sure the folder holding your files has read permission from your Web server.
Figure B
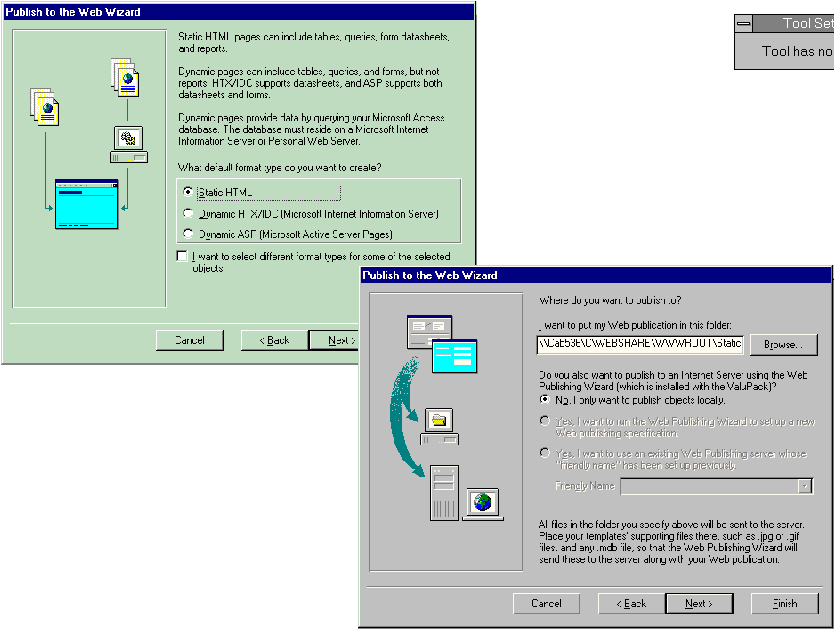
You can select a publishing format and designate a folder on the LAN in which to publish.
If you aren't publishing the HTML files to a local intranet server, you can store them in any folder for transmission to an Internet site. Use your favorite means for transmitting the files from your computer to the Web server.
Since the wizard publishes plain HTML, you can actually publish the pages to a folder on any server, including one from Netscape. Just as you can publish static Web pages to any server, you can also read them with any browser.
Figure C shows our final published datasheet in a browser. The Address box indicates that the wizard published the table in the virtual staticExs directory for the CAB586 Web server. The Address box also reveals a naming convention practice that the wizard follows: It appends the string _1 to the database object name when it constructs a file for the object. If you republish a datasheet to a server and you want to retain an earlier version, rename the first version—otherwise, the wizard will automatically save over it. The HTML file type in Figure C is suitable for any server, including a Unix server.
Figure C
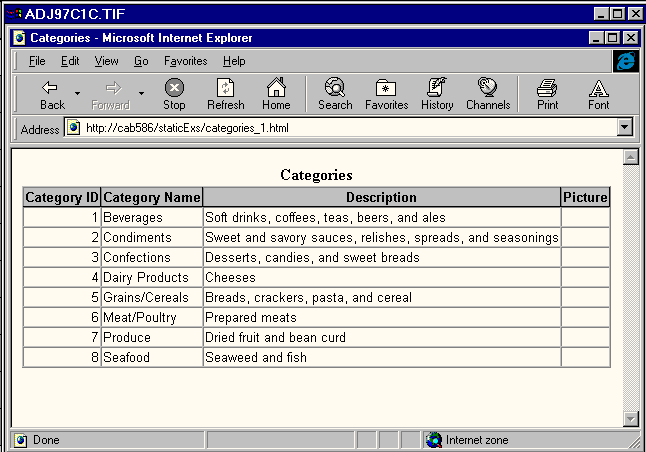
Our published datasheet looks like this in a browser window.
The original Access table includes embedded bitmap images of the product categories in the Picture field. This field appears blank in the published datasheet because the wizard doesn't publish bitmap images. If it's essential to make available embedded images or other embedded objects, you can do so by creating a new table with a Hyperlink data type for the embedded objects. Let's work through this technique.
Access 97's new Hyperlink data type lets you simulate embedded objects. Figure D shows a table that includes hyperlinks to images of the products in each category. You simply place hyperlinks in a table field that points to the embedded objects—when a user clicks the hyperlink, the hyperlink will open the appropriate application for the file to which it points.
Figure D
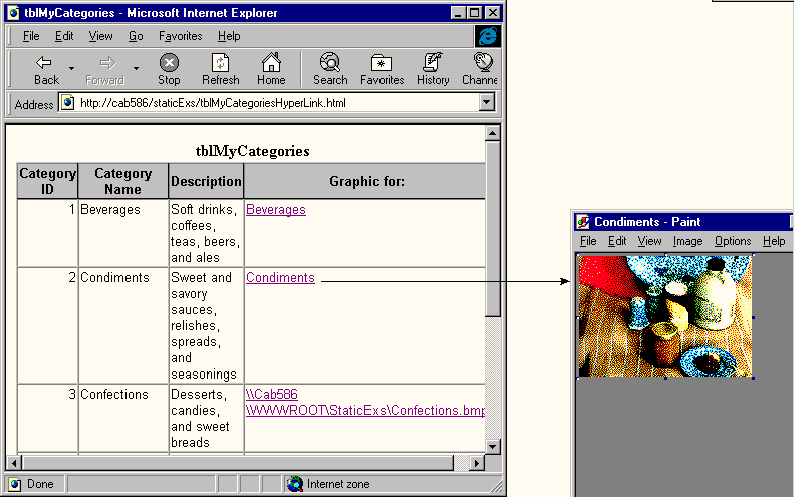
This new version of the Categories table includes hyperlinks pointing to images of the products in a category.
The hyperlinks in Figure D point to BMP files. We used this file type for convenience, since the original application used BMP files. If you were constructing a working site, you'd convert the images from BMP to either GIF or JPG format; doing so would conserve space and speed file transport time over the Web.
The Hyperlink data type can contain up to three parts: displaytext, address, and subaddress. As a minimum, the hyperlink data type must contain either an address or subaddress part. Either or both of these parts point the hyperlink to a specific location. The displaytext is a literal field that may offer more meaning to a user than a hyperlink address. For example, the Graphic for: column in Figure D shows displaytext parts for the first two category IDs. However, the third category ID's hyperlink doesn't have a displaytext part.
Hyperlinks have their own syntax, and you can write code to construct them and insert them into a table field. But for a small set of records, you can often manually insert the hyperlink in the table cells just as quickly.
To insert a hyperlink manually into a table cell, enter the cell and click the Insert Hyperlink tool on the Access toolbar to open the dialog box shown in Figure E. If you want to replace an existing hyperlink, we recommend removing the old hyperlink before entering the new one, so you start with a blank cell.
Figure E
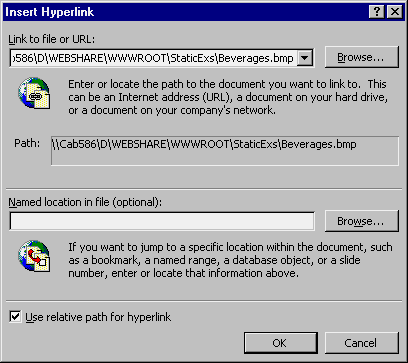
The Insert Hyperlink dialog box looked like this after we browsed to the Beverages address.
We tested the process by making a copy of the Northwind database's Categories table and naming it tblMyCategories. Then, we deleted the Picture field and added the Graphic for: field. Next, we copied the embedded category bitmaps to the Web site folder and inserted hyperlinks for each category in the manner we just described. Finally, we published the new table. This new table permits simulation of the embedded graphics in the original Categories table—it generates the result shown in Figure D.
Neither datasheet published in Figure C or D appears with a background image or credit indicating who created it and with what software. Web sites routinely provide such niceties, and the Access 97's Publish To The Web wizard accommodates this general practice—somewhat. Figure F shows the same published table as in Figure D, but with two logos in the lower-left corner. In addition, this figure includes a background image.
Figure F
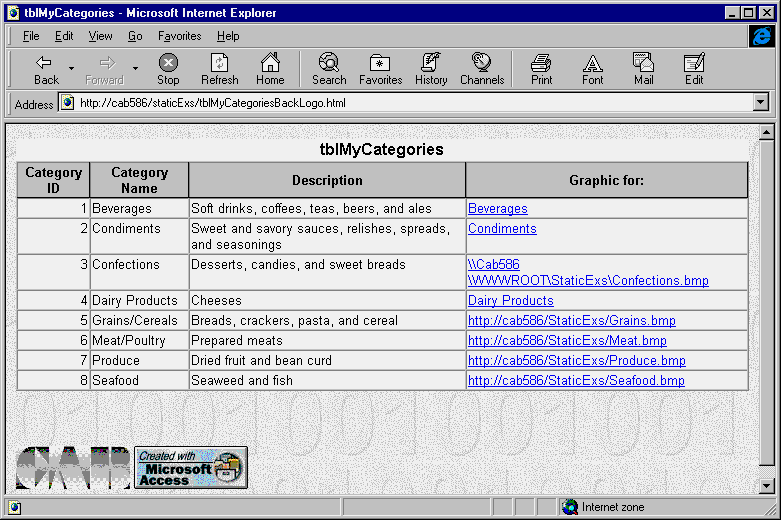
This version of the Categories table includes a pair of logos and a background image.
You must complete two tasks to achieve the look in Figure F: Compose the HTML for the page, and store the three images referenced by HTML at a location consistent with the point referenced by the HTML. The Publish To The Web wizard will compose most of the HTML. Then, you can use this HTML as a model for the minor part that the wizard doesn't complete. The wizard provides no support for copying the images to the target folder. Happily, this is a trivial task, but it's easy to forget or break a link to an image.
The wizard's third screen lets you select a template that includes a background image, logo, text, or other features. A Browse... button lets you view the template file selections directly with your browser to get a feel for which one contributes the most to your site's appearance; all the templates are HTML files. For instance, you can find the background and Created with Microsoft Access logo from Figure F in the 100.HTM template file, which resides in the directory \Program Files\Microsoft Office\Templates\Access.
Listing A shows excerpts from the HTML for Figure F. It includes the HTML for the table caption and its column headings, as well as the first row of data. In addition, the HTML includes samples of the layout for the logos.
Listing A: Excerpts from Figure F's HTML
<html>
<head>
<title>tblMyCategories</title>
</head>
<body background="100.jpg">
<table border="1" cellspacing="0" bgcolor="#FFFFFF">
  <caption align="top"><font color="#000000"
    face="Arial"><b>tblMyCategories</b></font>
    </caption>
  <font color="#000000" face="Arial"><THEAD></font>
  <tr>
    <th bgcolor="#C0C0C0" bordercolor="#000000"><font
    color="#000000" size="2" face="Arial">Category
    ID</font></th>
    <th bgcolor="#C0C0C0" bordercolor="#000000"><font
    color="#000000" size="2" face="Arial">Category
    Name</font></th>
    <th bgcolor="#C0C0C0" bordercolor="#000000"><font
    color="#000000" size="2"
    face="Arial">Description</font></th>
    <th bgcolor="#C0C0C0" bordercolor="#000000"><font
    color="#000000" size="2" face="Arial">Graphic
    for:</font></th>
  </tr>
  <font color="#000000"
  face="Arial"></THEAD></font><font
  color="#000000" face="Arial"><TBODY></font>
  <tr>
    <td align="right" valign="top"
    bordercolor="#C0C0C0"><font
    color="#000000" size="2"
    face="Arial">1</font></td>
    <td valign="top" bordercolor="#C0C0C0"><font
    color="#000000" size="2"
    face="Arial">Beverages</font></td>
    <td valign="top" bordercolor="#C0C0C0"><font
    color="#000000" size="2" face="Arial">Soft
    drinks, coffees, teas, beers, and
    ales</font></td>
    <td valign="top" bordercolor="#C0C0C0"><a
    href="\\Cab586\WWWROOT\StaticExs\Beverages.bmp">
    <font color="#0000FF" size="2"
    face="Arial"><u>Beverages</u></font></a></td>
  </tr>
.
.
.
</table>
<p><font color="#000000" face="Arial"><br>
<br>
<img src="CABGrey.gif" width="114" height="43">
<img src="msaccess.jpg" width="114" height="43"> </font></p>
</body>
</html>
Use your company logo to replace the image file CABGrey.GIF. You can adjust the width and height attributes to size the image. You can also leave out the Created with Microsoft Access logo if it doesn't fit the theme of your pages.
In order to see the background image referenced in the leading Body tag, you must copy the JPG file to the destination folder for your Web site. You also must copy the Created with Microsoft Access JPG image. Finally, you must copy your company logo. After you copy all three images, the HTML and the image files will work together to adorn your Web pages.
The Publish To The Web wizard provides built-in features for publishing Access reports to the Web. Instead of creating one long scrollable datasheet, the wizard prepares a series of Web pages with First, Previous, Next, and Last hyperlinks that let you jump from one page to another. These Web pages correspond to the printed pages of a report.
You don't have to perform any special steps to get the benefits that come with reports—simply select a report as the database object you want to publish. The wizard will respond by including the hyperlinks for jumping between pages.
While the wizard performs many valuable functions, you may have to hand-edit the Web page collection that it generates. First, the wizard doesn't copy any graphics in your reports. You can use the techniques we demonstrated earlier to manually insert graphics. Second, if you need to delete or add a page to the collection of Web pages generated by the wizard, you'll have to make appropriate revisions to the automatically generated hyperlinks. Third, the wizard doesn't always work well with rigidly formatted layouts, such as order forms. You'll need to develop traditional Web form solutions for these situations.
Figures G and H show the kind of improvements you can make by spending two or three minutes with your favorite Web editor. Figure G shows the Seafood page from the Northwind database's Catalog report; the wizard automatically generated this page. We used FrontPage Express to transform the base output from the wizard to the result that appears in Figure H.
Figure G
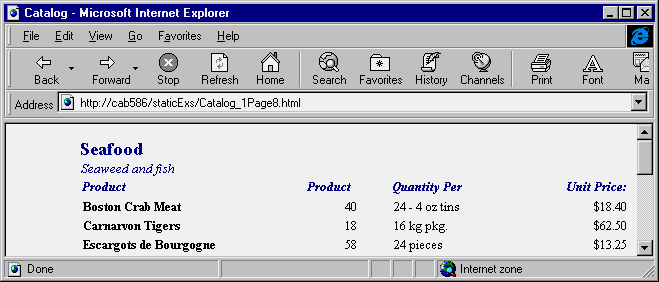
The Publish To The Web wizard generated the Seafood page from Northwind's Catalog report.
Figure H
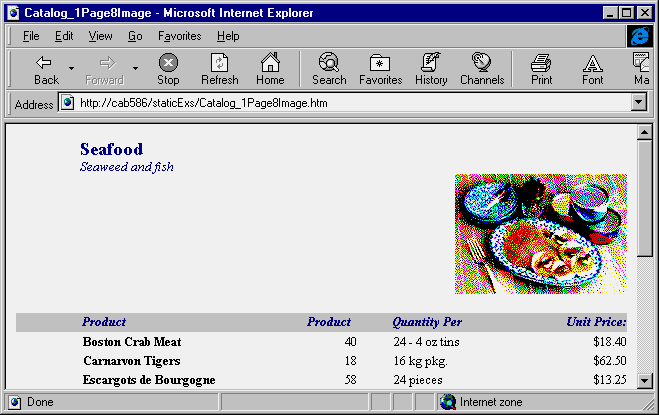
We edited the raw output to enliven our Web page.
The transformation involved just four steps. We inserted the seafood bitmap, aligned it to the right edge of the page, inserted a blank row after the bitmap, and placed a gray background color behind the column headings. Collectively, the changes make our Seafood page match almost perfectly the Print Preview version you can display directly from Access. However, the version in Figure G is available over the Web, and it can reach a much larger audience because users don't need Access or a LAN connection to view the report page.
The Publish To The Web wizard makes it a snap to create Web sites that publish Access datasheets and printed reports. Beginners should explore the static HTML route to publishing, because the wizard generates the HTML and doesn't require any special ODBC connections. In addition, static publishing is ideal for publishing data at fixed, regular intervals.
Static publishing is one of the best ways to make Access data available to a large audience of Web surfers. This is the case because static publishing places HTML on a Web server; the server, in turn, sends the HTML to site visitors. Dynamic publishing, in contrast, requires a query of the database engine in order to get the data ready for sending to a browser. Since Access targets workgroup instead of enterprise solutions, it can bog down if thousands of site visitors launch requests at the same time.
If you need to edit the basic HTML produced by the wizard, consider using an HTML editor, such as FrontPage Express. This combination will allow you to publish Access database objects to the Web without perishing in a flurry of HTML code and ODBC connections.
-----------------------------
Rick Dobson, Ph.D., is president of CAB, Inc., a consultancy offering database, Internet, and Office development services. Rick is Microsoft-certified to train developers in Access and Office 97 development. He's a contributing editor to Microsoft Interactive Developer and a frequent contributor to Byte. You can reach Rick online at RickD@cabinc.win.net or by fax at (502) 426-3743.
-------------------------------
This article is reproduced from the December 1997 issue of Microsoft Office Developer's Journal. Microsoft Office Developer's Journal is an independently produced publication of The Cobb Group. No part of this article may be used or reproduced in any fashion (except in brief quotations used in critical articles and reviews) without prior consent of The Cobb Group. To contact The Cobb Group, please call (800) 223-8720 or (502) 493-3200.
Copyright © 1997 The Cobb Group, a division of Ziff-Davis Inc. The Cobb Group and The Cobb Group logo are trademarks of Ziff-Davis Inc. All rights reserved. Reproduction in whole or in part in any form or medium without express written permission of Ziff-Davis is prohibited.