by Al Saganich
The latest release of the Java JDK from JavaSoft contains a number of new and exciting features. One of them, the Event Delegation Model, is a new event-handling structure that supports events in a simpler fashion than does the old event model. This new model allows you to create applets more quickly and easily than was previously possible.
Although Visual J++ 1.1 doesn't include full JDK 1.1 support in the shrink-wrapped CD package, Microsoft has already prepared a Visual J++ update package to address JDK 1.1. In this article, we'll show you how to install Microsoft's JDK 1.1 support and take advantage of the new Event Delegation Model.
Before you can begin using the new features, you'll need to download and install the beta JDK 1.1 support package from the Microsoft Visual J++ Web page. First, open http://www.microsoft.com/visualj in your browser. Near the bottom of the page, you'll see a link for the new Microsoft SDK for Java 2.0.
The Java SDK 2.0 contains support for the new JDK 1.1 features. Click on the link and follow the steps to download SDK-Java.exe. When the download finishes, install the new SDK either by running SDK-java.exe from the command line or by selecting it from within Internet Explorer. From there, just follow the directions to install the new JDK class library, Java compiler, and Java Virtual Machine.
Now, let's move on to the new Event Delegation Model. Just what is it? In order to understand the new model, it's necessary to understand a little about the old model.
Any seasoned Java developer can tell you about the existing Java event model. Under the old model, developers must extend the Frame class and implement a handleEvent() or an action() method. These methods typically consist of large switch statements that contain cases for each event the application might handle--not that much different from the original Windows event model.
Basically there are three areas where the original event model falls short:
The new Event Delegation Model handles each of these problems and follows three simple principles:
In addition, the Event Delegation Model rests on two basic concepts: the Event Source and the EventListener. Components such as the mouse, keyboard, or dialogs that generate events are the Event Sources. The events they generate fall into classes that the EventListener captures.
EventListener classes further break down events into low-level events--such as mouse-movement events, or into semantic events that apply to higher-level application elements--such as new selections in list boxes, button pushes, or other user interactions. The java.util.EventListener class contains a set of semantic interfaces and low-level event interfaces.
Semantic listeners are those that support changes in the state or value of components, as when the user makes a new selection or clicks a button. Low-level listeners are those that support capturing low-level events such as changes in the state or position of a window. Table A provides a list of some of the prepackaged event listeners.
Table A: Prepackaged EventListener classes
| Semantic Listeners | |
| ActionListeners | Support capturing menu selections, button clicks, list changes, etc. |
| AdjustmentListeners | Support capturing events-adjustment events. |
| ItemListeners | Support capturing events associated with item-state changes. |
| TextListeners | Support capturing events associated with text changes. |
| Low-level Listeners | |
| ComponentListeners | Capture events on components such as resize, etc. |
| ContainerListeners | Capture events on containers--such as new elements being added to the container. (The JDK normally handles these events.) |
| FocusListeners | Capture keyboard- and mouse-focus events. |
| KeyListeners | Capture keyboard events. |
| MouseListeners | Capture mouse events. |
| WindowListeners | Capture window resize, iconify, activate, and similar events. |
Now that we've seen an overview of the Event Delegation Model, let's look at how you'd implement it in a Visual J++ program. As we mentioned earlier, the JDK 1.0 event model requires applications to subclass the Frame class and add handleEvent() or action() methods to capture events. Moreover, the new event model allows for a much cleaner separation between the GUI, which controls the application, the application itself, which acts on GUI events, and the interface between the two.
Ideally, we'd like to have three classes in every application. Our goal is to have a GUI class that implements the presentation of our application to the world, an application class that handles the logic of our application, and a class that supports connecting the GUI to the application.
To demonstrate this model, let's build a simple Java application that implements this three-class principle. Begin by opening Developer Studio and creating a new Java project called EDMTest. Then, enter the code shown in Listing A as EDMTest.java.
Before we get into the details, let's reexamine our initial concepts. For this example, the primary goal was to separate the GUI from the application. We achieved this goal by creating an overall application class, EDMTest, which contains methods that implement the function of the application without regard to its interface.
In addition, we created a specific GUI class that links, via the CommandListener class, the GUI to the application's functional methods. Doing so separates the application's presentation from its function.
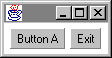
When you run EDMTest, it produces a simple frame containing two buttons, as shown in Figure A. One button causes the application to exit; the other awaits your creative touch to implement some additional functionality. When you run the application using jview.exe, our buttons also print a message when you click them. Now, let's look at the code in detail.
Our application produces a frame with two buttons.
Section 1 of Listing A contains the actual functional implementation of our example. For illustrative purposes, two methods are shown--one that exits the application and could include final cleanup support, and a second method that simply prints to system.out that the button was pressed. Note, however, that there's no mention of the GUI or any connection as to how these methods are invoked. These methods provide only the functionality.
Section 2 is the simplest section of the entire application. Within section 2, we create the new application and its appropriate GUI. We then bind the application to the GUI. (If more than one GUI existed for a given application, the application could create and bind the correct GUI without concern for the application's functionality.)
Section 3 contains the first real references to the new event model. Here we create our event handlers. Each handler implements one or more EventListener interfaces. Our example contains two buttons, for which we implement the ActionListener interface. ActionListener requires that we implement the actionPerformed method.
The CommandListener class has a few interesting features. First, although we've used a switch statement, we could have avoided doing so entirely by examining the ActionEvent directly and simply checking each button's label. This approach, however, has one significant drawback. If the label text of the button changes, you'll also need to modify the command handler.
To solve this problem, we simply define a constant for each operation and, as we'll see in section 5, create instances of this object--one per command. How you structure your command listeners to differentiate between events of the same type is a matter of personal choice.
As was stated in section 3, ActionListeners need to implement the actionPerformed method. Other listeners require other methods; for instance, the WindowListener interface requires seven additional methods in order to establish window state. In our example, we have a simple switch that connects each of the buttons to its appropriate underlying application method.
Section 5 contains the last bits of code. The example's interface contains only two buttons. We bind these buttons using a new button method, addActionListener, which takes as its argument a class that implements the ActionListener interface.
We can see our scheme in action now. First we create an action handler based on the specific command we wish to handle. For example, our exit() method creates a handler that binds the Exit button to the application's Exit command. We then use the addActionListener method to bind this handler.
We could have done the same thing for other GUI elements, such as check boxes or list boxes, letting each having its own addXYZ listener. The important aspect of this code is that we bound the handler for a GUI element when we created the element. In our example, we created an instance of a handler class object for each button, but we could have easily created classes of handlers, one for buttons, another for keyboard events, and so on.
It's important to understand one additional feature of the JDK 1.1--inner classes. Inner classes are just that, classes defined completely within the scope of another class. Our example application uses inner classes to encapsulate its GUI and CommandListener classes within itself. Inner classes themselves have many uses, only a few of which we've tapped in this example. Look for future articles in Visual J++ Developer's Journal highlighting inner classes themselves and how you can use them for more than just hiding one class within another.
The JDK provides a set of standard adapter classes that implement the methods of the various EventListener classes. The purpose of these classes is to provide a basis from which to implement the listener classes. For example the class java.awt.event.WindowAdapter contains an empty implementation of all the WindowListener required methods. A developer who needed to process Window events might derive his or her own class from this empty implementation and override only those methods he or she actually needed. Such a class might also include some event filtering in its constructor as well!
While our example was simple, perhaps almost trivial, it drives home several of the important aspects of the new Event Delegation Model. First and foremost is that we now have the ability to completely separate the implementation of the underlying functionality of an application from its interface. This separation allows for a much cleaner application, from both a development and a maintenance standpoint. For more information about the Event Delegation Model or the features of the SDK 2.0, see the documentation that comes with the SDK or check out the information on the Microsoft Visual J++ Web page.
Al Saganich is an independent software consultant, currently under contract to Digital Equipment Corp. He is co-author of the best selling Microsoft Visual J++ 1.1 SOURCEBOOK (J.Wiley and Sons, ISBN 0-471-17850-3), and is currently working on the next release of the Java 1.2 for C/C++ programmers to be published in the fall of 1997.
Listing A: EDMTest.java
import java.awt.*;import java.awt.event.*;/*** JDK 1.1 Event Delegation Model Test* Al Saganich* for the Visual J++ Developer's Journal*** This example uses new features* of the JDK 1.1**/// The class EDMTest is the "meat" of a real application.// Within this class are the actual methods// which are called when some GUI event occurs.//public class EDMTest{// These methods would normally correspond to actual// processing within the application.// For example, a simple calculator might have methods // here for add or subtract, etc.// Section 1public void ButtonA(){// Button A was pressedSystem.out.println("Button A pressed!");}// The user hit the exit buttonpublic void exit(){System.out.println("Exiting....");System.exit(0);}// Section 2// Create the application and attach the// GUI to it.static public void main(String args[]){EDMTest app = new EDMTest();GUI gui = new GUI(app);}}// Section 3// The command class handles all// command processing.// This class is the glue between the GUI and// the application.//class CommandListener implementsActionListener// Buttons require ActionListeners{static final int EXIT = 0;static final int BUTTONA = 1;int id;EDMTest app;public Command(int id, EDMTest app){this.id = id;this.app = app;}// Section 4// The ActionListener interface requires// the actionPerformed method.public void actionPerformed(ActionEvent e){switch(id){case BUTTONA:app.ButtonA();break;case EXIT:app.exit();break;}}}//// The GUI Class implements the use// interface for the application// and "glues" the interface to the// application via the command class.//class GUI{public GUI(EDMTest app){Frame f = new Frame();f.setLayout(new FlowLayout());Button b;
// Section 5f.add(b = new Button("Button A"));b.addActionListener(new CommandListener (Command.BUTTONA, app));f.add(b = new Button("Exit"));b.addActionListener(new CommandListener (Command.EXIT, app));f.pack();f.show();}}