If you've ever taken your laptop computer to a client's office, you've probably encountered problems connecting to the LAN because you didn't have the right type of network card. For example, a 10-base T card won't do you much good if your client's network uses BNC connectors. Fortunately, there's a cheaper solution than buying every type of network card on the market. In this article, we'll tell you about Windows 95's Direct Cable Connection utility. As we do, we'll show how you can configure it to connect your notebook to a client's LAN.
You're probably familiar with Lap Link or similar programs that use a null modem cable for communication. Direct Cable Connection is very similar to these other programs. The biggest difference is that it's included on the Windows 95 CD-ROM. Direct Cable Connection allows you to use a null modem cable or a parallel cable to link two PCs together. Once you've linked the PCs, the guest PC can access any shared directories on the host PC. The guest PC can also access the rest of the network (as long as you've granted the appropriate privileges).
To install Direct Cable Connection, open Control Panel and double-click the Add/Remove Programs icon. When you see the Add/Remove Programs dialog box, select the Windows Setup tab. Now, choose Communications from the Components list box and click the Details... button. Be sure to click on the word Communications and not on the check box, or you'll uninstall any Communications components that are already installed on your system. Next, select the Direct Cable Connection option from the Components list box. When you do, Windows 95 will display a message saying that Direct Cable Connection requires Dial-Up Networking. Windows 95 will ask if you still want to install Direct Cable Connection and its required components. Click Yes to continue. At this point, you'll have to click OK twice. Windows 95 will then prompt you for your installation media and begin installing the necessary files. When it finishes copying the files, you'll have to repeat this entire procedure on the other computer you plan to connect to.
Keep in mind that Windows 95 considers a connection via Direct Cable Connection to be a type of Dial-Up Networking. Therefore, in order for your connection to function properly, you must have the correct network components installed.
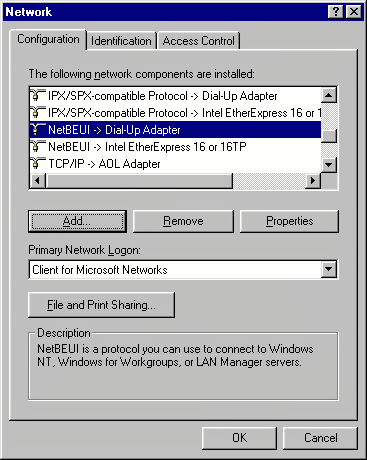
First, make sure that both machines have the NetBEUI protocol installed. To check this, open Control Panel and double-click the Network icon. Next, scroll The Following Network Components Are Installed list box and search for the NetBEU Dial-Up Adapter component, as shown in Figure A. If the NetBEUI protocol is already installed, you can skip to the next section. If it isn't, you can install it by clicking the Add... button and double-clicking Protocol. When you do, you'll see the Select Network Protocol dialog box. Now, choose Microsoft from the Manufacturers list box and NetBEUI from the Network Protocols list box, as shown in Figure B, and click OK.

Figure A. Make sure the NetBEUI Dial-Up Adapter protocol is installed.
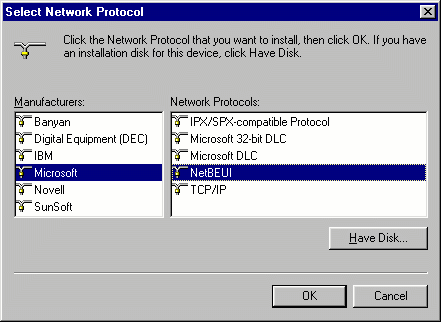
Figure B. Select NetBEUI from Microsoft's Network Protocols list box.
You should now check to make sure that the host PC has File and Printer Sharing for Microsoft Networks installed and enabled. If the host PC is already sharing directories across the network, that means the component is already installed.
If you're not sure, open Control Panel and double-click the Network icon. Next, see if the File and Print Sharing... button is grayed out. If it is, you can install the File and Printer Sharing for Microsoft Networks component by clicking the Add... button and double-clicking Service. When you see the Select Network Service dialog box, choose Microsoft from the Manufacturers list box and select File and Printer Sharing for Microsoft Networks from the Network Services list box, as shown in Figure C. Click OK to continue.
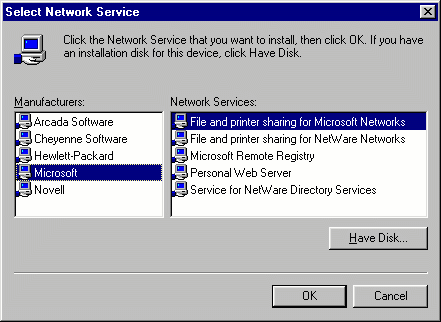
Figure C. Select File and Printer Sharing for Microsoft Networks from Microsoft's Network Services list box.
Once you've installed File and Printer Sharing for Microsoft Networks, you need to enable it. To do so, click the File and Print Sharing... button on the Network dialog box's Configuration tab. When you do, you'll see the File and Print Sharing dialog box, shown in Figure D. Select both check boxes and click OK to continue. Click OK again to close the Network dialog box.
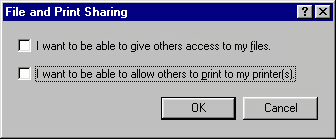
Figure D. Select both check boxes and click OK.
Although you don't need it at the moment, we strongly recommend that you also install File and Print Sharing for Microsoft Networks on the guest PC. By doing so, you can easily reverse the operation, if necessary, and use the host PC as a guest and vice versa. You can then use the host PC to remotely access files stored on your laptop's hard disk.
Instead of rebooting to effect the changes, shut down and power off both PCs. While the power is off, connect your serial or parallel cable between the PCs.
When you turn them back on, Windows 95 will give you the opportunity to sign in with a network login name and password. You can use any login name and password you want. If you'd rather not use a password, simply press [Enter]. Windows 95 will then ask you to confirm your password. To do so, simply retype it or press [Enter] again if you chose not to use a password.
Now, make your files on the host PC accessible to the guest by opening My Computer, right-clicking on the folder that contains the files you want to access from the guest PC, and selecting Sharing... from the shortcut menu. When you do, you'll see the Sharing tab of the file's Properties sheet. Select the Shared As option button, and Windows 95 will automatically enter in the Share Name text box the folder's name, as shown in Figure E. Next, select the level of access you want the guest to have and assign a password. Since all other network users will have access to this folder, you should carefully consider the level of access and the password you grant. Click OK to continue.
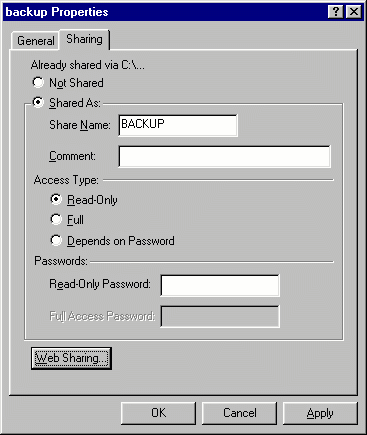
Figure E. The Sharing tab allows you to control access to the folder.
Now that you have all the necessary components in place, you can make the physical connection. To do so, select Direct Cable Connection from the Accessories menu. When you do, Windows 95 will launch the Direct Cable Connection wizard, shown in Figure F.
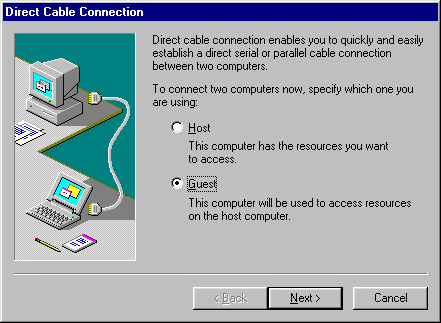
Figure F. Configure the PC containing the resources you want to access as the host.
The first item you'll have to configure is the role of the PC. Configure the computer that contains the resources you want to access as the host and the other PC as the guest.
Now, you must specify the type of connection you'll be using. You can choose from the options available in the Select the Port You Want to Use list box, shown in Figure G. If your connection type isn't listed, you can add it to the list by clicking the Install New Ports button and following the prompts. Click Next to continue. Then, assign password protection to your connection and click Finish to close the wizard.
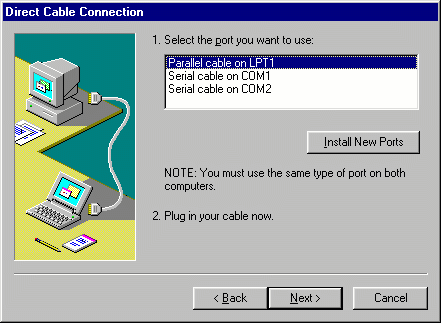
Figure G. Select your connection method and click Next.
If you're using a Novell NetWare network, the host PC will display a warning that NetWare servers will be inaccessible while the PC is running in host mode. Click OK to close the warning message. The host PC will now switch to stand-by mode as it waits for a connection. The guest PC will begin searching for the host PC. If you set up the guest PC before the host is online, you may receive an error message. If you do, get the host online, click OK on the guest PC to clear the error, and re-try the connection.
Once you successfully connect the PCs, they'll synchronize and begin the communications process. In some cases, one of the PCs may ask for a computer name. If it does, simply type the name you assigned to the PC during network setup. If you're unsure of this name, double-click the Network icon in Control Panel, select the Identification tab, and look for the name in the Computer Name text box.
You should now be able to access any of the host PC's shared folders that you have passwords for or that don't require passwords. You should also be able to browse the network to access another PC. However, in our tests, we've been able to access only other PCs running Windows 95. We haven't been able to access Windows NT or NetWare servers in this way.
To end a communications session, go to the guest PC and click the Close button in the Direct Cable Connection dialog box. When you do, the host PC will return to stand-by mode and wait for another connection. If you're not planning to re-establish the connection anytime soon, you can click the Cancel button on the host PC's Direct Cable Connection dialog box.
The next time you want to reconnect the two PCs, you won't have to go through nearly as many steps as you did to connect them the first time. To reconnect, simply launch the Direct Cable Connection program from the Accessories menu on both computers. Next, click the Listen button on the host PC. This will put the host in stand-by mode and prepare it to accept a connection. Then, click the Connect button on the guest PC to start the communications process.
In this article, we've shown how you can use Windows 95's Direct Cable Connection utility in place of a network card. We've also described how to configure and re-establish this connection.