By Brian Johnson
For the past couple of months I’ve been playing with JavaBeans, the component architecture that lets programmers create reusable objects (beans) that can be used without internal modification in Java programs. When you start playing around with multiple component architectures such as ActiveX, Delphi controls, and JavaBeans, creating components becomes second nature.
Because JavaBeans are designed to be used in visual development tools like Borland’s JBuilder and IBM’s Visual Age for Java, many Visual J++ users are left wondering how to use beans in their own programs. In this article, I’ll tell you a little about how beans are created, and how you can use them from Visual J++.
Before we talk about anything else, I want to get generic and discuss what a component is without getting into the code. Once the concepts are understood, the code should come easily.
For any component architecture, there are three characteristics that make it useful to the end programmer: methods, properties, and events. By “end programmer,” I’m referring to the developer who’s never seen the internals of the component, and really doesn’t need to worry about how things work.
A method is any function in a component. In any object-oriented or object-based language where methods of a component are called, the terminology usually consists of the name of the component, followed by a period (.), followed by the name of the method. To make things easier on the end programmer, any arguments to a method in a component are usually set up as properties. This differentiates a component from something like a package or class library, for which the end programmer provides arguments to functions within the package.
A property is a value that’s set in a component. Properties help to insulate the component, because the value of the property can be checked before use. Properties are set and retrieved in components through “get” and “set” methods. A method that sets a property is called the “set” method; the value of a property is retrieved through a “get” method. Without getting into too much code at this point, a “get” method for a bean looks something like this:
public int getMyValue() {
  ...
  return myNumber;
}
In this example, myNumber is a private variable within the component. In JavaBeans, the “get” portion of the getMyValue method is a standard naming convention telling a visual tool that this is a method that gets the value of a property.
In JavaBeans, the value of a property is set in much the same way as it’s retrieved. The word “set” is used in the method, while the new value for the property is passed as a parameter:
public void setMyValue(int val) {
  myNumber = val;
}
Notice that the method takes the value that’s passed, and sets the value of a private internal variable, which is then used internally in the component.
The final element of a component is an event. Events are important when you want to be able to write code that’s executed when things happen. Common events include mouse clicks, property changes, and keystrokes. Events are important in that they allow an application that contains a component to receive notification when things happen to that component.
Javasoft’s Bean Developers Kit provides all the information you need to start working with JavaBeans and the JavaBeans API. Along with documentation, the kit also includes a reference implementation of the BeanBox visual development tool. If your bean works in the BeanBox, it will most likely work in other visual development tools. You can get the Javasoft BDK on the Web at http://www.javasoft.com/beans.
Beans themselves are actually just classes and supporting files that have been packaged in a .JAR file, which is a .ZIP-type archive that can be used directly by other visual development tools. To create .JAR files, you’ll probably need to obtain a copy of the Javasoft JDK 1.1.x, which contains a .JAR utility. If you’ve upgraded to Microsoft’s SDK for Java 2.0 or higher, you’ll have no problems either writing or compiling bean classes. [For a complete discussion of .JAR and CAB files, see Sean Sullivan’s article “From CAB to JAR” in the January 1998 Microsoft Visual J++ Informant.]
Creating beans. Microsoft Visual J++ is a natural environment for building beans: Component development depends mostly on hand-written code; Visual J++ provides an integrated environment where you can code and debug your bean classes. If you’re new to beans, the following primer touches on coding bean properties, methods, and events. It barely scratches the surface in terms of how far you can go with beans, but it should provide enough information to get you started.
Bean properties. Properties are the values within a bean; e.g. the bean is blue, the dial is set to 70, and the width of the box is 25. One of the features of a component model like JavaBeans is that a property can be set at design time (when you create a program using the bean in a visual programming tool), at run time (when you run the program), or both.
In a visual development tool, access to a bean’s properties is usually provided through a properties dialog box of some sort. The list of properties attached to a particular bean is known as a property sheet. The look of a property window or dialog box depends on the visual tool vendor.
There are several types of properties you can set in your beans: simple, indexed, bound, and constrained. In this article, I’ll show you how to set up simple and bound properties. Simple properties are important because that’s probably how you’ll set up most of the properties in any bean you create; bound properties are important because they send messages when the value of the property changes.
Getting and setting simple properties. Simple properties are created using a specific syntax. You can set a property, and you can get a property. Getting and setting refer directly to the way the properties are created and accessed. For example, setting up a property in a bean is as simple as adding a “set” method to the name of the property:
public void setMyValue(int val);To retrieve that value, an associated “get” method is used:
public int getMyValue();Though it might not seem obvious at first, there’s something special going on with these “get” and “set” methods. When created properly, simple properties are added to the bean’s property sheet automatically, through a process known as introspection. This simply means a tool can figure out what a bean does and what its properties are, just by looking at it. You don’t have to do anything special to set up simple properties in your beans. Just use “get” and “set,” and away you go.
Take a look at the code in Figure 1. This is a simple, do-nothing bean. I’ve added the “get” and “set” methods for the myValue property.
import java.awt.* ;
import java.beans.* ;
import java.io.* ;

public class PropBean extends Canvas
  implements Serializable {

  private int myNumber;

  public PropBean() {
    setSize(60, 40);
  }

  public void paint(Graphics g) {
    g.fillRect(0, 0, 60, 40);
  }

  public void setMyValue(int val) {
    myNumber = val;
  }

  public int getMyValue() {
    return myNumber;
  }
}
Figure 1: A simple, do-nothing bean.
If you’ve ever wanted to be notified immediately about something, then you’ll understand a bound property — a property that sends a message when it changes.
What’s so great about that? Another bean or the application that contains the bean can listen for a message broadcast when the value of the bound property changes. When one bean listens to another, it means the messages the first bean creates can be interpreted by the listener bean, allowing it to react to changes in the bean sending out the message.
This might seem confusing at first; because it’s so important, it’s worth a good, hard look. Messages are what make a graphical user interface (GUI) useful. Messages are generated based on events that take place in a program. Messages are being fired all the time in GUI applications and operating systems; the JVM (Java Virtual Machine) environment is no exception. The problem is that many messages are being generated. It wouldn’t be very efficient if a bean had to listen to all these messages just to find out the one thing it was interested in.
A bean sends a message when a bound property changes. A listener bean is notified when the bound property changes. For a bean to let other beans listen in on property changes, it must use the addPropertyChangeListener method. To get off the listener list, a listener bean must be able to de-register its interest. This is done through the removePropertyChangeListener method.
Once addPropertyChangeListener and removePropertyChangeListener are in place, the bean creates a PropertyChangeSupport object, and uses the firePropertyChangeEvent method to broadcast a message containing the details of the change.
The code in Figure 2 shows you how this works. This bean code sends a notification when its name property changes. To determine whether this really works, you’ll need to register a listener bean, then have it report the results of a property change. You can test this in the BeanBox by using the ChangeReporter bean, which consists of a text box that’s able to report changes to beans with which it’s a registered listener.
import java.awt.* ;
import java.beans.* ;
import java.io.* ;

public class BoundBean extends Canvas
  implements Serializable {

  // Set up two variables. myString holds the value of the
  // myBound property. changes is a property support object
  // we need to add the property-change support
  // functionality.
  private String myName = "BoundBean";
  private PropertyChangeSupport changes = new

  PropertyChangeSupport(this);

  public BoundBean() {
    resize(60, 40);
  }

  public void paint(Graphics g){
    g.fillRect(0, 0, 60, 40);
  }

  // This is where the action is. When the value of the
  // myBound property is changed, the FirePropertyChange
  // method broadcasts the name of the property, the old
  // value, and the new value.
  public void setName(String s) {
    String old = getName();
    myName = s;
    changes.firePropertyChange("name", old, myName);
  }

  public String getName() {
    return myName;
  }

  // addPropertChangeListener lets listeners
  // register with our bean.
  public void
    addPropertyChangeListener(PropertyChangeListener l) {
    changes.addPropertyChangeListener(l);
  }

  // removePropertyChangeListener lets a
  // listener de-register.
  public void
    removePropertyChangeListener(PropertyChangeListener l) {
    changes.removePropertyChangeListener(l);
  }
}
Figure 2: A bean that announces its property changes.
To test this bean, you need to compile it, package it, and put it in the BeanBox. Once the bean is prepared and installed, the following steps will hook the BoundBean to the ChangeReporter bean:
Click BoundBean in the BeanBox ToolBox, then click the BeanBox window to place an instance of the bean there.
Click ChangeReporter in the BeanBox ToolBox, and place an instance of it in the BeanBox.
Click BoundBean to select it. A hashed line will be drawn around the bean.
Select Edit | Events | propertyChange from the BeanBox menu. A red line will follow your mouse pointer in the BeanBox.
Click the ChangeReporter bean to bring up the EventTargetDialog list box.
Select reportChange from the EventTargetDialog list box, and click OK. You should see a message that reads, “Generating and compiling adaptor class.”
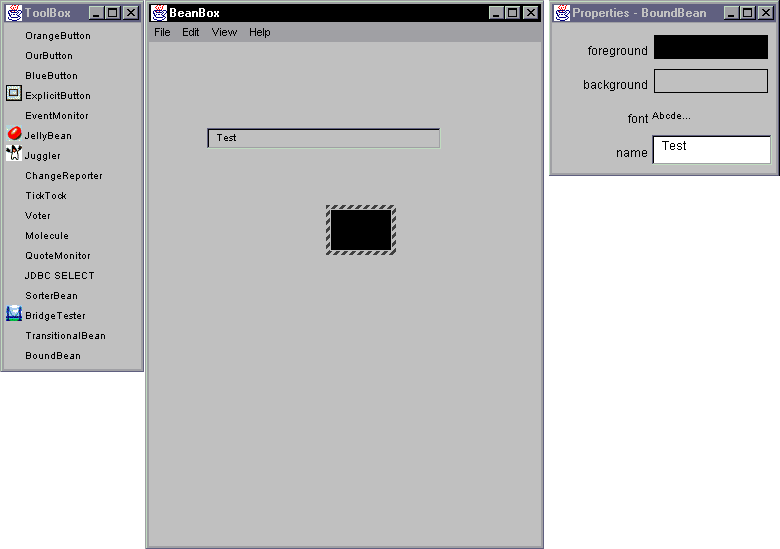
To test the BoundBean, simply select it and watch the ChangeReporter bean. You should see the name of the property being edited, and the new value for the property as it’s being changed. In Figure 3, the value of the ChangeReporter bean matches the name property in the Properties window.
Figure 3: The BoundBean being tested in the BeanBox.
Methods are the functions that exist inside your bean. Beans generally won’t contain a lot of public methods, but you can create beans for other programmers just to make certain methods you write easy to use. The methods you create for your beans are no different than in any other Java class. What you need to think about is whether these methods should be available to the end user. Public methods will be available programmatically to the end user. Private methods will be available only within the bean itself. Most of the methods you create inside your beans will usually remain private. Rather than call a method directly, a user will usually plug in a value or two, then get the result from the bean visually or as a property.
Methods may be used in beans as parts of invisible beans, which are JavaBeans that have no run-time interface. Invisible beans come in handy because they let programmers plug in values by using the bean’s property sheet in a visual development tool. Invisible beans can make it easy for a programmer to use a class without having to refer to the class’ documentation. This makes it easy to take advantage of the beans’ properties.
Figure 4 shows you how an invisible bean might work. This bean simply takes two integer values, and figures out the average. I talked about the set and get methods in the last section. The method used to perform the calculation is private, and is called from the getFinal method. Because the property Final has no set method in this class, it’s considered a read-only property. When the property is accessed, the private method Average is called, and returns the average of the Value_1 and Value_2 properties.
public class InvisibleBean {

  private int val1, val2;

  public InvisibleBean() {
  }

  public void setValue_1(int v) {
    val1 = v;
  }

  public int getValue_1() {
    return val1;
  }

  public void setValue_2(int v) {
    val2 = v;
  }

  public int getValue_2() {
    return val2;
  }

  // Property that contains a result
  public int getFinal() {
    return average(val1, val2);
  }

  // Private method in class / bean
  private int average(int x, int y) {
    return (x + y)/2;
  }

  public void init() {
    val1 = 0;
    val2 = 0;
  }
}
Figure 4: An invisible bean that returns a calculation as a read-only property.
Bean events include things like mouse movements, clicks, keystrokes, and changes in the property of a bean. Bean events allow the end user to attach things that happen to the bean to methods, properties, and events — in other beans, and in the program where the bean is used.
Bean events are closely tied to communications between beans and the application where the bean is used. Three things need to happen when an event takes place in a bean:
An event takes place in a bean.
The bean sends out a message saying the event happened.
Another bean is waiting for a message from the first, and executes some code after it gets the message.
The bean where the event originates is called the event source. The bean waiting for the message that the event happened is called the event listener.
If you’re working with the canvas as the bean, then you don’t need to do anything special to use these events in visual development tools. Since these events are inherited, you need only override them when you want to add your own functionality.
When your bean becomes more complex, there’s a slight problem with simply wiring bean events. If your bean consists of one or more buttons, for example, it would be good to know which button was pressed by the user.
Think about it this way: Suppose you’re listening to your car radio. You clicked on the button that started your radio, and everything was great. You’re the audience, the click was the event, and the radio is the bean containing the event. If your radio bean played just one station, you’d be set. All the radio bean would have to do is fire an event for the simple act of clicking on it. But your radio has six buttons, each of which play a different station when pushed. How do we wire things so we can figure out what will happen when any given button is pressed?
The answer is to create an adaptor that implements an ActionListener interface for each of the buttons on the radio. The ActionListener stuff is inherited from java.util.EventObject, which is part of the JavaBeans API. You wire the adaptor classes to each of the events in the bean by using addActionListener.
To keep things as simple as possible, I’ll create a bean that contains just a couple of buttons (see Figure 5). This preliminary bean is shown in Figure 6. When pressed, each of the two buttons send a string to the console.
import java.awt.* ;
import java.awt.event.*;
import java.beans.* ;
import java.io.* ;

public class ButtonBean extends Panel {

  public ButtonBean() {
    Button btn1 = new Button("Button 1");
    Button btn2 = new Button("Button 2");
    setLayout(new FlowLayout());
    add(btn1);
    add(btn2);

    // Create listener objects for buttons.
    btn1.addActionListener(new btn1Adaptor());
    btn2.addActionListener(new btn2Adaptor());
  }

  public void paint(Graphics g){
  }

  // Adapter for Button 1
  class btn1Adaptor implements ActionListener {
    public void actionPerformed(ActionEvent e) {
      System.err.println("Button 1 Pressed");
    }
  }

  // Adapter for Button 2.
  class btn2Adaptor implements ActionListener {
    public void actionPerformed(ActionEvent e) {
      System.err.println("Button 2 Pressed");
    }
  }
}
Figure 5: The ButtonBean bean uses adaptors to determine which button was pushed.
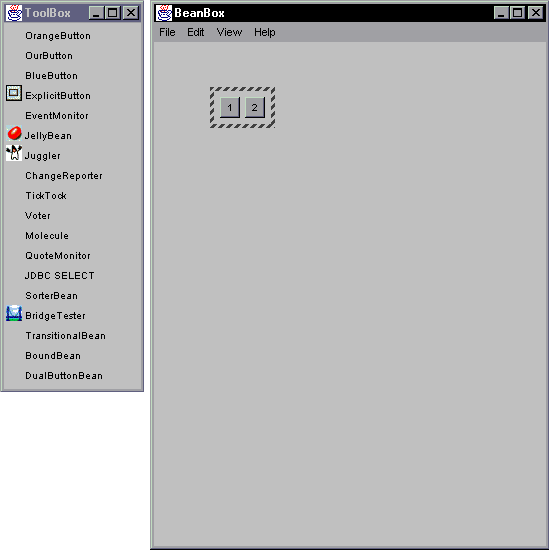
Figure 6: The ButtonBean in the BeanBox.
If you play with the bean at this point, you’ll notice there’s no way to attach a btn1 click event to another bean. For that, we can add a bound property, which can then be changed from adaptor classes. The new source code could look something like that in Figure 7.
import java.awt.* ;
import java.awt.event.*;
import java.beans.* ;
import java.io.* ;

public class DualButtonBean extends Panel {

  private int channel = 0;
  private PropertyChangeSupport changes =
    new PropertyChangeSupport(this);

  public DualButtonBean() {
    Button btn1 = new Button("1");
    Button btn2 = new Button("2");
    setLayout(new FlowLayout());
    add(btn1);
    add(btn2);
    btn1.addActionListener(new btn1Adaptor());
    btn2.addActionListener(new btn2Adaptor());
  }

  public void setBeanChannel(int x) {
    int old = getBeanChannel();
    channel = x;

    // Convert int values to strings.
    String myStringOld = "" + (old);
    String myStringNew = "" + (channel);

    // Fire the property change event.
    changes.firePropertyChange("beanChannel",
                                myStringOld,
                                myStringNew);
  }

  public int getBeanChannel() {
    return channel;
  }

  public void paint(Graphics g){
  }

  // addPropertChangeListener lets listeners
  // register with our bean.
  public void
    addPropertyChangeListener(PropertyChangeListener l) {
    changes.addPropertyChangeListener(l);
  }

  // removePropertyChangeListener lets a
  // listener de-register.
  public void removePropertyChangeListener(
                PropertyChangeListener l) {
    changes.removePropertyChangeListener(l);
  }

  class btn1Adaptor implements ActionListener {
    public void actionPerformed(ActionEvent e) {
      setBeanChannel(1);
    }
  }

  class btn2Adaptor implements ActionListener {
    public void actionPerformed(ActionEvent e) {
      setBeanChannel(2);
    }
  }
}
Figure 7: The ButtonBean class revised. DualButtonBean uses bound properties.
There are lots of ways to do this. My solution was to create a PropertyChangeSupport object named “changes” to later fire a PropertyChangeEvent within the bean. When the propertyChange event is wired to the BDK’s ChangeReporter bean, the change made to the beanChannel property is displayed.
To use a bean in a hand-written applet or program, you first need to unpack the .JAR file that contains the bean classes. The BeanInfo class is unimportant; the information available in this file is there to make the bean easier to use in a visual tool. To find out what methods, properties, and events are available in a bean, you’ll need to rely on the documentation the bean writer supplies; or you can take a look at the bean in the BeanBox. Once you know what the class has to offer, you can simply add the bean to any class you create. The listing in Figure 8 shows you how the DualButtonBean class might be added to a simple applet.
import java.applet.*;
import java.awt.*;
import java.beans.*;

public class ByHand extends Applet {

  PropertyChangeAdapter adapter = new
  PropertyChangeAdapter();
  int dualButtonChannel;
  String dualButtonString;
  DualButtonBean myDual = new DualButtonBean();

  public ByHand() {
  }

  public String getAppletInfo() {
    return "Name: ByHand\r\n" +
           "Author: Brian Johnson\r\n" +
           "Created with Microsoft Visual J++ Version 1.1";
  }

  public void init() {
    setLayout(new FlowLayout());
    add(myDual);
    myDual.addPropertyChangeListener(adapter);
    resize(320, 240);
  }

  public void writeValue() {
    dualButtonChannel = myDual.getBeanChannel();
    dualButtonString = "" + (dualButtonChannel);
    repaint();
  }

  public void paint(Graphics g) {
    g.drawString(dualButtonString, 10, 20);
  }

  class PropertyChangeAdapter
    implements PropertyChangeListener {

    public void propertyChange(PropertyChangeEvent e) {
      writeValue();
    }
  }
}
Figure 8: The ByHand class contains the DualButtonBean from Figure 5.
For this to work, the DualButtonBean classes need to be in the same directory as the ByHand class. It’s really rather simple. I just used the Visual J++ App Wizard to create a simple applet. I created an instance of DualButtonBean by inserting the line:
DualButtonBean myDual = new DualButtonBean();I then added myDual to the applet using add(myDual). The tricky part comes when we want to receive notification of a bean event. I worked from the sample code for the BDK’s ChangeReporter bean to add a PropertyChangeAdaptor to the ByHand class. As suggested in the commented source for the ChangeReporter class, I created a PropertyChangeAdaptor named adaptor, and added a PropertyChangeListener to the myDual object. I then created a PropertyChangeAdaptor class to listen for and react to events.
Next the writeValue method is called, retrieving the getBeanChannel property. This property is then changed to a string and written to the applet; you can see the result in Figure 9. The number that’s drawn depends on the button that’s pushed. Again, the programmer using the bean isn’t concerned with the inner machinations of the bean — only with the result.
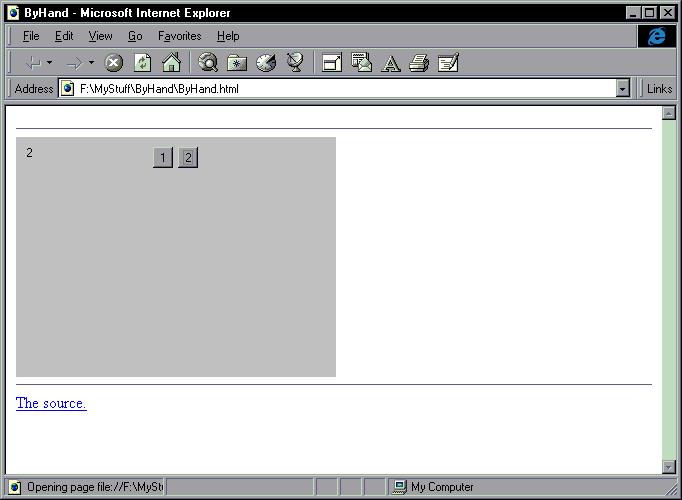
Figure 9: The ByHand class containing the DualButtonBean in Internet Explorer.
JavaBeans is a component architecture designed to be used with both visual development tools and with tools like Microsoft Visual J++. This article has introduced some component concepts, and some features of beans. As a Java editing tool, Visual J++ lends itself naturally to the creation of bean components. Finally, I showed you how you can take advantage of bean components in your own Visual J++ projects.
The files referenced in this article are available for download from the Informant Web site at http://www.informant.com/ji/jinewupl.htm. File name: JI9802BJ.ZIP.
Brian Johnson is a free-lance writer and programmer in Orlando, FL. He’s co-author of VBScript Unleashed [SAMS, 1996]. You can e-mail him at brianjay@gate.net.