By Ken Spencer
Many organizations build Web applications that require users to log on, usually because they need to control access to sensitive information. But while security needs may vary, the overall challenge is the same: how do you force users to log on to your application appropriately?
The answer can take several forms. You might try to use built-in Windows NT® security features. However, if you force everyone to log on using Windows NT Password Authentication, then all the users accessing your site must be Windows NT users. This might be a problem if 10,000 users who are not in the Windows NT SAM database visit your site—that’s a lot of user accounts to set up and maintain. You might also try NTFS file security, but that requires lots of manual tweaking of file security, defining Windows NT user accounts, and so on, result-ing in many of the same problems.
I’m going to show you another approach, an approach that’s similar to what we used in the Registered Users area of our Web site at http://www.32x.com. This area allows anyone who has attended one of 32X Corporation’s seminars to access and download the sample files provided. When the user selects the Registered Users option, the resulting page requests the confirmation number given to the user when they attended the seminar. The confirmation number is looked up in a Microsoft Access database and, if the lookup is successful, a custom page is created and returned to the browser.
The example I created for this article uses a SQL Server™ database to hold user accounts that are defined explicitly for this application. The same account may or may not exist in the Windows NT SAM database, but this application does not check for a matching SAM entry. When a user tries to access the sample site, the Login.asp page requests their user name and password. When the user submits the page, CheckUser.asp looks up the user name and password in the SQL Server database. If the user name and password are found, the user is logged on and the groups the user belongs to are retrieved. If the user is not logged in, then Login.asp displays again. The home page each user sees depends on the group the user belongs to.
I will show you how to build this code for use in any application. I will also point out some of the nuances of using the login approach and what you may need to do to secure the app. Then I’ll walk you through the process of creating the database and stored procedures used to perform the data retrieval.
The first step in creating the login application was to define the requirements for users’ access to the pages in the application. Many people at the 32X Visual InterDev seminars have requested a way to force users to log in to the application and then to display only information that is related to the user’s role. This is the approach I took with my application. The requirements for the sample application are fairly basic:
The database structure to support these requirements must hold user accounts, user groups, and groups of users. Then the application can base access to the data in the application on the groups a user is assigned to. Figure 1 shows the application’s home page (default.asp), which is displayed if the user logs on and is in the GeneralManager group.
Figure 2 shows the same home page as displayed for a user from the ManufacturingManager group. Notice the link to the Manufacturing data. Also notice that the Purchasing link shown in Figure 1 is missing. These are the only two links on the page, but I could easily add many more based on the group definitions of the users.
Figure 1: Home page
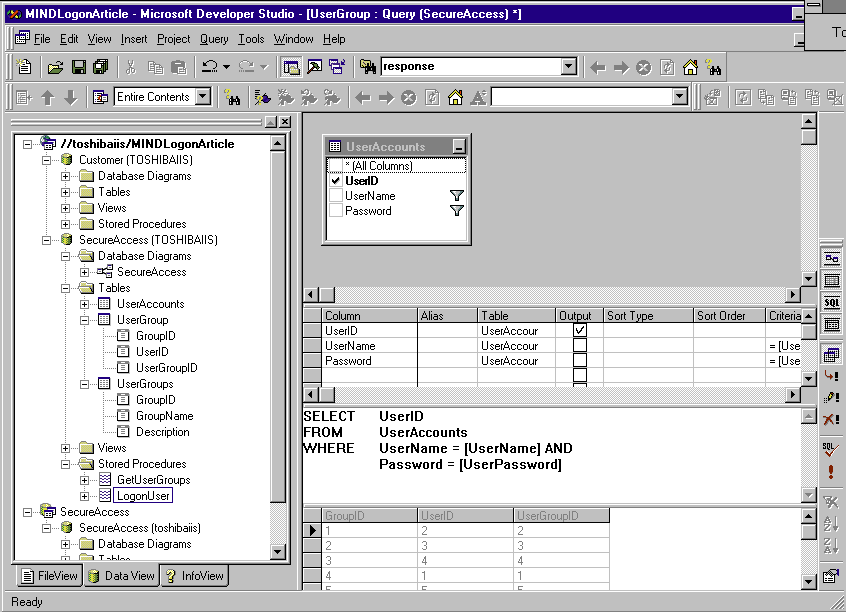
Figure 2: Home page for another group
The first thing I created was the database, which is easy if you understand the user requirements. This database must hold the user name, password, group names, and a link between group names and user names. Figure 3 shows the structure of the database as displayed in the Database Diagram window in Visual InterDev™.

Figure 3: Database Diagram Window
I used the New Database Wizard to create the SQL Server database. The database creation steps in this section will only work on SQL Server 6.5 with Service Pack 1 or higher. If you’re using Microsoft Access, Oracle, or another database, you must use the techniques required by your database to create the database structure.
First, I followed these steps to start the New Database Wizard:
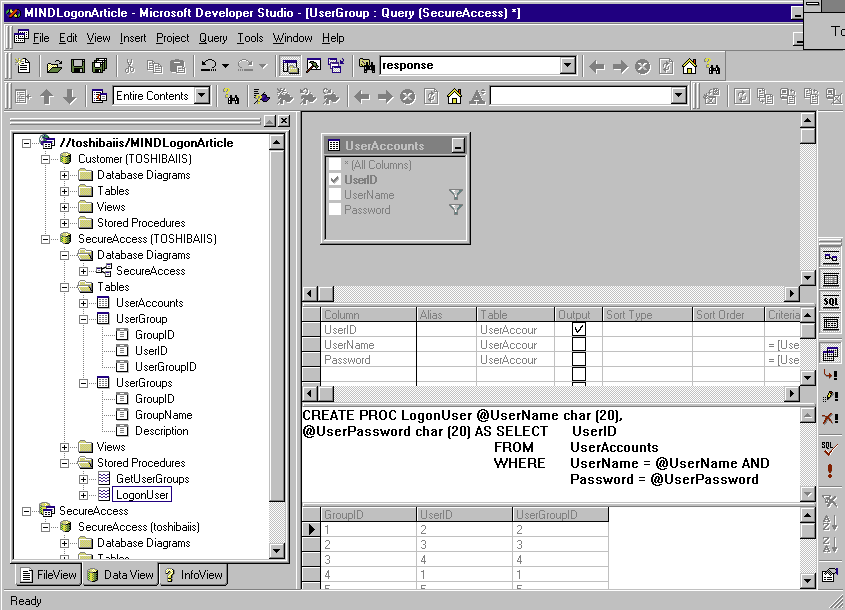
Figure 4: New Project Screen
Next I entered the name of the database server—the computer hosting the SQL Server database—and the user account and password for the database administrator, or at least an account with the permissions to create a new database. The entries that I used are shown in Figure 5.
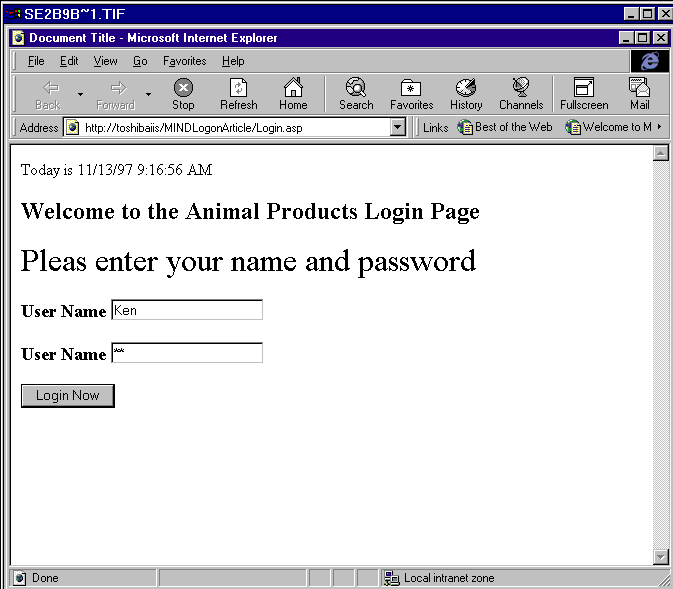
Figure 5: New Database Wizard
I completed the wizard by naming my database and selecting the device where the database and its log file will reside. This entire process should take about two to three minutes.
I used a separate database for the user accounts. This allows me to use the same database for more than one application and to easily share the login pages and data connections with other applications. Your requirements may differ.
To create the tables shown in Figure 3, I designed a new database diagram by right-clicking the Database Diagrams folder in DataView and selecting New Diagram. Then I right-clicked in the design window and selected New Table. I entered the name and column descriptions for each table, then saved the design, creating the tables.
The UserID field of the UserAccounts table, the GroupID of the UserGroups table, and the UserGroupID field of the UserGroup table all use the INT datatype. They are set to disallow nulls, and each is the primary key of its table. I also selected the Identity checkbox for these two fields, making each field a counter. The resulting UserID, GroupID, and UserGroupID fields will increment by one each time a new entry is added to the table.
Next I created a relationship from the UserAccounts table to the UserGroup table. I also created a relationship from the UserGroups table to the UserGroup table. The relationships were created by dragging the UserID field from the UserAccounts table to the UserID field of the UserGroup table. The second relationship was created by dragging the GroupID field from the UserGroups table to the GroupID field of the UserGroup table. If you build this project, your display should resemble the structure shown in Figure 3, except that it displays only the columns in the database.
Once you have created the database and the three tables, enter some sample data in each table. The UserAccounts table and UserGroups tables must have entries before they can be used in the UserGroup table. After you have entered several users or groups in the appropriate table, click the Run button on the Query toolbar to refresh the query—this will display the automatically generated ID field values.
Next I created two stored procedures. Logonuser checks the username and password fields and returns a UserID if the lookup is successful. GetUserGroups returns all the groups for a specific UserID. These two stored procedures retrieve all of the user information when a user logs in.
I used stored procedures for a couple of reasons. First, stored procedures may be 10 to 20 times faster than dynamic SQL (the type of SQL that is generated by Query Builder or that you enter directly into the CommandText property of ADO). Second, stored procedures work like objects in the database—once you create them, anyone can simply access them and take advantage of their features without knowing the details of how they work. These are all the reasons I need to move the code to a stored procedure. As an added bonus, the next time I need a UserID or the groups that the current user belongs to, I can get them from the database using the stored procedures created here.
The SQL code for Logonuser is:
CREATE PROC LogonUser @UserName char (20), @UserPassword char (20)AS SELECT UserID FROM UserAccounts WHERE UserName = @UserName AND Password = @UserPassword
The SQL code for GetUserGroups is:
CREATE PROC GetUserGroups @UserID int AS SELECT UserGroup.GroupID, UserGroup.UserID, UserGroups.GroupName, UserGroups.Description FROM UserGroup INNER JOIN UserGroups ON UserGroup.GroupID = UserGroups.GroupID and UserGroup.UserID = @UserID
I created the SQL for each stored procedure in Query Builder. To open Query Builder, I double-clicked the UserAccounts table. This opened the results pane of Query Builder and returned all rows of the table. Next, I selected the first three buttons on the Query toolbar to display the other panes of the interface: Diagram, Grid, and SQL.
The following steps create the SQL for the Logonuser stored procedure:
The SQL statement in the SQL pane should look like the first SQL statement shown above and in Figure 6. Click the Run button on the Query Builder toolbar to test the query. This should display the Parameters dialog in which you can enter a valid and invalid user name and password for the test. Try this with both valid and invalid user name/password combinations.
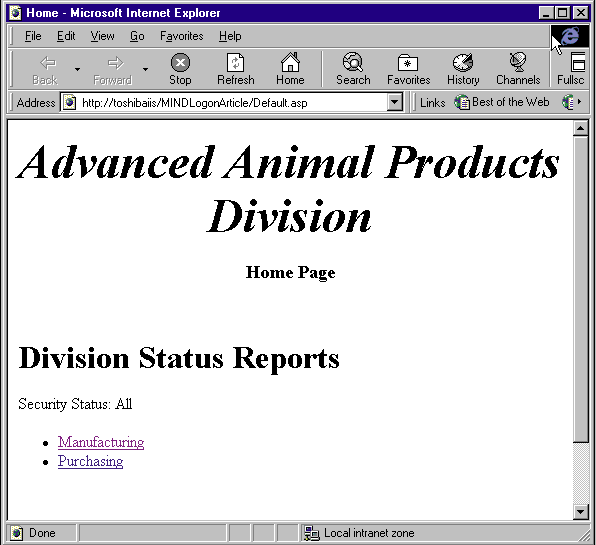
Figure 6: Query Builder
Now let’s turn the SQL statement into a stored procedure. Simply modify the SQL to look like the one in Figure 7, then click the Run button. Query Builder should display a dialog with this message: Query has executed successfully. Repeat these same steps for the second stored procedure that retrieves the groups a user belongs to. You can also enter the SQL directly into Query Builder and click the Run button to shortcut the process.
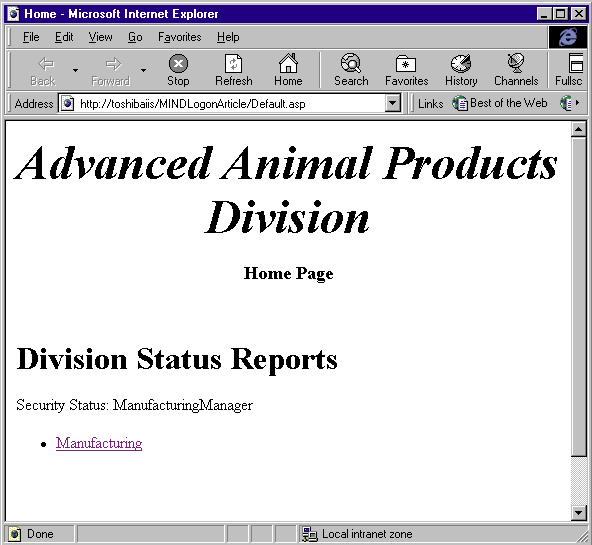
Figure 7: Modified SQL Statement
Now I can create the login code and begin to build the application. First, I have to build the user interface. I used the FrontPage® 97 Editor to create this page. The page is shown in Figure 8, while the code is shown in Figure 9. The login page is displayed automatically by the code in Global.asa (see Figure 9).
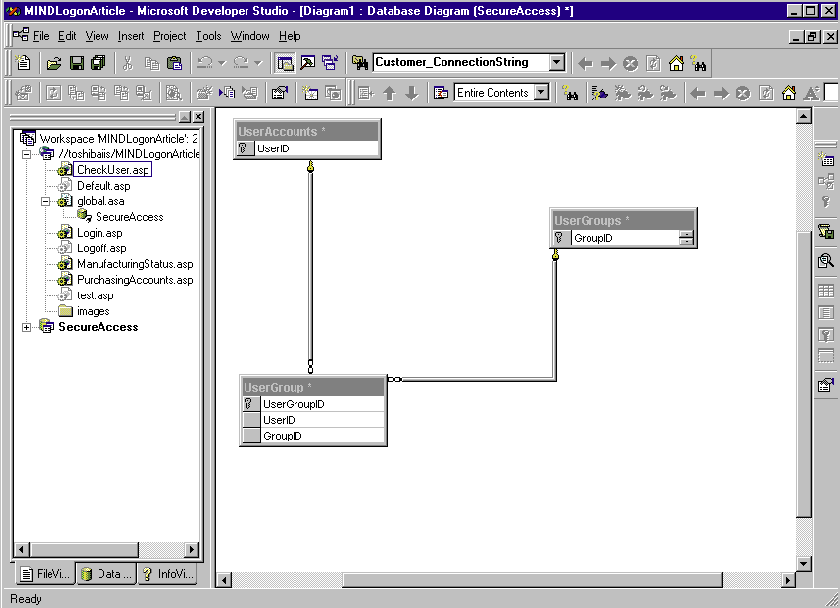
Figure 8: Login Interface
Figure 9: Global.asa
<SCRIPT LANGUAGE=VBScript RUNAT=Server>
Sub Session_OnStart
    '==Visual InterDev Generated - DataConnection startspan==
    '--Project Data Connection
        Session("Customer_ConnectionString") = "DRIVER={SQL
            Server};SERVER=toshibaiis;UID=sa;PWD=;APP=Microsoft (R) Developer
            Studio;WSID=KLSTOSHIBA;DATABASE=Customer"
        Session("Customer_ConnectionTimeout") = 15
        Session("Customer_CommandTimeout") = 30
        Session("Customer_RuntimeUserName") = "sa"
        Session("Customer_RuntimePassword") = ""
    '--Project Data Connection
        Session("SecureAccess_ConnectionString") = "DRIVER={SQL
            Server};SERVER=toshibaiis;UID=sa;PWD=;APP=Microsoft (R) Developer
            Studio;WSID=KLSTOSHIBA;DATABASE=SecureAccess"
        Session("SecureAccess_ConnectionTimeout") = 15
        Session("SecureAccess_CommandTimeout") = 30
        Session("SecureAccess_RuntimeUserName") = "sa"
        Session("SecureAccess_RuntimePassword") = ""
    '==Visual InterDev Generated - DataConnection endspan==
    if Request("Name") = "" or  Not Request("ValidateLogin") = "99223322" then
        response.redirect "login.asp"
    end if
End Sub
</SCRIPT>
The following statement in the Global.asa Session_OnStart event code is used to redirect the user to the Login.asp page:
if Request("Name") = "" or  Not Request("ValidateLogin") = "99223322" then
    response.redirect "login.asp"
end if
This code will force users to the Login.asp page when they first enter the application. In fact, as long as the user does not have an active Session (with a valid SessionID) and has not filled out the UserName and Password fields on the Login page, the user will be sent to the Login.asp page. The If statement checks that the Name field isn’t blank and that ValidateLogin is not equal to 99223322. The ValidateLogin field is set in the Login.asp page. If the user guessed that I checked the Name field and tried to bypass that, they would still run up against the ValidateLogin field. It’s doubtful that they would ever guess I was checking for that crazy numeric value or the name of the field.
The Login page is simple enough, and at first glance seems to do the trick. It is asking the user for a user name and password. Simple, right? Well, not so fast. Almost every browser has a line where the user can enter a URL. So all the user has to do to bypass my login page is enter a URL into the URL line in the browser for a valid page in the application. This will immediately display the new page in the user’s browser, bypassing my login page.
Figure 10: Login.asp
<!DOCTYPE HTML PUBLIC "-//IETF//DTD HTML//EN">
<html>

<head>
<meta http-equiv="Content-Type"
content="text/html; charset=iso-8859-1">
<meta name="GENERATOR"
content="Microsoft FrontPage (Visual InterDev Edition) 2.0">
<title>Document Title</title>
</head>

<body bgcolor="#FFFFFF">
<%
Session.Abandon
%>

<p>Today is <%=Now%> </p>

<p><font size="5"><strong>Welcome to the Animal Products Login
Page</strong></font></p>

<p><font size="6">Pleas enter your name and password</font></p>

<form action="CheckUser.asp" method="POST">
    <p><font size="4"><strong>User Name </strong></font><input
    type="text" size="20" name="Name"></p>
    <p><font size="4"><strong>User Name </strong></font><input
    type="password" size="20" name="Password"></p>
    <p><font size="3"><input type="submit" name="B1"
    value="Login Now"></font></p>
</form>
</body>
</html>
There are several ways to solve this problem. I chose one that my buddy David Hale at Compaq suggested. To use this approach, the Login page will immediately terminate a user’s session before they log in. This ensures that the user will be rerouted back to global.asa when they complete this page or if they try to leave the page by entering another URL or choosing a site from their Favorites list. The user’s session is terminated using this line of code from Figure 10:
<%
Session.Abandon
%>
The Login page still works because it’s running (displayed) in the user’s browser. The Login page is a standard page with two HTML form fields. The first field contains the UserName while the second field contains the user’s Password. The UserName is a standard Text field, while the Password is a Password field. The Action property of the HTML form is set to CheckUser.asp.
So, what happens when the user logs in? After the user enters a name and password and clicks the Login Now button, the Session_OnStart event in Global.asa is executed again because I terminated the user’s session with Session.Abandon in Login.asp when it loaded.
The code for CheckUser.asp is shown in Figure 11. The CheckUser page has an important job—it checks the user name and password in the SecureAccess database and, if a valid user is found, it retrieves a list of the groups the user is linked to. If the user name and password are not valid, then the user is redirected to Login.asp.
Figure 11: CheckUser.asp
<%@ LANGUAGE="VBSCRIPT" %>
<%
    UserName = Request("Name")
    Password = Request("Password")
%>
<!--METADATA TYPE="DesignerControl" startspan
<OBJECT ID="DataCommand1" WIDTH=151 HEIGHT=24
CLASSID="CLSID:7FAEED80-9D58-11CF-8F68-00AA006D27C2">
<PARAM NAME="_Version" VALUE="65536">
<PARAM NAME="_Version" VALUE="65536">
<PARAM NAME="_ExtentX" VALUE="3986">
<PARAM NAME="_ExtentY" VALUE="635">
<PARAM NAME="_StockProps" VALUE="0">
<PARAM NAME="DataConnection" VALUE="SecureAccess">
<PARAM NAME="CommandText" VALUE="dbo."LogonUser"">
<PARAM NAME="Command Type" VALUE="1">
<PARAM NAME="ParamCount" VALUE="3">
<PARAM NAME="Param0" VALUE="Return Value,,4,4,4">
<PARAM NAME="Param1" VALUE="@UserName,[UserName],1,1,20">
<PARAM NAME="Param2" VALUE="@UserPassword,[Password],1,1,20">
</OBJECT>
-->
<%
Set SecureAccess = Server.CreateObject("ADODB.Connection")
SecureAccess.ConnectionTimeout = Session("SecureAccess_ConnectionTimeout")
SecureAccess.CommandTimeout = Session("SecureAccess_CommandTimeout")
SecureAccess.Open Session("SecureAccess_ConnectionString"),
Session("SecureAccess_RuntimeUserName"),
Session("SecureAccess_RuntimePassword")
Set cmdTemp = Server.CreateObject("ADODB.Command")
Set DataCommand1 = Server.CreateObject("ADODB.Recordset")
cmdTemp.CommandText = "dbo.""LogonUser"""
cmdTemp.CommandType = 4
Set cmdTemp.ActiveConnection = SecureAccess
Set tmpParam = cmdTemp.CreateParameter("Return Value", 3, 4, 4)
cmdTemp.Parameters.Append tmpParam
Set tmpParam = cmdTemp.CreateParameter("@UserName", 129, 1, 20, "" & UserName & "")
cmdTemp.Parameters.Append tmpParam
Set tmpParam = cmdTemp.CreateParameter("@UserPassword", 129, 1, 20, "" & _
Password & "")
cmdTemp.Parameters.Append tmpParam
DataCommand1.Open cmdTemp, , 0, 1
%>
<!--METADATA TYPE="DesignerControl" endspan-->
<%
if Not DataCommand1.BOF and Not DataCommand1.EOF then
'response.write "Valid Logon " & DataCommand1("UserID")
UserID = DataCommand1("UserID")
Session("UserID") = UserID
Session("UserName") = UserName
Session("Password") = Password
Else
response.redirect "Login.asp"
End If
%>
<!--METADATA TYPE="DesignerControl" startspan
<OBJECT ID="DataCommand2" WIDTH=151 HEIGHT=24
CLASSID="CLSID:7FAEED80-9D58-11CF-8F68-00AA006D27C2">
<PARAM NAME="_Version" VALUE="65536">
<PARAM NAME="_Version" VALUE="65536">
<PARAM NAME="_ExtentX" VALUE="3986">
<PARAM NAME="_ExtentY" VALUE="635">
<PARAM NAME="_StockProps" VALUE="0">
<PARAM NAME="DataConnection" VALUE="SecureAccess">
<PARAM NAME="CommandText" VALUE="dbo."GetUserGroups"">
<PARAM NAME="CommandType" VALUE="1">
<PARAM NAME="ParamCount" VALUE="2">
<PARAM NAME="Param0" VALUE="Return Value,,4,4,4">
<PARAM NAME="Param1" VALUE="@UserID,[UserID],4,1,4">
</OBJECT>
-->
<%
Set SecureAccess = Server.CreateObject("ADODB.Connection")
SecureAccess.ConnectionTimeout = Session("SecureAccess_ConnectionTimeout")
SecureAccess.CommandTimeout = Session("SecureAccess_CommandTimeout")
SecureAccess.Open Session("SecureAccess_ConnectionString"), _
Session("SecureAccess_RuntimeUserName"), _
Session("SecureAccess_RuntimePassword")
Set cmdTemp = Server.CreateObject("ADODB.Command")
Set DataCommand2 = Server.CreateObject("ADODB.Recordset")
cmdTemp.CommandText = "dbo.""GetUserGroups"""
cmdTemp.CommandType = 4
Set cmdTemp.ActiveConnection = SecureAccess
Set tmpParam = cmdTemp.CreateParameter("Return Value", 3, 4, 4)
cmdTemp.Parameters.Append tmpParam
Set tmpParam = cmdTemp.CreateParameter("@UserID", 3, 1, 4, UserID)
cmdTemp.Parameters.Append tmpParam
DataCommand2.Open cmdTemp, , 0, 1
%>
<!--METADATA TYPE="DesignerControl" endspan-->
<%
dim i
dim GroupName
i = 1
do while Not DataCommand2.EOF
GroupName = "Group" & Trim(i)
Session(GroupName) = DataCommand2("GroupName")
i = i + 1
DataCommand2.MoveNext
Loop
response.Redirect "Default.asp"
%>
</BODY>
</HTML>If the login is successful, then a number of session variables are created (see Figure 12). These session variables are the key to displaying the correct data for each user and for allowing the user to have the correct level of access throughout the application.
Figure 12: Session Variables
| Session Variable Name | Description of Contents |
| UserID | UserID from the UserAccounts table. |
| UserName | Contains the username entered. |
| Password | Contains the password entered. |
| GroupX | A group of session variables that contain the groups the user is linked to. There can be any number of GroupX variables, where X starts at 1 and is incremented by 1 for each additional group a user is linked to. |
I created CheckUser.asp using the File | New dialog and selecting the Active Server Page (ASP) entry. Next, I entered these two lines to retrieve the Name and Password fields from the Login page:
<%
UserName = Request("Name")
Password = Request("Password")
%>
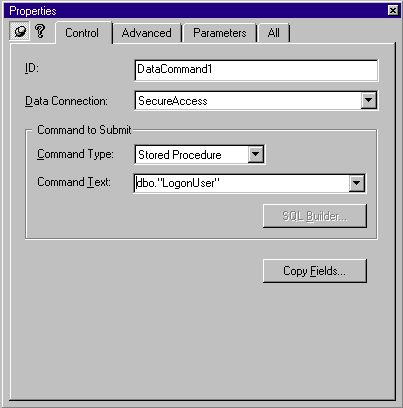
Then I inserted a design-time Data Command control. Figure 13 shows the Data Command Control dialog. First, select the data connection that you will use. This data connection must point to your database that contains the user name and group tables. Next, select Stored Procedure from the Command Type list. Now you can select the LogonUser stored procedure you created earlier from the Command Text list.
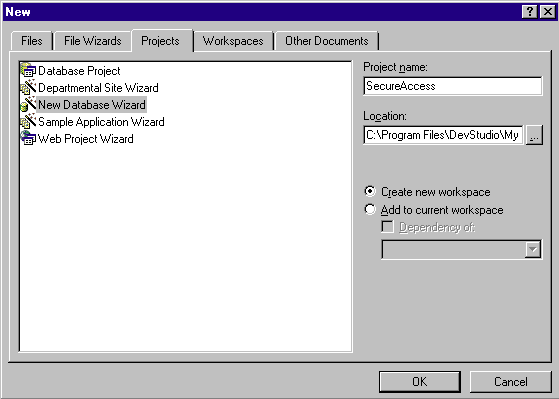
Figure 13: Data Command Control
There is one more step: because this stored procedure contains parameters, you must set the parameters your application will use to hook up with it. This is done with the Parameters tab in the Data Command Control dialog. First, select the UserName parameter, then enter the name of the ASP variable you will relate to this parameter in the parameter area and click the green Check button to the left of your entry. This adds your variable name to the display. You must perform this step for any variable that you wish to link to a stored procedure parameter.
The next step involves adding the following ASP code to check the status of the login:
If Not DataCommand1.BOF and Not DataCommand1.EOF then
    'response.write "Valid Logon " &             DataCommand1("UserID")
    UserID = DataCommand1("UserID")
    Session("UserID") = UserID
    Session("UserName") = UserName
    Session("Password") = Password
Else
    response.redirect "Login.asp"
End If
%>
This code determines whether the recordset contains any records. If it does, the login is successful and the first part of the If statement executes. If the recordset is empty, then the login is unsuccessful and the user is returned to the Login.asp page.
You should now insert a second Data Command control and point it to the GetUserGroups stored procedure. The process is exactly the same as the first Data Command control, except this time you’re only using one parameter (UserID).
It is worth noting that you do not have to use two Data Command controls here. You can manually add the ADO code for the second control and use the references to the first ADO Command, Connection, and Recordset objects. This cuts down the overhead of recreating new references to the same component.
The last bit of code you need to add to this page comes right after the second Data Command control:
<%
dim i
dim GroupName
i = 1

do while Not DataCommand2.EOF
    GroupName = "Group" & Trim(i)

    Session(GroupName) = DataCommand2("GroupName")

    i = i + 1
    DataCommand2.MoveNext
Loop

response.Redirect "Default.asp"

%>
This code loops through the recordset containing the groups the user belongs to and creates a GroupX session variable for each. For instance, the name of the first group returned will be stored in Group1, the second in Group2, and so forth. This allows you to access the group information from another page in your application at any time.
You should consider using one variable to store the groups in an array. This makes it easier to loop through all the group names and determine which groups a user belongs to.
The last task this page performs is to redirect the user to Default.asp:
response.Redirect "Default.asp"
The entire listing for CheckUser.asp is in Figure 11. At this point, my application has a valid login process that validates the user and displays Default.asp (shown in Figure 14). What does Default.asp show? That depends upon the groups the user is linked to.
Figure 14: Default.asp
<%@ LANGUAGE="VBSCRIPT" %>
<!DOCTYPE HTML PUBLIC "-//IETF//DTD HTML//EN">
<html>
<head>
<meta http-equiv="Content-Type"
content="text/html; charset=iso-8859-1">
<meta name="GENERATOR"
content="Microsoft FrontPage (Visual InterDev Edition) 2.0">
<title>Home</title>
</head>
<body bgcolor="#FFFFFF">
<p align="center"><font size="7"><em><strong>Advanced Animal
Products Division</strong></em></font></p>
<p align="center"><font size="4"><strong>Home Page</strong></font>
</p>
<p align="center"> </p>
<h1>Division Status Reports</h1>
<%
Dim Status
if trim(Session("Group1")) = "GeneralManager" then
Status = "All"
Else
Status = Session("Group1")
End if
Response.write "Security Status: " & Status & "<BR>" & "<BR>"
Response.write "<ul>"
If Status = "ManufacturingManager" or Status = "All" then
Response.write "<li><a
href=""ManufacturingStatus.asp"">Manufacturing</a></li>"
End If
If Status = "PurchasingManager" or Status = "All" then
Response.write "<li><a href=""PurchasingAccounts.asp"">Purchasing</a></li>"
End If
Response.write "</ul>"
%>
<p> </p>
<p> </p>
<p> </p>
</body>
</html>The page contains one block of script code that drives the content on the page. This code uses simple If…then syntax to check the value of the Group1 session variable and display the appropriate page for the user. I first check to see if the user is in the GeneralManager group:
If trim(Session("Group1")) = "GeneralManager" then
    Status = "All"
Else
    Status = Session("Group1")
End if
If the user isn’t in the GeneralManager group, then the value of Group1 is placed in the Status field. The next line displays the value of Status:
Response.write "Security Status: " & Status & "<BR>" & "<BR>"
The rest of the code checks the value of Status to determine which URLs to display in the unordered list. If Status is “All”, then every page is displayed:
Response.write "<ul>"
If Status = "ManufacturingManager" or Status = "All" then
    Response.write "<li><a href=""ManufacturingStatus.asp"">Manufacturing</a></li>"
End If

If Status = "PurchasingManager" or Status = "All" then
    Response.write "<li><a href=""PurchasingAccounts.asp"">Purchasing</a></li>"
End If
Response.write "</ul>"
You may want to allow your users to log off when they are finished using the application. This can be done quite easily using the code shown in Figure 15. This code uses Session.Abandon to terminate the user’s session just like Login.asp does. To add this logoff page to your application, all you need to do is create the file in Figure 15 and add a link to it from another page with the title Logoff or Logout.
Figure 15: Logoff.asp
<%@ LANGUAGE="VBSCRIPT" %>

<HTML>
<HEAD>
<META NAME="GENERATOR" Content="Microsoft Visual InterDev 1.0">
<META HTTP-EQUIV="Content-Type" content="text/html; charset=iso-8859-1">
<TITLE>Document Title</TITLE>
</HEAD>
<BODY>

You have been logged off.
<%
Session.abandon
%>

</BODY>
</HTML>
The Logoff page is also extremely useful when you are developing an application like this. When you are using Session variables, it’s useful to destroy them from time to time. All you need to do is display the Logoff.asp page.
What happens if the user is logged into the application and the PurchasingAccounts.asp is the only link they have? Keeps them from getting to other pages, right? Not necessarily. If the user is savvy, he or she may figure out the name of the ManufacturingStatus.asp file and try entering it in the browser’s URL field. This will display the file unless you take special precautions in the ManufacturingStatus.asp file. Figure 16 shows this file with only a few lines of ASP code that perform this check. This page uses part of the code from Default.asp. All I do is check to see if the user is linked to the GeneralManager or the ManufacturingManager groups. If the user is in one of these groups, they see this page. If not, they go back to Default.asp.
Figure 16: Manufacturing.asp
<%@ LANGUAGE="VBSCRIPT" %>
<%
Dim Status

    if trim(Session("Group1")) = "GeneralManager" then
        Status = "All"
    Else
        Status = Session("Group1")
    End if
    If not Status = "ManufacturingManager" and not Status = "All" then
        resonse.Redirect "Default.asp"
    End If

%>

<html>

<head>
<meta http-equiv="Content-Type"
content="text/html; charset=iso-8859-1">
<meta name="GENERATOR"
content="Microsoft FrontPage (Visual InterDev Edition) 2.0">
<title>Document Title</title>
</head>

<body bgcolor="#FFFFFF">
<font size="5"><strong>Manufacturing Status</strong></font>

<ul>
    <li><font size="5"><strong>Jones and Smith project is on
        Target for delivery</strong></font></li>
    <li><font size="5"><strong>Cat and Dog probject is delayed
        for weeks</strong></font></li>
    <li><font size="5"><strong>All other projects are likely to
        be really late</strong></font></li>
</ul>
</body>
</html>You’ve seen how to build a login system using ASP and SQL Server. Here are a few tips I would consider using to extend this concept:
For related articles, see http://www.microsoft.com/sitebuilder/features/asptips.asp, http://www.microsoft.com/workshop/server/asp/feature/security-f.htm, and http://www.microsoft.com/workshop/server/asp/bugs/tshoot-f.htm.