Setting Configuration Options for Remote Servers
In most cases, you will not need to take any action to set configuration options for remote servers, because the defaults are set appropriately by the setup program. However, if you suspect the default setting of the server's remote access option has been altered, perform the following procedure, and then restart the server.
 To check and if necessary set remote configuration options
-
From the Microsoft SQL Server 6.0 program group, start SQL Enterprise Manager.
-
From SQL Enterprise Manager's Server Manager window, open a server group, and select a server.
-
From the Server menu, choose Configurations.
The Server Configuration dialog box appears.
-
Choose the Configuration tab.
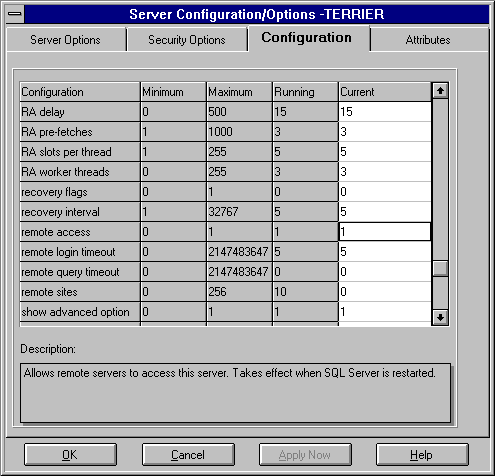
The Configuration window displays the configuration settings for this server.

-
Review and, if appropriate, change the values for remote access, remote login timeout, and remote query timeout.
-
remote access, if set to 1, allows remote servers and users to access this server. Set to 0 to prevent remote server access and remote user connections to this server. The default is 1. Takes effect when SQL Server is restarted.
-
remote login timeout specifies the number of seconds to wait before returning from a login attempt. A value of 0 will allow an infinite wait. The default is 5. This is an advanced configuration option and will be displayed only if show advanced option is set to 1.
-
remote query timeout specifies the number of seconds to wait before returning from processing a query. A value of 0 will allow an infinite wait. The default is 0. This is an advanced configuration option and will be displayed only if show advanced option is set to 1.
-
When configuration options are set, choose OK.
If you have changed a configuration option, you must also restart the server. If so, proceed to step 7. If not, skip to step 10.
-
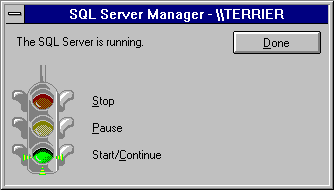
From the toolbar, select the Services icon (the stoplight).

The SQL Server Manager services window appears.
-
Double-click the red Stop light.

-
After the server has stopped, restart it by choosing the green Start/Continue light.
-
Return to step 2, select the other server of the remote server pair, and then complete steps 3 through 9.
You can also start and stop the server by clicking with the right mouse button on the server name in the Server Manager window and then selecting Stop or Start from the drop-down menu that appears.
You can also change the server configuration options by using the sp_configure system procedure and then running RECONFIGURE. For information on sp_configure, see the Microsoft SQL Server Transact-SQL Reference.
 To check and if necessary set remote configuration options
 To check and if necessary set remote configuration options

