It's time to move your Microsoft Access database to SQL Server using the Upsizing Wizard. This section assumes you are moving data to Microsoft SQL Server 6.0 or 6.5 using Microsoft Access 95 with the Upsizing Wizard, although you can also use Microsoft Access 97 with the Upsizing Wizard.
Load the Upsizing Wizard into Microsoft Access by double-clicking the Upsizing Wizard executable Upsize95.exe, or Wzcs.exe if you are using Microsoft Access 95, or Wzcs97.exe if you are using Microsoft Access 97. This will place the wizard database Wzcs.mda in your Microsoft Access directory and make the necessary changes to the Windows registry.
Start Microsoft Access and load your database.mdb file. On the File menu, click Add-ins, then Upsizing Wizard. Microsoft Access loads the Upsizing Wizard into memory and displays the Upsizing Wizard dialog box.
You must decide whether to create a new database for your tables or use an existing database. If you are moving a small sample database, select Use existing database. If you are moving your data for a production database, select Create new database, unless you have prepared a database on the SQL Server to receive your data.
The Select Data Source dialog box prompts you for the data source of the server.
The SQL Server Login dialog box prompts you for the server's Login ID and Password. When first installed, Microsoft SQL Server has a system administrator (sa) account with no password. If your SQL Server administrator has established a login ID for you, use your network login and password. If the server uses integrated security (where you make a trusted connection) and if your login or domain group has privileges on the server, you need no login ID and no password.
Click Options to see if a database has been provided as part of the data source. If you know the name of an existing database on the server, you can provide it or select one from the list.
Click OK. If you receive any errors, see SQL Server Books Online.
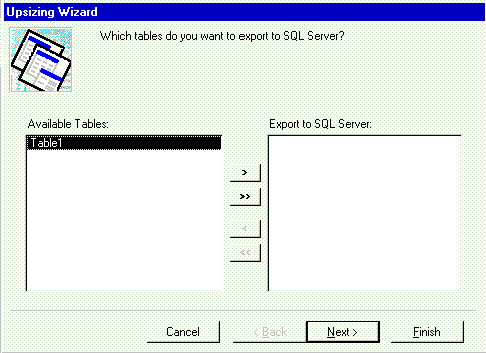
This dialog box prompts you for tables to be exported to SQL Server. Select some or all of them. Include all the relevant tables in your referential integrity relationships. If in doubt, and if the table is not huge, move it to the server for now. For more information about which tables make sense to move to the server, see "Changes to Your Application," later in this paper.

You can upsize indexes, validation rules, defaults, and table relationships.
You will probably want to modify your indexes once the tables are on the server. As a minimum, designate a clustered index. Though indexes are easy to rebuild or drop and recreate, that can be time consuming on large tables. As a general rule, upsize the indexes of tables less than 10 or 20 MB. If your tables exceed 100 MB, skip the indexes until you are sure what you want. Building indexes does take time and selecting this check box slows down the data transfer.
You can also check the box to accept the indexes you have been using in Microsoft Access. If this is not a large table, go ahead and do that for now. Microsoft Access creates all indexes as nonclustered indexes.
Validation rules are checked in almost all cases. If you have a validation rule (a rule in SQL Server) that says the Qty field must be greater than 5 or the DeliveryDate field must be later than the OrderDate field you should keep it. The Upsizing Wizard uses triggers rather than SQL Server rules to enforce field-level validation because SQL Server rules do not allow you to display custom error messages. When the Upsizing Wizard creates the trigger, it provides an appropriate custom error message explaining why an invalid INSERT was rejected.
You should leave this checked in almost all cases, too. A default value of Net30 for payment terms or Date() for the OrderDate works the same in SQL Server as it does in Microsoft Access. The Upsizing Wizard provides the correct Transact-SQL syntax for common functions such as Date().
This one can be tough. "Use DRI" will create the SQL Server tables with Declarative Referential Integrity, the designations that enforce foreign key to primary key relationships. SQL Server 6.0 and 6.5 do not enforce cascade updates and deletes, so if you have that selected in your relationships you will get a dialog box reminding you that you are foregoing that feature. If you select Use triggers, the Upsizing Wizard will write triggers for your tables to enforce cascading updates and deletes. This may be a valid reason to make more than one pass through the Upsizing Wizard selecting triggers to move the tables that have cascading updates or deletes and selecting DRI to move the tables that do not. All the tables involved in the relationships must be present or must have been created on the server with the DRI option, so move the triggered tables before the DRI tables.
You can forego the relationships entirely by unchecking the Table relationships box. This is a good choice for fast data transfer if you intend to revisit the data and table structure once loaded on the server.
You can add timestamp fields to tables and create a table structure without upsizing data.
Selecting Yes, let wizard decide is recommended for now. Only select No, never or Yes, always if you understand the impact of data conversion and timestamps. A timestamp field is an easy way for Microsoft Access to tell if the data in a record has changed since its creation. This field is not visible to Microsoft Access users but can speed data entry and avoid the #Deleted error described in the Common Error Messages section of this document.
If your table contains text or image fields, you should have a timestamp field. Because such fields are often large, Microsoft Access does not automatically check to see if the value of the field has changed before updating a record. If there is no timestamp field in the table, Microsoft Access may overwrite changes to these fields.
Only create table structure, don't upsize any data is your choice if you have set up the data structure but want to begin anew when the tables are moved into production on the server. This helps transfer tables that are large due to high quantities of data and insufficient database locks. Use this option to transfer the table structure, then move the data in smaller chunks using APPEND queries. For more information about this technique, see "Other Ways of Moving Data," later in this paper.
You can attach newly created SQL Server tables, save a password and user ID with linked tables, and create an upsizing report.
If you plan to use your Microsoft Access database as a front-end program to manipulate the SQL Server data, attach to the tables. If you are abandoning your application because you plan to use ODBC from a Visual Basic-based application to connect to SQL Server, do not select this option.
Do not use this option if you are using a trusted connection and integrated security. If you are using standard security, this applies to you. If you do not check this box, a user connecting with the Microsoft Access database is asked for login ID and password whenever they open the table, or a query or form based on the linked table. This can be an important security feature. If you check this box, the login ID and password is cached with the connection and users of the database have rights to the SQL Server database consistent with their login ID and password. If in doubt, avoid an inadvertent hole in your security by not checking this box.
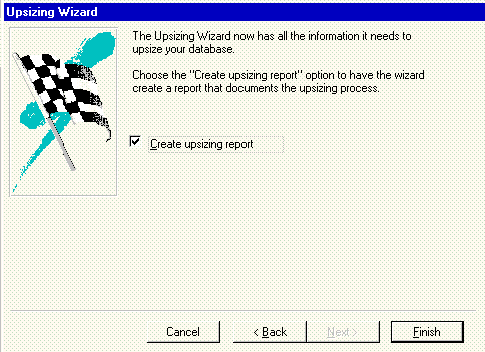
The Create upsizing report option is strongly recommended. The Upsizing Wizard intercepts many server error messages so that it can continue transferring tables without interruption. It saves them for the report. Consequently, you will not see all of the errors unless you see the report.
You must have a default printer driver loaded for Microsoft Access. For information about the most common errors, see "Common Messages," later in this paper.
One of the first status messages you will see concerns the character translation table. The Upsizing Wizard uses this table to transfer extended characters: ANSI characters 128 through 255. This table is deleted when the wizard finishes. If you have an unusual program termination and notice that this table has been left on the server, delete it.
The Upsizing Wizard creates the tables on the SQL Server and copies the data into the new tables. It then renames the tables in the Microsoft Access database, appending "_local" to each table name. If spaces exist in the table names and it changes the spaces to underscores, it redirects all queries from the original name to the underscored name. Then it links to the new tables on the server.