
Nigel Thompson
Microsoft Developer Network Technology Group
November 23, 1994
Click to open or copy the files in the MarkPnt sample application for this technical article.
Click to open or copy the files in the Animate library for this technical article.
Microsoft® Visual C++™ and the Microsoft Foundation Class Libraries (MFC) provided a very fast way to get a standard Windows™-based application up and running. But what if you don't want the normal look and feel? Many games and educational applications have special user interface needs that can't be met with the standard Windows user interface. This article takes a look at creating a simple child's coloring game that uses only a single window and has no window border, caption, buttons, cursor, or any other recognizable elements of a Windows user interface.
The sample application MarkPnt (Mark Paint) is a simple paint program that I developed for my young son, Mark. It runs full screen with no caption, menus, or cursor. There is no keyboard interface, and the mouse buttons need not be used at all.
The application uses sprite animation technology to simulate drawing with a crayon on paper. The animation is done partly with direct pixel access to a device-independent (DIB) structure and partly with graphics device interface (GDI) operations on the same DIB.
I was recently allowed a brief glimpse of the future, and I'd really like to tell you all about it, but then I'd have to kill you. Anyway, the result of my viewing this new piece of technology was the realization that there are a lot of applications that can use the Microsoft® Windows™ platform that don't need or want to conform to the current Windows user interface (UI) guidelines. Of course, this desire to depart from the world of rectangular buttons and system menu boxes is not new. Many Windows products—notably games and educational applications—have for some time been doing their own UI. In part, this is because they are ported from the MS-DOS® environment, where there was no free UI support, and also because the Windows UI just doesn't cut it for the under-five set.
So in the spirit of the new world, I thought I'd see just how hard it was to create a Windows-based application with no recognizable Windows UI, using my favorite tools—Visual C++™ and the Microsoft Foundation Class Libraries (MFC). To make life a little easier on myself, I also made use of my own C++ class library, which provides support for simple sprite animation. The result is a simple drawing game that requires no keyboard input and no mouse button usage—it just lets you draw.
The final version was tested by my son Mark, who is 18 months old, and Nicholas Cluts, who is 2-1/2 years old. Neither of them managed to trash the machine, and a good time was had by all.
Inasmuch as the application we want to create uses none of the standard Windows UI, why should we bother to use the MFC libraries? And I guess an associated question might be, If I use Visual C++, won't I get a lot of stuff I don't need?
To answer the second question first: Yes, you do get a lot of stuff you don't need if you use AppWizard to create the initial framework of the application, but removing the few unneeded files and a couple of lines of code is trivial. As to why we should use MFC, my own answer is simply that MFC provides a lot of classes not related to the UI, such as simple window management and file I/O, which we will probably benefit from. The bottom line for me is that I now know MFC quite well, and my own animation library classes are all derived from MFC base classes, so, providing I can get the look and feel I want in the application, using MFC is going to make programming easier for me.
Let's look at the required appearance on the screen first and then at the C++ classes needed to create it.
I hate using the word architecture because it always sounds so grand, and my application designs are often so trivial. Nonetheless, Figure 1 shows what I wanted the screen to look like when the application was running. I haven't included a screen shot here because the application runs full-screen and uses 256 colors, so it's a little difficult to get a decent rendition in a document.
Figure 1. Screen design for the application
As you can see, the screen is to look like a ring-bound notebook. A number of drawing tools live at the bottom of the page, while the current tool can be moved with the mouse. A click-sensitive area at the top right (which looks like a folded-over page corner) is designed to be used to erase the page and start again.
Because most very small kids can't use mouse buttons, I designed the application to draw all the time. No mouse clicks at all are required to draw. Tool selection is done by simply dragging the current tool over one of the inactive tools. As a compromise for adults, I added two features: the new page sensor, which erases the entire picture if it is clicked, and the ability to lift the tool up if either mouse button is held down.
Given that my own son couldn't click the new page sensor, I made the picture fade out over a period of about 15 minutes.
So how are we going to do all this with MFC? The design is very simple: One window will be used to fill the entire screen. The drawing tools, binder rings, and new page sensor will all be sprites. The active tool will be a sprite that moves with the mouse. The cursor will be made invisible. The sprite code will be from my animation library.
For the actual drawing, we will use a device-independent bitmap (DIB) as a buffer. As the drawing tools move, we will modify the content of the DIB buffer and draw the changes to the screen. The grunt work of this is done by using the CDIBSurface class from my animation library.
Figure 2 shows the main classes used in the application. Each class is derived from an MFC class.
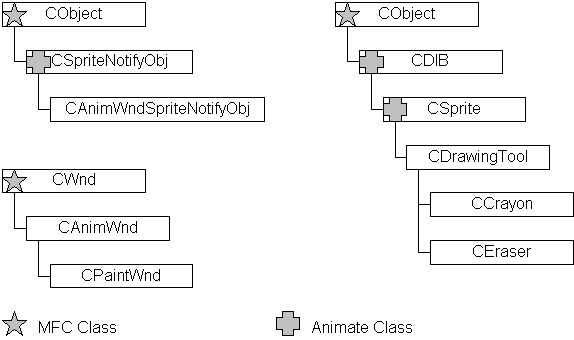
Figure 2. The main classes used in the application
I split the window class into two classes, CAnimWnd and CPaintWnd, because I thought I could try to make CAnimWnd more general and maybe use it in other applications. The sprite notification object is used to track changes in the sprites—we'll see how that works shortly. The drawing tools are all simply derivations of the sprite class.
If you're not familiar with sprites or animation in general, you might like to scan through the first chapter or two of my book Animation Techniques in Win32, which has been published by Microsoft Press (January 1995).
Use AppWizard in Visual C++ to create a minimal application framework. In other words, select a single document interface (SDI) application with no printing, toolbars, and so forth. This will give you an application that has a main frame window, a view class, and a document class. If you want, you can build it and the Mr. Boring regular Windows-based application it produces.
The next step is to remove the main frame window class files (usually MAINFRM.CPP and MAINFRM.H) and the files used to create the document and view classes. What this leaves you is a single .CPP file for the application (for example, MARKPNT.CPP). You'll need to remove references to the main frame, document, and view headers from the remaining files.
Having removed the junk, we need to alter the startup code in the InitInstance member of the main application file. This normally creates the frame window by creating a new empty document. We're going to replace the initialization code generated by AppWizard with some code to create our own main window, which in this case is of the CPaintWnd class. Here is what InitInstance looks like after these changes have been made:
BOOL CMarkPntApp::InitInstance()
{
    CPaintWnd* pWnd = new CPaintWnd;
    pWnd->Create("",
                 WS_POPUP | WS_VISIBLE,
                 NULL,
                 0, 0,
                 ::GetSystemMetrics(SM_CXSCREEN),
                 ::GetSystemMetrics(SM_CYSCREEN));
    m_pMainWnd = pWnd;
   return TRUE;
}
An instance of the window class is created, and its Create member function is called to create the actual window. In this case, the window is a simple pop-up window with no border or caption, and the window is created the same size as the screen. Once the window has been created, a pointer to it is stored in the application's m_pMainWnd variable.
Ignoring what goes on in the CPaintWnd class for the moment, what we have done so far is to create an application with a single pop-up window that occupies the entire screen of the machine. The remaining steps are all concerned with how we implement the functionality of the application. The framework is complete.
As I mentioned earlier, the main window class is built in two stages: CAnimWnd is derived from CWnd and is used to create a window with the basic requirements we will need to support animated sprites. CPaintWnd is derived from CAnimWnd and implements the features specific to this application. Let's look at these two classes now.
The CAnimWnd class is designed to support a set of sprites that may be moved around the window under program control. This window class must be responsible for maintaining the list of sprites and be capable of drawing them to the screen as they are moved around. Because there must be some sort of background to the animation (even if it's only a flat color), this window must also take care of drawing the background, too. Normally an animation involves a background scene that is quite complex, but in this case, I decided to leave out support for a background image and simply support a fill color. This isn't exactly a general solution, but it does what we need for this application, and it's easy to modify it to display a background image if that's what you need.
In order to make management of the sprites simple, I included some sprite-handling functions in the animation window class. This makes it extremely simple to load a sprite and add it to the animation. It also makes it easy to keep track of where the sprites are and keeps all the dirty region paint code in one place. We'll look at the details shortly, but let's look first at the public member functions of CAnimWnd:
BOOL InsertSprite(CSprite* pNewSprite);
CSprite* RemoveSprite(CSprite *pSprite);
void ReorderSprite(CSprite* pSprite);
CSprite* CAnimWnd::HitTestSprite(CPoint point);

virtual void Render(RECT* pClipRect = NULL);
void Draw(RECT* pClipRect = NULL);
void RenderAndDrawDirtyList();
void RenderSprites(RECT* pClipRect = NULL);
void AddDirtyRegion(RECT* pRect);
The first group of functions deals with allowing sprites to be added to or removed from the list. The Reorder function is used to reposition a sprite correctly in the list when its z-order changes, so that when the sprite list is rendered and drawn to the screen, the relative positions will come out right.
The second group of functions is used in the construction of the displayed image. The rendering functions are used to create a composite image in the off-screen rendering buffer and the drawing functions are used to copy areas of the off-screen buffer to the screen. The Render function will normally be implemented in a class derived from CAnimWnd, so the function has been defined as virtual. To understand why we need this to be virtual, let's look at how WM_PAINT messages are handled by this window class in its OnPaint function:
void CAnimWnd::OnPaint()
{
    PAINTSTRUCT ps;
    BeginPaint(&ps);
    Render(&ps.rcPaint);
    Draw(&ps.rcPaint);
    EndPaint(&ps);
}
The WM_PAINT message is sent to get the window to repaint a given area to the screen. We handle this in two main steps: First the affected area is rendered to the off-screen buffer, then that area is copied to the screen. These steps correspond to the calls to Render and Draw, above. In the simple case where there is no class derived from CAnimWnd, it's easy to see what happens. CAnimWnd::Render is called, followed by CAnimWnd::Draw. If we derive a class from CAnimWnd, we have done this presumably to add to the functionality—to add a background image, perhaps. If CAnimWnd is still handling the WM_PAINT messages, the Render function in the derived class will be called rather than CAnimWnd::Render. Because the derived class doesn't know how to render the sprite list in CAnimWnd, the CAnimWnd::RenderSprites function is provided. Here's CAnimWnd::Render:
void CAnimWnd::Render(RECT* pClipRect/*= NULL*/)
{
    // Compute the clip box.
    CRect rcDraw;
    m_dsBuffer.GetRect(&rcDraw);
    if (pClipRect) {
        rcDraw.IntersectRect(&rcDraw, pClipRect);
    }

    // The default action is to fill the buffer with the
    // background color or the background image and then to
    // render the sprite list.
    CBrush br (m_clrBackground);
    CDC* pDC = m_dsBuffer.GetDC();
    ASSERT(pDC);
    pDC->FillRect(&rcDraw, &br);

    // Flush the GDI queue before doing any direct pixel ops.
    GdiFlush();
    RenderSprites(pClipRect);
}
As you can see, the default action is to fill the area with the background color and then render the sprites. So a typical class derived from CAnimWnd might do something like this in its Render function:
void CMyWnd::Render()
{
    // Compute the clip box.
    CRect rcDraw;
    m_dsBuffer.GetRect(&rcDraw);
    if (pClipRect) {
        rcDraw.IntersectRect(&rcDraw, pClipRect);
    }

    // Do some fascinating stuff of my own.
    ...

    // Flush the GDI queue before doing any direct pixel ops.
    GdiFlush();
    CAnimWnd::RenderSprites(pClipRect);
}
This is pretty much what CPaintWnd does, as we'll see next.
Note As my colleague Mr. Rogerson points out, there is, of course, more than one way to implement this kind of functionality. The base class could have two functions: Render and RenderDetail. Render would set things up and then call RenderDetail. When RenderDetail returned, the tail end of Render would tidy up and call RenderSprites. A class derived from CAnimWnd would then simply override RenderDetail for its own needs.
The CPaintWnd class is derived from CAnimWnd and uses the sprite functions in the base class to implement a set of drawing tools, some "cute look" features, and some additional user interface functions. In addition, CPaintWnd handles the mouse input, takes care of palette messages, and implements a timer event-driven background process that fades out the image over a period of time. Of course, it's also responsible for doing the actual drawing, which is, after all, what the application is all about. This all sounds like a lot of code, but in practice, it's mostly a case of using existing classes. Let's start by looking at the window create, size, and delete handlers.
BOOL CPaintWnd::Create(const char* pszTitle, DWORD dwStyle,
                       CWnd* pParent, int x, int y, int cx, int cy)
{
    m_dsPaint.Create(cx, cy, &m_Pal);

    // Fill the paint buffer with the background color.
    ErasePaintSurface();

    if (!CAnimWnd::Create(pszTitle,
                          dwStyle,
                          pParent,
                          x, y,
                          cx, cy,
                          ::LoadCursor(AfxGetResourceHandle(),
                                       MAKEINTRESOURCE(IDC_CURSOR)),
                           &m_Pal)) {
        return FALSE;
    }

    m_uiTimer = SetTimer(1, 100, NULL);
    return TRUE;
}
The window uses a CDIBSurface object as a painting buffer, and this object is created first, the same size as the window. The paint surface is erased, and the base class for the window is called to create the actual window:
BOOL CAnimWnd::Create(const char* pszTitle, DWORD dwStyle,
                      CWnd* pParent, int x, int y, int cx, int cy,
                      HCURSOR hCur, CPalette* pPal/*= NULL*/)
{
    // Save the palette, or create one.
    if (pPal) {
        m_pPal = pPal;
        m_bMyPal = FALSE;
    } else {
        CDIBPal* pWashPal = new CDIBPal;
        ASSERT(pWashPal);
        pWashPal->CreateWash();
        m_pPal = pWashPal;
        m_bMyPal = TRUE;
    }

    // Create the off-screen rendering buffer.
    m_dsBuffer.Create(cx, cy, m_pPal);

    // Create a class name.
    const char* pszClassName
        = AfxRegisterWndClass(CS_HREDRAW | CS_VREDRAW, hCur);

    // Create the window.
    return CWnd::CreateEx(0,
                          pszClassName,
                          pszTitle,
                          dwStyle,
                          x, y,
                          cx, cy,
                          pParent->GetSafeHwnd(),
                          NULL);
}
If a palette was supplied, it is saved; if not, a default color cube palette is created. The off-screen drawing buffer (another CDIBSurface object) is then created. A new window class is registered with the cursor passed by the caller. In the case of this application, the cursor is completely transparent—we'll use a drawing tool instead. The CWnd::CreateEx function is then called to create the window.
As a part of the main window creation process, all the drawing tools are added to the sprite list. This is done in CPaintWnd::OnCreate:
int CPaintWnd::OnCreate(LPCREATESTRUCT lpCreateStruct)
{
   if (CAnimWnd::OnCreate(lpCreateStruct) == -1)
       return -1;

    // Add all the pens to the sprite list.
    for (int i = 0; i < m_iNumPens; i++) {
        InsertSprite(&m_Crayon[i]);
    }

    // Make the first one current and on top.
    m_pCurrentTool = &m_Crayon[0];
    m_pCurrentTool->SetZ(10);

    // Add the eraser to the sprite list.
    InsertSprite(&m_Eraser);

    // And the other bits and pieces.
    InsertSprite(&m_Corner);

    // Build the binder sprite.
    m_Binder.Create(m_dibRing.GetWidth(),
                    ::GetSystemMetrics(SM_CYSCREEN),
                    &m_Pal);
    CRect rcBinder;
    m_Binder.GetRect(&rcBinder);
    CRect rcRing;
    m_dibRing.GetRect(&rcRing);
    int iRingHeight = m_dibRing.GetHeight();
    int iRingWidth = m_dibRing.GetWidth();
    for (int y = 0; y < rcBinder.bottom; y += iRingHeight) {
        rcRing.top = y;
        rcRing.bottom = y + iRingHeight;
        CRect rc;
        if (rc.IntersectRect(&rcRing, &rcBinder)) {
            // Something we should draw.
                m_dibRing.CopyBits(&m_Binder,
                                   rc.left, rc.top,
                                   rc.right - rc.left, rc.bottom - rc.top,
                                   0, 0);
        }
    }
    // Tell the sprite to reacquire its transparency information.
    m_Binder.MapColorsToPalette(&m_Pal);
    InsertSprite(&m_Binder);

   return 0;
}
The crayons and the eraser are all objects derived from CSprite. The binder sprite (the set of rings on the left of the image) is constructed by building a composite image of a single ring. Each sprite is added to the sprite list in the CAnimWnd object. The next step is to put the sprites in the correct positions and adjust their z-order values. This is done in response to a WM_SIZE message:
void CPaintWnd::OnSize(UINT nType, int cx, int cy)
{
   CAnimWnd::OnSize(nType, cx, cy);

    // Move all the crayons down to the bottom.
    int h = m_Crayon[0].GetHeight();
    int w = m_Crayon[0].GetWidth();
    int y = cy - h - 1;
    int iCellWidth = cx / m_iNumPens;
    for (int i = 0; i < m_iNumPens; i++) {
        int x = i * iCellWidth
              + cx / m_iNumPens / 2
              - w / 2;
        m_Crayon[i].SetPosition(x, y);
    }

    // Put the eraser at the bottom left.
    m_Eraser.SetPosition(iCellWidth / 2 - m_Eraser.GetWidth() / 2, y);

    // Set up the new page sensor at the top right.
    m_Corner.SetPosition(cx - m_Corner.GetWidth(), 0);

    // And the binder rings on the left.
    m_Binder.SetPosition(-1, 0);
    m_Binder.SetZ(80);

    // Set up the background fading.
    InitFade();

    Invalidate();
}
Using OnSize here is convenient because it's the first time we know the actual size of the window; and because this application occupies the entire window by design and cannot have its size changed, the call to this function occurs only once.
The final step in the creation of the window is to have it all painted, which is handled in part by CPaintWnd and in part by CAnimWnd, as we saw earlier. Here's the Render function from CPaintWnd:
void CPaintWnd::Render(RECT* pClipRect)
{
    // Compute the clip box.
    CRect rcDraw;
    m_dsPaint.GetRect(&rcDraw);
    if (pClipRect) {
        rcDraw.IntersectRect(&rcDraw, pClipRect);
    }

    // Copy the paint area to the buffer.
    m_dsPaint.CopyBits(&m_dsBuffer,
                       rcDraw.left, rcDraw.top,
                       rcDraw.right - rcDraw.left, rcDraw.bottom - rcDraw.top,
                       rcDraw.left, rcDraw.top);

    // Call base class to render the sprites.
    CAnimWnd::RenderSprites(pClipRect);
}
This is extremely simple. The paint buffer (with the squiggly line drawn by the user) is copied to the off-screen buffer (part of the base class). The base class is then called to render all the sprites on top of the drawing. Of course, a high-resolution screen means that a lot of memory is being used for buffer space, but that's one of the trade-offs I've made for simple code and high performance.
That takes care of creating and painting the window. When the user closes the application, there is a bit of tidy-up work we need to do. The application framework won't delete the main window object, so we need to take care of this in a PostNcDestroy handler:
void CPaintWnd::PostNcDestroy()
{
    // We must delete the window object ourselves because the
    // app framework doesn't do this.
    delete this;
}
If you leave this out, Visual C++ will report a number of memory leaks, including a CWnd object when the application terminates.
I have written quite a lot about palettes at one time or another, and I don't want to repeat myself unnecessarily here, so I will say only that the application has a single palette that is created as a simple color cube to give a rough variety of colors. The application needs to handle two palette messages, and these are taken care of by these two functions:
void CPaintWnd::OnPaletteChanged(CWnd* pFocusWnd)
{
    // See if the change was caused by us and ignore it if not.
    if (pFocusWnd != this) {
        OnQueryNewPalette();
    }
}

BOOL CPaintWnd::OnQueryNewPalette()
{
    // We are going active, so realize our palette.
    if (m_pPal) {
        CDC* pdc = GetDC();
        CPalette *poldpal = pdc->SelectPalette(m_pPal, FALSE);
        UINT u = pdc->RealizePalette();
        ReleaseDC(pdc);
        if (u != 0) {
            // Some colors changed, so we need to repaint.
            InvalidateRect(NULL, TRUE); // Repaint the lot.
            return TRUE; // Say we did something.
        }
    }
    return FALSE; // Say we did nothing.
}
That's more or less all there is to it, except to know that each time a new CDIB or CSprite object image is loaded, it must be mapped to this common palette by calling its MapColorsToPalette function. The CCrayon and CEraser classes are both derived from CDrawingTool, which does this for you in its Load function:
void CDrawingTool::Load(UINT uiID, CPalette* pPal)
{
    ASSERT(uiID);
    ASSERT(pPal);
    BOOL b = CSprite::Load(uiID);
    ASSERT(b);
    MapColorsToPalette(pPal);
}
No big deal, but if you don't do it, you won't get the colors you expect—be warned!
Given that we have no size border, menus, buttons, and so forth, writing the user interface code shouldn't take long! Three main functions are controlled by the mouse: drawing, tool selection, and clearing the image. Drawing is done any time the mouse is moved and no mouse button is down. If any mouse button is down, the drawing tool (crayon or eraser) doesn't affect the image. A new tool is selected by simply moving the tip of the current tool over the image of the new tool. A timer is used to prevent tool changes from happening too rapidly in succession. A mouse click on the new page sensor is detected and used to clear the drawing image.
In addition to these functions, remember that we have no cursor as such, and the current drawing tool sprite needs to be moved around as the mouse is moved. Here's the code for handling mouse move events:
void CPaintWnd::OnMouseMove(UINT nFlags, CPoint point)
{

    // Move the current pen to the new position.
    ASSERT(m_pCurrentTool);
    m_pCurrentTool->SetPosition(point.x, point.y - m_pCurrentTool->GetHeight());

    // If no buttons are down, we paint.
    if ((nFlags & (MK_LBUTTON | MK_RBUTTON)) == 0) {

        // Get the paint area DC.
        CDC* pDC = m_dsPaint.GetDC();

        // Create the pen.
        CPen pen(PS_SOLID,
                 m_pCurrentTool->GetSize(),
                 m_pCurrentTool->GetColor());
        CPen* ppenOld = pDC->SelectObject(&pen);

        if (m_ptPrev.x == -1) {
            m_ptPrev = point;
        }
        pDC->MoveTo(m_ptPrev);
        pDC->LineTo(point);
        pDC->SelectObject(ppenOld);
        GdiFlush();

        CRect rc;
        rc.left = min(point.x, m_ptPrev.x);
        rc.top = min(point.y, m_ptPrev.y);
        rc.right = max(point.x, m_ptPrev.x);
        rc.bottom = max(point.y, m_ptPrev.y);
        rc.InflateRect(m_pCurrentTool->GetSize(), m_pCurrentTool->GetSize());

        AddDirtyRegion(&rc);
    }

    // See if we are in tool-change lockout time.
    if (m_iChangeLockoutTime == 0) {
        // OK for a tool change

        // Test for a hit in a sprite just below where the tool
        // is (so we don't hit-test inside the tool itself).
        int x = m_pCurrentTool->GetX();
        int y = m_pCurrentTool->GetY();
        CDrawingTool* pspNewTool = (CDrawingTool*)
            HitTestSprite(CPoint(x, y + m_pCurrentTool->GetHeight() + 10));
        if (pspNewTool && pspNewTool->IsKindOf(RUNTIME_CLASS(CDrawingTool))) {
            m_pCurrentTool->SetPosition(pspNewTool->GetX(),
                                        pspNewTool->GetY());
            m_pCurrentTool->SetZ(50);
            m_pCurrentTool = pspNewTool;
            m_pCurrentTool->SetPosition(x, y);
            m_pCurrentTool->SetZ(10);
            // Restart the lockout timer.
            m_iChangeLockoutTime = 10; // 1.0s
        }
    }

    // Draw all the changes.
    RenderAndDrawDirtyList();

    m_ptPrev = point;
}
The current tool is first moved to the mouse location. After that, a test is made to see if any mouse button is down, and if not, a pen is created for a drawing operation. The pen is used to draw a straight line from the last known mouse position to the current one.
A test is then made to see if the tool lockout timer has expired. If it has, a test is made to see if the current mouse position is over a new tool, and if so, the current tool is swapped with that one.
Finally, all the areas affected by the sprite movement and drawing operations are rendered and drawn to the screen.
Mouse clicks are handled separately:
void CPaintWnd::OnLButtonDown(UINT nFlags, CPoint point)
{
    // See if we got a hit in the new page sensor.
    if (m_Corner.HitTest(point)) {
        ErasePaintSurface();
        Invalidate();
    }
}
If the click occurs in the new page sensor, the current image is erased and the screen redrawn to reflect the change.
I wanted the image to fade away slowly in the background; this is implemented by using a timer and some simple software that gradually sets all the pixels in the paint buffer back to the background color. To make the transition look more natural, I used a 16-by-16 grid of points and randomized the order in which the points in the grid are reset to the background color. Each timer tick, a certain number of passes are made over the paint buffer. Each pass sets one pixel in each grid square back to the background color. The code for this is in FADE.CPP. I'll leave this to you to investigate.
Not all Windows-based applications need to look like Windows-based applications. You can use Visual C++ and MFC to create applications that have their own style and function just as easily as you can use them to create more regular-looking Windows-based applications. As ever, if you have comments on this article, send me e-mail: nigelt@microsoft.com.