
Mark McCulley
Microsoft Corporation
February 23, 1996
Click to open or copy the files in the LATENCY sample application for this technical article.
MIDI sequencer applications require extremely precise timer services. Occasionally applications experience a delay in receiving notification from a timer—this delay is called timer latency. Timer latency under Microsoft® Windows® 95 can be considerably greater than under Windows 3.1 and can result in audible glitches when playing MIDI files with Win32®-based MIDI sequencers. In this article, I present a technique to minimize timer latency under Windows 95. This technique can be applied in MIDI sequencers as well as in other applications sensitive to timer latency.
You can use the Latency sample application that accompanies this article to measure timer latency on your Windows 95 or Windows NT® system. This application also provides code illustrating a simple thunking layer that allows 16-bit dynamic-link libraries (DLLs) to be used with a 32-bit Windows 95 application.
One of the great new features of Windows 95 is preemptive multitasking—users are free to do something other than meditate while the cursor is busy. However, a side effect of this feature is an increase in multimedia timer latency—the latency is much greater than under Windows 3.1. How much greater? I have observed latency of several hundred milliseconds with Windows 95. Ordinary user actions such as minimizing and launching applications can preempt timer services. For the vast majority of applications, this increase in timer latency is not a problem. For MIDI sequencers, however, timer latency in the hundreds of milliseconds is unacceptable.
What causes timer latency in Windows 95? I have not yet been able to uncover a definitive answer to this question, but I suspect the scheduler and the Win16 Mutex mechanism are involved. Because parts of Windows 95, including the multimedia subsystem MMSYSTEM, are still in 16-bit land, scheduling and managing tasks is very complex. Let's just leave it at that for this article.
If you'd like to know why steady and precise timers are so important for MIDI sequencers, read on. If you'd rather just get a solution to the problem, skip ahead to "The Solution."
Anyone who has played in a band will tell you how important it is to have a good drummer. The other musicians in the band rely on the drummer to provide a steady beat around which they can play their part. If the beat drifts even slightly, the song just doesn't sound right. Likewise, MIDI sequencers rely on a steady stream of timer interrupts to determine when to play each MIDI event. The human ear is capable of detecting very subtle rhythmic variations in music—if the timing is even slightly off, the change in the sound of the music can be obvious.
How precise does MIDI playback have to be? Let's throw out a few numbers for data points. First, a look at the physical side of things. The MIDI hardware interface operates at a baud rate of 31.25 Kbaud, with 8 data bits, one start bit, and one stop bit. It takes 320 microseconds to transmit a single byte to a synthesizer over a MIDI cable. Here's the math:
Thus it takes approximately one millisecond (960 microseconds, to be exact) to transmit a complete three-byte MIDI note-on message. Now let's look at timing from the musical perspective. At 120 beats per minute in 4:4 time, the duration of a sixty-fourth note (that's four flags on the note stem) is 31 milliseconds. Here's some more math:

Now you have a couple of data points for perspective. If your head hurts from all of this math, you can just take my word for it: The timing precision of a good MIDI sequencer must be as close to 1-millisecond accuracy as possible to be considered acceptable to professional musicians.
The first MIDI sequencers for Intel-based personal computers were MS-DOS–based applications. These applications hooked timer interrupts using the MS-DOS Set Interrupt Vector and Get Interrupt Vector functions (INT 21H, Functions 25H and 35H). Party on the hardware—no problems with timer latency! On the down side, there were no device-independent drivers, and each ISV had to write new drivers whenever new MIDI hardware appeared on the market. With versions of Windows earlier than version 3.0, applications could still hook interrupts via the MS-DOS functions and, at the driver level, operate as they did under MS-DOS. However, with the release of Windows versions 3.0 and 3.1, the rules changed—Windows now virtualized system timer resources and no longer allowed hooking timer interrupts.
Microsoft realized that the timer services provided by the SetTimer function were inadequate for MIDI sequencers and provided a much more precise set of multimedia timer services in Windows 3.1 using the timeSetEvent function. Windows 3.1 used a system VxD to virtualize timer services and multimedia timer callback functions, now accessed at interrupt time, had to adhere to stringent guidelines. Party on the hardware again—Windows 3.1 gave MIDI developers support for high-resolution timers and device-independent MIDI drivers!
You can use the Latency sample application to observe and measure timer latency. This application runs on both Windows 95 and Windows NT—it does not run on Win32s® because Win32s does not support multimedia callbacks in 32-bit applications. Latency has a simple menu-based user interface—it's not up to snuff as a real-world, logo-compliant Windows-based application but is functional and efficient nonetheless.
To observe timer latency under Windows 95:
As you minimize and maximize applications, you'll be able to hear interruptions in the sound produced by Latency. Latency plays a MIDI note event (closed hi-hat cymbal on the percussion channel) each time the timer procedure is called. Pay close attention to this cymbal sound while trying other actions such as dropping menus, launching applications, and accessing a network. Latency also keeps track of the minimum and maximum timer period and reports this information in the client area of the application's window.
Note If your system does not have MIDI support, you cannot enable sound with the Latency sample application.
The Latency sample-application package includes source code for four target executable programs and DLLs. The following table lists these targets and their associated makefiles:
| Target File | Makefile | Description |
| LATENCY.EXE | LATENCY.MAK | 32-bit application |
| TIMER32.DLL | TIMER32.MAK | 32-bit DLL with timer procedure |
| TIMER16.DLL | TIMER16.MAK | 16-bit DLL with timer procedure |
| THK3216.DLL | MAKETHK.BAT | 32-bit DLL providing 32-bit to 16-bit thunk layer |
As there are mutual and shared dependencies among the targets, I did not separate the sources into directories for each target; all sources are in a single directory. The following table summarizes the files required to make each target. You can use this table to easily recreate the project in your favorite IDE.
| LATENCY.EXE | TIMER32.DLL | TIMER16.DLL | THK3216.DLLl |
| LATENCY.C | TIMER32.C | TIMER16.C | THK3216.C |
| LATENCY.RC | WINMM.LIB | TIMER16.DEF | THK32.OBJ |
| VERSION.LIB | THK16.OBJ | THK3216.DEF | |
| WINMM.LIB | THUNK32.LIB |
The library files VERSION.LIB, WINMM.LIB, and THUNK32.LIB are all Windows system libraries. The two object files, THK16.OBJ and THK32.OBJ, are created by the assembler from code generated by the thunk compiler from the TIMER.THK thunk script. Before building any of the targets, you must run the thunk compiler and assembler to create theTHK16.OBJ and THK32.OBJ object files. I included a batch file, MAKETHK.BAT to do this:
thunk -t thk timer.thk -o thk3216.asm
ml /DIS_32 /c /W3 /nologo /coff /Fo thk32.obj thk3216.asm
ml /DIS_16 /c /W3 /nologo       /Fo thk16.obj thk3216.asm
I included the THK16.OBJ and THK32.OBJ object files in the sample-application package so that you can make some simple modifications to the sources without having to dig up the thunk compiler and an assembler to build the thunk. If you change the signature of any thunked functions or want to add additional thunked functions, you must modify the thunk script and rebuild the thunk.
You can solve timer-latency problems under Windows 95: Put the timer callback and associated procedures in a 16-bit DLL. This strategy will result in multimedia timer latency on par with Windows 3.1. Use the Latency sample application to hear the differences between using 16-bit and 32-bit timer procedures.
To use a 16-bit timer procedure with Windows 95, you'll need to implement a thunking layer and ensure that your timer procedure follows the stricter requirements of a Windows 3.1 multimedia timer callback. You'll also need to provide a 32-bit version for Windows NT. Read on for the hairy details.
The multimedia timer procedure and all code and data accessed by the timer procedure must go in the 16-bit DLL. If your application uses MIDI input, consider putting your MIDI input callback and associated code in a 16-bit DLL as well. That decision should depend on your experience using MIDI input in Windows 95 and whether or not you use driver-supplied timestamps or generate your own timestamps. I haven't experimented under Windows 95, but I suspect that the MIDI input callbacks may also be susceptible to delays on the order of tens or hundreds of milliseconds.
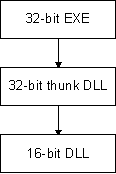
Because of differences in addressing memory and in basic word size, you cannot directly call 16-bit code from 32-bit code (and vice versa). You can accomplish this task, however, using a fairly straightforward mechanism—thunking. What is a thunk? Simply put, a thunk is a bit of code that acts as an interface between two architecturally different environments. Windows 95 uses flat thunking (one of several types of thunking) to call 16-bit code from 32-bit code. Flat thunks, the type I discuss in this article, are responsible for the following tasks:
The recommended way to design a thunk call is to isolate all thunk-specific code in DLLs. There should be a 32-bit and 16-bit DLL to provide both sides of the thunk.
If you already have a version of your sequencer in a 16-bit DLL, adding a thunking layer is pretty much a cookbook process. If you decide to port your 32-bit sequencer down to 16 bits, complete and test the port in the 16-bit environment before implementing the thunking layer and testing under Windows 95. Debugging thunks is not something you want to have to do—most debugging tools do not work across the thunk layer. A good approach is to begin with working sample code and modify it for your own purposes. I started with a sample application named App32 from the Win32 SDK. Here's a summary of what you need to do to create a thunk layer for your 16-bit sequencer DLL:
Of course the devil is in the details, and I'm not going to elaborate more on thunks in this article. I found the following articles, all from the Microsoft Product Support Knowledge Base, to be quite helpful in learning how to create a flat thunk for Windows 95:
Under Windows 3.1, applications accessed all multimedia callbacks (MIDI, Wave, and timer) at interrupt time and callbacks were required to adhere to strict coding guidelines. Although these restrictions are no longer in place in Windows 95, they still hold for 16-bit code accessed from Windows 95 applications. If your sequencer code originated in the 16-bit world, you're no doubt aware of these limitations. But if you've been going hog-wild in your 32-bit multimedia timer procedures, moving back to the 16-bit world will cramp your style. Here's the bad news, quoted directly and without humility, from the Windows 3.1 Multimedia Programmer's Reference:
Because the callback is accessed at interrupt time, it must reside in a DLL, and its code segment must be specified as FIXED in the module-definition file for the DLL. Any data that the callback accesses must be in a FIXED data segment as well. The callback may not make any system calls except for PostMessage, timeGetSystemTime, timeGetTime, timeSetEvent, timeKillEvent, midiOutShortMsg, midiOutLongMsg, and OutputDebugStr.
There's not a lot you can do in a 16-bit multimedia timer callback. No GDI calls, not even memory allocation. You can get a timestamp, output some MIDI events, and post a message back to your application to handle any other tasks such as updating the display.
In addition to taking note of the 16-bit timer callback restriction, you should follow several other guidelines when writing your 16-bit sequencer DLL:
Windows NT does not allow you to use 16-bit DLLs with your 32-bit application. Fortunately, based on my observations using the Latency sample application, you don't need to—multimedia timers in Windows NT are the steadiest of any setup I tested. I should post a disclaimer here: My testing was limited and unscientific. I tested with only two platforms and only by using the Latency sample application. You should do some testing of your own to determine how your application responds to different operating environments.
For your application to run on both Windows 95 and Windows NT, you'll have to create both 16-bit and 32-bit versions of the DLL containing the timer procedure and associated code. You can detect which environment is present at run time to dynamically load and link the proper DLL. Once you determine whether you're running on Windows 95 or on Windows NT, you can load either the 32-bit or the 16-bit version of your sequencer DLL. Again, here's a code fragment from Latency illustrating how easy it is to dynamically load and link to a DLL at run time:
FARPROC pStartTimer3216;    // ptrs to procs dynamically
FARPROC pStopTimer3216;     // linked from THK3216.DLL
FARPROC pResetMaxMin3216;   //
FARPROC pEnableSound3216;   //
FARPROC pDisableSound3216;  //
// Load DLL containing 32-bit side of thunk
if (IS_WIN95)
{
    if (hmodThunkDll = (HMODULE) LoadLibrary ("THK3216"))
    {
        // Dynamically link to thunked functions
        pStartTimer3216  = GetProcAddress (hmodThunkDll, "StartTimer3216");
        pStopTimer3216   = GetProcAddress (hmodThunkDll, "StopTimer3216");
        pResetMaxMin3216 = GetProcAddress (hmodThunkDll, "ResetMaxMin3216");
        pEnableSound3216 = GetProcAddress (hmodThunkDll, "EnableSound3216");
        pDisableSound3216 = GetProcAddress (hmodThunkDll, "DisableSound3216");
    }
    if (!(hmodThunkDll && pStartTimer3216 && pStopTimer3216 && pResetMaxMin3216))
    {
        // Problem loading or linking to DLL, clean up and scram
        MessageBox (NULL, "Unable to load THK3216.DLL",
                    NULL, MB_ICONERROR | MB_TASKMODAL);
        if (hmodThunkDll)
        {
            FreeLibrary (hmodThunkDll);
        }
        return (FALSE);  // failure
    }
}
Note The Latency sample application is a bit unusual in that it loads both 16-bit and 32-bit versions of DLLs with timer procedures. I did this so that you could test both situations under Windows 95. You'll probably want to load either the 16-bit or the 32-bit DLL, depending on the operating environment at run time.