Herman Rodent
Microsoft Developer Network Technology Group
Created: June 22, 1993
Click to open or copy the files in the TEXTBOX sample application for this technical article.
Does the pile of documents on your desk about Object Linking and Embedding (OLE) version 2.0 scare you? Do you hate the idea of having to learn C++? Is your manager getting a little pushy about progress on the OLE implementation you haven't started yet? When I first looked at OLE 2.0, it seemed very complicated and overwhelming, and I thought that maybe the time had come for me to take up woodworking for a living. If that's how you feel, read on.
This article is the first in a series on implementing OLE 2.0 in your applications and covers some basic requirements that must be understood before any OLE work can take place. The remaining articles in the series will cover:
Some time back, I got hold of an early copy of the specification for Object Linking and Embedding (OLE) version 2.0. The spec ran to about 300 pages of dense techno-stuff in a small typeface. Gripping reading for nerds of all ages. My first impressions were that it's way too complicated to learn or be likely to work properly and that the documentation had no information at all about how to implement it. I decided to shelve the documents for a later date.
Since then, newer, fatter specs have come my way, each time replacing the volume on the shelf. With the advent of the second beta of OLE 2.0, I installed the software for a quick look and saw many samples that all "sort of" worked, as well as a bunch of test tools. Obviously, the product was getting a little nearer to release to the masses. A draft copy of the Object Linking and Embedding Programmer's Reference, Version 2 came my way—more dense pages of fascinating information. And then came the great sample, OUTLINE. I decided to print it out on the aging Hewlett-Packard® LaserJet® printer in my office, and it went right through an entire pack of 8.5-by-11-inch paper—we're talking about 30,000 lines of text here!
Then came a draft of the first six chapters of Kraig Brockschmidt's fine, unpublished book on OLE, Inside OLE 2, and shortly after, the OLE 2.0 Developers Conference in Seattle, Washington (May 3-5, 1993). I read all the documents, attended the conference, read Kraig's book, read some of the documents again, and thought, "There's no way to put it off any longer—I'm going to have to write some code." But where to start? That's the Big Question.
I began my own investigation by attempting to leap right in and create a container application. I made two discoveries while failing to achieve this apparently simple goal. I discovered first that OLE is something you add to a completed application (or at least to one that is fully designed in the first place), and second, that in order to call the OleCreate API, you need two things I didn't have: a client site and a pointer to a storage object.
So far as I was aware, a client site is where your customers work. Storage objects I knew about—after all, I'd read hundreds of pages of OLE documents discussing them. Mind you, I had no idea how to get a pointer to one.
I decided to back up a bit and start again. What I did was create a complete application (albeit a simple one) that has file I/O, Clipboard support, and so on. Then I slowly added OLE functionality to that application. The result is a series of applications and articles that I hope will help guide you quickly and simply through the OLE forest.
The first article looks at the base application, devoid of any OLE entanglements. The second article adds structured storage from OLE 2.0; the third turns the application into a simple container.
Be aware that this series of articles is in no way a replacement for the OLE documentation, Kraig's book Inside OLE 2, or any other source you might have—it's simply a guide to getting started with an implementation of OLE 2.0 in your application.
You cannot implement any OLE code without having at least a fully designed application and, preferably, a partially (or even fully) implemented one. I know this because I wasted a great deal of time trying to see how I could play with OLE and its features without doing any real work.
The other major thing to realize is that you can't add OLE to just any application. The application has to deal with displaying objects of some sort or other for it to make any sense to add OLE to it. This isn't quite true, because (as I'm sure some of you realize) OLE provides a structured storage system that can be used as a stand-alone feature, and it also provides an automation feature—rather like DDE's Execute command—which could also be seen as a kind of stand-alone feature. Nonetheless, the main reason for OLE's existence is linking and embedding objects, and if we want some of this action, we are going to have to provide an application to link them to or embed them in.
A major feature of all the OLE demonstrations I have seen is the highly complex user interface required to support in-place activation. My own experience of creating Microsoft® Windows™-based applications suggests that about 75 percent of the programming effort goes into the user interface and the remaining 25 percent goes to make the application do whatever it does for a living. Implementing OLE is in keeping with this—there is a lot of user interface work to do. To help out here, the OLE team produced a user interface DLL that is shipped as source code with the OLE 2.0 Software Development Kit. This provides almost every dialog box you will need in your implementation and will greatly contribute to a standard look for the world's future OLE applications. This standardization in appearance is something the users should be very happy about. In my efforts to show you how you can implement OLE, I will always try to do as little work as possible, so the user interface you see in my samples is as simple as I can get away with. What this means to you is that I might implement only one feature of a set in order to keep the code simple and clean. I leave it to you to research the remaining members of the set and implement them. So although my user interface will win no prizes with the users, I hope you'll see my simple code as an attempt to make things easier for you to understand.
For my base application, I needed something that would make sense to add OLE to and would have just enough features so that it could be expanded to use a reasonable amount of the OLE system. I decided to implement a small application that shows blocks of text in rectangular regions of the client area of the application's main window.
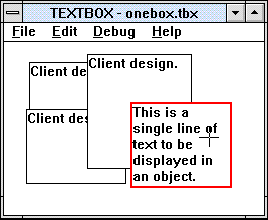
TEXTBOX only allows a single document to be open at any one time, which requires much less code than for a multiple-document interface (MDI) application. The text blocks can be created from a text file or from a Clipboard CF_TEXT object. Each object is resizable, and a colored border drawn around an object indicates that it is the currently active object. Figure 1 shows a screen shot of the TEXTBOX application with several objects displayed.
Figure 1. The TEXTBOX application
TEXTBOX also maintains an insertion point that has a cross for a cursor. The currently active object can be moved by clicking inside its display area and dragging it. It can also be resized by clicking and dragging any of its four borders. The behavior of the user interface is not all that it might be, but it is enough to provide adequate functionality without too much code.
Each object has size, position, and content information. All of the objects can be saved in a file together with the size of the main window so that a complete scene can be reloaded at a later time.
When I created TEXTBOX, I had no real idea of how I might add OLE functionality to it and so designed it in a way I thought would keep it as simple as possible. Here are the steps I took to create it:
All this took about three days to do.
This might seem like a lot of work, and in some ways it should seem so. After all, I said earlier that we want to add OLE to an already complete application—at least completely designed. So what we have now is an application that supports some form of object display and has Clipboard support, a File Save/Load feature, and some degree of user interface in the form of drag and resize.
Actually, a lot of the work was very easy, the bulk of the code coming from the W16APP template.
The following sections give some details of the implementation.
In almost all of my code samples, I generally ignore whether a pointer is near, far, or huge, and simply name it as a pointer. So, for example, a pointer to a bucket would be named pBucket rather than npBucket, lpBucket, or hpBucket. As we move toward the happy days of 32-bit, flat-memory-model, Windows-based programming, I hope this simpler style will become more commonplace.
If you read the OLE documentation (and I hope you will, if you haven't already), you will find some considerable discussion about objects. In fact, almost all of the existing publications dealing with OLE begin with a discussion about objects in some way or other. I'm going to take a more radical approach and not bother. After all, what is left to say about them? The TEXTBOX sample application defines a structure called OBJECT, but this is simply where I keep the information about each of the text regions on the screen. I could just as easily have called it AARDVARK, which is a nice name, albeit a bit silly for an object. (Smile—this is what passes for humor here at MSDN Central.)
The other aspect of the current set of OLE documents worth mentioning is that they describe the code-writing process as if you were implementing the application in C++. To be fair, the sample code that accompanied the OLE 2.0 Beta release was all in straight C, rather than C++, but the code is written to look and feel like C++. I'm not a C++ programmer and neither are 85 percent of those of you reading this, so all my samples are in C. If you are going to be doing a lot of OLE work, now might be a good time to consider learning C++ because, despite the fact that (as I will demonstrate) you can implement OLE support in C, it looks a lot easier to implement it in C++ if you are familiar with the language. My mission here is to get you started, though, so we'll stick to straight C and leave the object-oriented approach to the textbooks rather than use it in the code.
The TEXTBOX application defines a structure to keep track of the data associated with each text rectangle displayed. Here's the structure as defined in GLOBAL.H:
#define DEFAULT_OBJ_WIDTH   100
#define DEFAULT_OBJ_HEIGHT  75

typedef struct _OBJECT {
    struct _OBJECT FAR *pNext;  // Pointer to the next one.
    LPVOID pInfo;               // Pointer to its info.
    RECT rc;                    // Container rectangle.
    UINT uiSize;                // Size of the info.
    BOOL bSelected;             // Is it selected?
    UINT uiType;                // CF_TEXT, and so on.
} OBJECT, FAR *POBJECT;
The application maintains a linked list of these objects. The global variable gpObjList points to the top of the list.
The file OBJECT.C contains several functions that deal with the OBJECT structures. Table 1 lists the functions and gives a brief description of each one.
Table 1. Object Management Functions in OBJECT.C
| Function | Description |
| CreateObj | Creates a new object. |
| DeleteObj | Deletes an existing object. |
| RenderObj | Renders the image of an object. |
| InsertObjCmd | Processes the Insert Object menu item. |
| HitTestObj | Tests for a mouse hit inside an object. |
| SelectObj | Shows an object in the selected state. Deselects all other objects. |
| BringObjToTop | Brings an object to the top of the list making it the most visible (on top). |
| AppendObj | Appends an object to the end of the object list. |
| UnlinkObj | Removes an object from the object list without deleting it. |
| SizeBorderHitTestObj | Tests for a mouse hit in the size border area of an object. |
In designing and implementing these functions, I tried to keep in mind that I would be altering them to deal with OLE objects at some point. However, with no experience to go on, predicting what changes would be required turned out to be very difficult.
The TEXTBOX application supports two Clipboard formats: CF_TEXT and a private format called Text Box Object. (There's that word object again.) Why two formats? I wanted to do something really simple to get Clipboard support working early, so I chose to implement CF_TEXT first. The CF_TEXT format lets you copy or cut the text from the currently selected rectangle to the Clipboard. Testing this was easy—you simply used the Clipboard viewer to see the result of the cut or copy operation. Incidentally, the reason you can only select one rectangle at a time in the application is to keep the Clipboard support as simple as possible.
The problem with CF_TEXT was that only the text got copied, which meant that if it were pasted back, no information about the size or position of the rectangle would be available. The private format, Text Box Object, was designed to provide not only the text content of an object, but also the size and position of the object. The data copied to the Clipboard consists of an OBJECT structure followed immediately by the text data as shown in Figure 2. Since the Clipboard viewer can't display this private format (it has no way to understand it), I had to implement paste support next so that I could test the format.
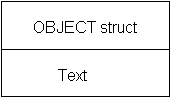
Figure 2. The Clipboard data format, Text Box Object
When the Cut or Copy command is chosen, the application copies both the Text Box Object format and the CF_TEXT format data to the Clipboard.
The paste operation looks in the Clipboard for the private Text Box Object format first and then for the CF_TEXT format. In general, an application should always look for a format that gives as much information as possible and only if none are present should it use one of the more generic formats, such as CF_TEXT.
All of the Clipboard support is located in the CLIP.C module, which contains nothing out of the ordinary, so I will not reproduce the code here.
The code to allow the currently selected rectangle to be dragged and resized is contained mostly in the main window message handler in MAIN.C. Two helper functions, HitTestObj and SizeBorderHitTestObj, are contained in the OBJECT.C module. These functions detect mouse hits in the object rectangle and size border regions, respectively.
The code for dragging and resizing the rectangles is deliberately rather simplistic and, consequently, provides a somewhat odd feel to the user. I considered it important to include dragging and resizing because I wanted to see what was going to be involved in supporting it with OLE objects later on.
The TEXTBOX application can save the set of objects and the current size of the window in a private file format. These files can subsequently be reopened using the File Open command. The file format consists of a header block containing an identifier tag and information about the size of the main window, followed by a data block for each object. The object data blocks are the same format as the Text Box Object Clipboard format and consist of an OBJECT structure followed by a NULL-terminated text string. Figure 3 shows an example of a file structure where two objects were saved.

Figure 3. A TEXTBOX file containing two text rectangle objects
When a file is opened, the header is read and then objects are read until the end of the file is encountered. There is no object count in the header. I considered a more complex file format, but again decided to keep it as simple as possible to reduce the support code and also because I was curious to see how simple a format could be used to store the OLE object data when we eventually reached that stage of the development.
The printing support in TEXTBOX is very rudimentary. It uses the MM_ISOTROPIC mapping mode to retain the aspect ratio of the window image and then scales the window rectangle to fit the paper size. The result is that the relative shapes of the rectangles look right, but the text layout is different from what appears on the screen because no account is taken of the effects of font scaling. The way the rectangles are rendered to the printer device context (DC) is that the lower (or backmost) rectangles are not clipped to those in front of them, leading to a rather messy result.
Although the state of the printing can hardly be considered satisfactory, I decided to wait to fix this problem until much later because my guess was that printing the OLE objects would introduce more complexity in any case, and I wanted to have a clear run at that problem when the time came.
So now we have an application that, although not wonderful, is at least a platform we can add some OLE features to. What to do next? As I mentioned earlier, my original plan was to take this application, replace my own Insert Object dialog box with the one in the OLE development samples, and go straight to implementing container support. I spent many hours getting the dialog box to appear, only to discover that I couldn't take the next step.
I needed to call the OleCreate API, which has several parameters. I had most of them from the result of the Insert Object dialog box, but I was missing the client site and storage pointers. I had no idea how to create these two parameters, and NULL wasn't going to do it. So I had to back up a bit and find out what they were all about. The next article covers adding structured storage, and subsequent articles go on to add the remaining requirements to implement container support and much more.
If you still haven't read any of the OLE documents and you're hoping to avoid that by reading my articles, then I'm afraid you're going to be a bit disappointed. You would do well to at least read the first few chapters of Kraig Brockschmidt's as-yet-unpublished book, Inside OLE 2, or the "Architectural Overview of OLE" chapter in the Object Linking and Embedding Programmer's Reference, Version 2. Without some sort of idea of what OLE is all about, you're going to find the next step heavy going.
You don't need to understand everything you read. You certainly don't need to remember what functions go with what interface for what object—all that you need to know for a minimal implementation will be in the following articles.