Peter Donnelly
Microsoft Corporation
February 1997
Click to copy the files in the TEXTURE sample application for this technical article.
Microsoft® Direct3D™ Retained Mode includes a powerful function, IDirect3DRM::CreateWrap, for setting up a bitmap to be applied to the surface of any face or mesh in a scene. CreateWrap takes 16 arguments that controls seven aspects of the texture wrap. Because texture wrapping involves mapping a two-dimensional (2-D) image onto a three-dimensional (3-D) object, some fairly complex mathematics is involved. If, like me, you elected Latin over trig in high school and don't know the difference between a cotangent and a cube root, you have probably found it difficult to understand just how the arguments affect the final result.
In this article, I attempt to explain the arguments to CreateWrap in as nontechnical a way as possible so that a developer without a mathematician's understanding of 3-D concepts can at least use the function to achieve desired effects. I concentrate on wrapping meshes, since applying a wrap to a single face does not present the same conceptual difficulties.
Throughout the article I refer to the arguments by the names used in the CreateWrap reference, given in its entirety in the Appendix.
The accompanying sample program by Philip Taylor lets you experiment with different textures, meshes, and arguments. It is an invaluable tool for understanding the dynamics of texture wrapping.
To run the program you need to have the runtime files for Microsoft DirectX™ 3 or later. If you want to change and recompile it, you need the Microsoft DirectX Software Development Kit (SDK), available with MSDN Professional or higher subscriptions or at http://www.microsoft.com/msdn/sdk/.
After starting the program, you can change the default bitmap and 3-D object by using a drag-and-drop operation (explained below) or by clicking Open on the File menu. If you have the DirectX SDK, the \dxsdk\sdk\media folder contains some basic shapes and textures you can use.
To use the drag-and-drop feature, open Microsoft Windows® Explorer and drag any 3-D object (.x) file into the program window. If necessary, change the size of the object with the gray plus or minus keys. Then, drag in any eligible bitmap file in .bmp or .ppm format. Bitmaps have to be square, with pixel dimensions that are a power of two (for example, 32 x 32 pixels).
Once the texture is loaded, it is displayed as a background for reference. (If it is in .bmp format, it is mirrored from top to bottom.) It is also wrapped onto the object with the default values.
To change the wrap values (that is, the arguments to CreateWrap), click Values on the Wrap menu. The dialog box that appears can be dragged to an empty part of the screen and left open. When you have made the desired adjustments, click Apply to see the effect on the image.
If the entire object is one color, or if the wrap just doesn't seem to bear any relationship to the bitmap, try adjusting the scaling factors. You may look at the "Texture scale" section of this article to understand what ranges of values will produce meaningful results for the different types of wrap.
Note that if you change the size of the object after applying a wrap, the wrap will not rescale until you click Apply. Also, if you drag in a new object, you must reapply the wrap by dragging in the texture file again.
You can halt the movement of the object by making the program window active and then pressing the spacebar, or by clicking Single Step on the File menu. Pressing the spacebar again will cause the animation to advance by a single step. Resume normal animation by pressing ENTER or by clicking Go on the File menu.
The source code for TEXTURE.exe is included. This is in the form of a Microsoft Visual C++® version 4.0 project. Alternatively, if you prefer, you can use the supplied makefile with a command-line compiler. Note that the compiler must be able to find the DirectX include files in the dxsdk\sdk\inc and dxsdk\sdk\samples\misc directories. If you're using Microsoft Developer Studio™, add these directories under Include files on the Directories tab in the Options dialog box.
Probably the biggest obstacle to understanding the concept of texture wrapping is the word "wrap" itself. It suggests that the texture is something two-dimensional, folded, and deformed in order to cover the surface of a three-dimensional object. Indeed, the analogy of a piece of paper or rubber is sometimes used in discussions of texture wrapping.
It took me quite a long time, studying the Direct3D documentation and the few other scraps of information I could find, and playing with TEXTURE.exe to realize that the paper or rubber analogy is misleading. If you wrapped an object with a piece of paper or rubber, each point on the wrap would end up covering just one point on the object. In computer-graphics terms, each pixel in the texture would color one texel on the mesh. But in complex 3-D objects, this is not what happens at all.
The light went on when I realized that a wrap is a solid. By this I mean that it is not just a bunch of textured planes wrapped around nothingness. It is more like one of those color solids used to illustrate color theory. Every point within the volume of the wrap contains color. Applying a wrap to an object means putting the object inside the volume of color, with the result that every visible surface point of the object takes on the color of that point within the wrap.
How is the arrangement of colors within the wrap determined? That's where the math comes in, but I want to explain it with my own analogy. To do this I have invented a machine—a sort of projector that takes an image from a slide and projects it through an array of laser lenses, one per pixel, filling up a space with colored beams. For the sake of the analogy, any surfaces placed in the path of the beams are considered to be translucent—they take on the colors of the beams that pass through them but don't block the light from other surfaces behind them.
Type (type). The type of the wrap essentially determines how the texture is going to be mapped to the surfaces of the object—that is, how the volume of the wrap is going to be filled with color.
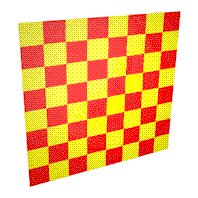
Figure 1 shows a simple texture, or the arrangement of the lenses on the imaginary projector. The following figures will demonstrate how this texture is mapped onto three-dimensional space.
Figure 1. A texture
Let's take the flat wrap first. In this case, the lenses of the projector are mounted on a flat rectangular grid so that the beams of light are parallel, as in Figure 2. (As you look at the figures, remember that they represent the arrangement of colors within the wrap space, not wrapped objects. Wrapped objects would look like this only if they had the same shape and orientation within wrap space.)
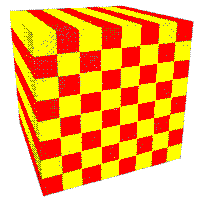
Figure 2. A flat wrap
First project the image onto a flat plane. You can project the image from the front or the back and from any angle. A viewer looking directly at the front face of the plane sees a normal image if you're projecting from the front and a mirror image if you're projecting from the back. If you're projecting from an angle, the viewer sees a distorted image. But anyone looking along the beams (the direction vector) always sees the normal image.
What if you're wrapping a 3-D object rather than a single flat surface? Remember, for the sake of our analogy, we're imagining that all surfaces are translucent and do not block the beams of the projector.
Take the case of a cube, each face of which lies along an axis in object space. Run TEXTURE.exe, and try the following with CUBE.x in the DirectX SDK. Apply a flat wrap to the cube from directly in front of it by using a direction vector of [0,0,1]. (You might want to refer to the descriptions of the Up arguments and the Texture scale section later in this article to make sure you get the image correctly oriented. For this model, the front face of the cube is the one that sits square in the window when it faces the camera.) You now see the normal image on the front face of the cube, but the imaginary beams carry on and mirror the image on the back face. (You are actually "back-projecting" onto the back face.)
Now look at the other faces. They're not blank—each one is covered with streaks extending across the entire face. What's going on here? Simple, each of the imaginary beams at the edge of the front face has traveled down the full length of each side, coloring each texel in its path.
What happens when you alter the angle of the projector and, instead of holding it at right angles to a face, direct it so that one corner of the cube is the center of the picture and the beams strike three edges at a 45-degree angle? The three "front" faces get colored directly, and the beams shine through to create a mirror image on the three "back" faces. You can try this by setting the direction vector to [1,1,1].
Now apply the laser-projector analogy to the cylindrical wrap. This time you have arranged the array of laser lenses in the form of a cylinder standing around the object, with the beams pointed at the center axis so that all rays at a given height will converge. Each beam colors every surface between it and the axis, but no further. (An amazing feature of our projector is that you can limit the length of the light beams.)
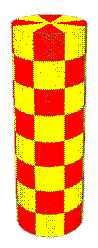
Figure 3. A cylindrical wrap
The effect can be seen most readily with the teapot model (TPOT1.x). Apply a checkerboard texture with a cylindrical wrap and set the direction vector to [0,0,1] so that the cylinder axis runs down from the lid handle to the center bottom of the pot. You'll see that along any straight line running at right angles from the cylinder axis to the outside of the model, all surfaces are the same color, even the inner parts of the handle and spout. (Bet you can't do that with a piece of rubber!) You can see the same thing with TORUS.x, where the direction vector [0,1,0] will put the cylinder axis through the donut hole. The pattern on the outside of any section of the donut is repeated (smaller, of course) on the inside of that section.
Try applying a cylindrical wrap to a cube. If you set the direction parallel to a face, you end up with anomalous patterns on two faces (the ends of the cylinder). This is a similar effect to the streaking we saw in the flat wrap. The two faces are on the same plane as the beams, so you see lines of color converging toward the axis.
For the spherical wrap, you must arrange the array of lenses in a sphere around the object. The array has to be deformed at the "poles" of the sphere. In effect, the columns of lenses have to be bunched more and more closely together as they approach the poles. The beams all converge at the center of the sphere. It is a little difficult to see the effect of this convergence with most models, but if you apply a spherical checkerboard wrap to the teapot, again with the direction vector set to [0,0,1], you can see that the lines of color on the sides of the handle and spout converge on the center of the model, whereas with the cylindrical wrap they are parallel. The cutaway view in Figure 4 shows more clearly how the lines converge toward the center of the wrap.
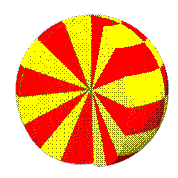
Figure 4. A spherical wrap (cutaway view)
The chrome wrap is similar to the spherical, except that the angle of reflection is also taken into account when mapping the texture to the surface.
Reference frame (lpRef). The reference frame is the set of coordinates to which the wrap's coordinates are relative. When this parameter is NULL, the wrap coordinates are relative to the object space—that is, to the modeling coordinates of the object, independent of the object's position in the world space. I'll explain this relationship more fully when I get to the Direction and Up arguments.
It is also possible to assign the reference frame to the camera. This generally is done for chrome wraps. A chrome wrap needs to know the position and orientation of both the object and the camera so that it can calculate reflection angles. You pass the camera as a reference frame to the wrap, and then to chrome-map any object, you use Wrap::ApplyRelative with the frame that contains the object. The same chrome wrap can be used for any number of objects relative to the same camera.
Wrap origin (ox, oy, oz). These arguments determine where on the object the "seams" of the wrap will be. By default, with the wrap origin at [0,0,0], the point of origin for the wrap on the object is at the center of the mass. On a rectangle where the direction of the wrap is [0,0,1], the wrap will start in the center of the rectangle. To set the origin to a corner, you have to set ox and oy to -0.5n, where n is the width or height of the rectangle object.
Direction (dx, dy, dz). This set of arguments determines the z-axis of the wrap, in the coordinates of the reference frame.
The net effect of defining the Direction and Up vectors is to create a system of coordinates for the wrap—in other words, to create a "wrap space" and define its relationship to the "model space" of the object or other reference frame. The direction vector defines the z-axis in wrap space, and the Up vector defines the y-axis. The x-axis is easily derived, being at right angles to both y and z, so you don't have to worry about it.
Remember, each point in wrap space contains one color from the texture. In order for these colors to be applied to the object, the object has to be located and oriented within wrap space. Each time the scene is rendered, the vertices of the object are transformed to wrap coordinates.
Here's an example of how wrap coordinates are related to object coordinates. Take a cube whose front face has vertices at [0,0,0], [0,1,0], [1,1,0], and [1,0,0]. These are the model coordinates set when the object was constructed. Now place the cube inside a box so that its faces are parallel with the faces of the box. The box is wrap space, and right now its coordinate system exactly matches the coordinate system of the object. The Direction vector of the wrap is [0,0,1]—the z-axis of the box is lined up with the z-axis of the cube.
Now, reach in and rotate the block 90 degrees counterclockwise on the floor of the box. The z-axis of the wrap space is now oriented differently in terms of object space—it lies along the x-axis of the object. You have in effect created a direction vector of [-1,0,0].
For the flat wrap, as we've seen, the direction vector—the z-axis of wrap space—is the path of our imaginary beams of light. For the cylindrical wrap, it's the axis of the cylinder. For the spherical wrap, it's the vector that connects the two poles.
Up (ux, uy, uz). These arguments determine how the texture is rotated before it is applied to the object. To revert to the projector analogy, changing the Up vector is like rotating the slide in the tray.
A positive value for an axis orients the top of the wrap toward that axis in object space; for instance, [0,1,0] orients the wrap so that the top is toward the top of the object, and [1,-1,0] orients it at a 45-degree angle toward the left.
The Up vector is always at right angles to the direction vector. If you attempt to set the direction vector to [0,0,1] and the up vector to [0,1,1], the uz argument will be normalized to 0.
The top of the wrap, by the way, is not necessarily the same as the top of the bitmap. The bitmap can be placed into the wrap in different orientations depending on the scaling factors used. I'll get to that in a moment.
Texture origin (ou, ov). These arguments determine what part of the texture gets laid down at the wrap origin. Normally they will be zero, but you can set them to other values when you want to extract a portion of a large texture. Say, for example, you are wrapping a different picture onto each of sixteen objects. According to the Direct3D documentation, textures of 256 x 256 pixels are the most efficient, so you make your pictures 64 x 64 pixels and put them in a 4 x 4 array in a single texture file. As you create a wrap for each object, you index into the array by setting appropriate values of ou and ov, and you set the scaling so that only one-sixteenth of the texture will be displayed on the object being wrapped.
Here, the dimensions of the texture are considered to be 1 x 1, so the offset of the second picture on the third row in our example would be [-0.25, 0.50]. The value of ou is negative because you're shifting the image to the left in wrap space. The sign of ov depends on the scaling of the v-axis. As I'll explain in a moment, the scaling factor sv is positive for a .bmp file but negative for a .ppm file. For a .bmp file, the value of ov in the example would be -0.50, but for a .ppm file it would be 0.50. I confess I haven't been able to puzzle out the logic, but presumably it makes sense when you take into account the relationship between bitmap origin, scaling origin, and the wrap coordinate system.
Texture scale (su, sv). These two parameters determine how the texture is to be scaled to the object. The actual size of the texture in pixels is irrelevant; again, a square texture may always be considered to have dimensions of 1 x 1.
For a flat wrap, su is the scale of the width of the texture to the width of the object, and sv is the scale of the height of the texture to the height of the object. In the case of our sample cube, say the edges are each 5 modeling units long. In order to apply a flat wrap in such a way that the texture map exactly covers one face, the scaling factors for any square bitmap would both be 1/5 = 0.2. Of course, you can always tile the texture by setting larger values.
For a cylindrical wrap, a value of 1 for su ensures that the texture wraps exactly once around the object so that the longitudinal edges will meet. For sv, scaling is similar to that for a flat wrap: to scale the texture so that it just covers the object from top to bottom, set sv to 1/h, where h is the height of the object.
With the spherical wrap, setting both su and sv to 1 stretches the texture to just cover the object in both dimensions.
You can set su (for a cylinder or a sphere) and sv (for a sphere) to values other than 1, but the results tend to be somewhat bizarre.
There's one further wrinkle. The orientation of the bitmap within the wrap depends on whether the scaling factors are positive or negative and on the format of the bitmap itself. With a positive value in sv, CreateWrap takes the first scan line in the bitmap and puts it at the bottom of the wrap. Because .ppm bitmaps are in top-down format, this results in the picture being mirrored from top to bottom, just as in a real projector. So, for .ppm files, you have to set a negative value for sv in order to orient the top of the texture to the top of the wrap. On the other hand, .bmp files are stored in bottom-up format, so the y-axis scaling factor should be positive. I'm told that a future release of Direct3D will treat .ppm files and .bmp files the same, but for the time being you do have to keep the different formats in mind.
Table 1. Texture Types and Scaling Factors
| Type | su | sv |
| Flat | 1/w to cover width of object exactly | 1/h to cover height of object exactly |
| Cylindrical | 1* | 1/h to cover height of object exactly |
| Spherical/chrome | 1* | 1* |
*Values of <>1 may be used to wrap part of the texture or to tile it but may not give satisfactory results at the seams.
This reference is reprinted from the Direct3D documentation (MSDN Library, SDK Documentation, Platform SDK).
Creates a wrapping function that can be used to assign texture coordinates to faces and meshes. The vector [ox oy oz] gives the origin of the wrap, [dx dy dz] gives its z-axis, and [ux uy uz] gives its y-axis. The 2D vectors [ou ov] and [su sv] give an origin and scale factor in the texture applied to the result of the wrapping function.
HRESULT CreateWrap(
    D3DRMWRAPTYPE type,
    LPDIRECT3DRMFRAME lpRef,
    D3DVALUE ox,
    D3DVALUE oy,
    D3DVALUE oz,
    D3DVALUE dx,
    D3DVALUE dy,
    D3DVALUE dz,
    D3DVALUE ux,
    D3DVALUE uy,
    D3DVALUE uz,
    D3DVALUE ou,
    D3DVALUE ov,
    D3DVALUE su,
    D3DVALUE sv,
    LPDIRECT3DRMWRAP* lplpD3DRMWrap
    );
type
One of the members of the D3DRMWRAPTYPE enumerated type.
lpRef
Reference frame for the wrap.
ox, oy, and oz
Origin of the wrap.
dx, dy, and dz
The z-axis of the wrap.
ux, uy, and uz
The y-axis of the wrap.
ou and ov
Origin in the texture.
su and sv
Scale factor in the texture.
lplpD3DRMWrap
Address that will be filled with a pointer to an IDirect3DRMWrap interface if the call succeeds.
Returns D3DRM_OK if successful, or an error otherwise. For a list of possible return codes, see Direct3D Retained-Mode Return Values.
Thompson, Nigel. 3D Graphics Programming for Windows 95. Redmond, WA: Microsoft Press, 1993. pp. 173-195.
Watt, Alan and Mark Watt. Advanced Animation and Rendering Techniques: Theory and Practice. Addison-Wesley, 1992. pp. 178-185.
A more technical explanation of mapping.