Building an add-in consists mainly of creating a class module that handles events specific to add-ins and any events you want to specify, along with your support modules and forms. Unless you need to have multiple instances of an add-in running in the same IDE, all class procedures should be declared Private to prevent other routines from inadvertently referencing them.
Once the add-in code is complete, you must compile it as an ActiveX .dll or .exe file, since add-ins must be ActiveX components. For various reasons, it's generally best to create add-ins as ActiveX .dll files.
For more information For a brief comparison of add-ins as .exe and .dll files, see "Compiling Add-Ins" in "How to Build an Add-In." get your feet wet, start by building a very simple add-in that demonstrates an essential component of an add-in — its Class module. How this example works will be explained afterward.
Note The procedure below leads you manually through creation of an add-in. Alternatively, you can simply create an Add-In project, and all of the basic add-in infrastructure is created for you.
To create the AddInProject add-in
On the File menu, click New Project to open the New Project dialog box. (This will close your current project or project group; you will be prompted to save any changes you have made.) Double-click the ActiveX DLL icon to create a new project.
Click the Project menu, then click References. Select the Microsoft Visual Basic Extensibility and Microsoft Office 8.0 Object Library check boxes.
This gives you access to the extensibility objects and collections that you need to create add-ins.
Click the Project menu, then click Add Module. In the Add Module dialog box, double-click the Module icon to create a new module.
Note that there is an icon for an AddIn template. The template includes some of the code necessary for beginning an add-in.
Enter the following code in the new module:
Declare Function WritePrivateProfileString& Lib _
"kernel32" Alias "WritePrivateProfileStringA" _
(ByVal AppName$, ByVal KeyName$, ByVal _
keydefault$, ByVal FileName$)
Sub AddToINI()
Dim rc As Long
rc = WritePrivateProfileString("Add-Ins32", _
"AddInProject.AddInClass", "0", "VBADDIN.INI")
MsgBox _
"Add-in is now entered in VBADDIN.INI file."
End Sub
Alternatively, you can use the Add-In designer to create a reference to your add-in. For detailed instructions about how to do this, see "Referencing Add-Ins" in Chapter 4, "Connecting and Exposing Add-Ins".
In the Project Explorer window, double-click the Class module Class1 to bring it to the front. Set its Name property to "AddInClass" and make sure that its Instancing property is set to "5 – MultiUse".
Add the following line of code to the Class module:
Implements IDTExtensibility
This adds a reference to the IDTExtensibility object to your project.
Click IDTExtensibility in the Object box.
Notice that four new events appear in the Procedure box: OnConnection, OnDisconnection, OnStartupComplete, and OnAddInsUpdate.
Click each of the events in the Procedure box to add their procedures to your Class module.
While you can enter the procedure syntax manually, it's strongly recommended that you click the event name in the box to add the procedures to the Class module to ensure that all names and arguments are entered correctly. Plus, it's faster!
All four of these event procedures must be present in your Class module for add-ins to work correctly. Also, if one or more of the event procedures has no code in it, it will be removed upon compilation, so it's important that you add at least a comment to each of the four events to ensure that they remain in the Class module when you compile.
Now that you have all four events added, add the following code to them:
Private Sub IDTExtensibility_OnConnection(ByVal _
VBInst As Object, ByVal ConnectMode As _
VBIDE.vbext_ConnectMode, ByVal AddInInst As _
VBIDE.AddIn, custom() As Variant)
MsgBox "Add-in is now connected"
End Sub

Private Sub IDTExtensibility_OnDisconnection(ByVal _
RemoveMode As VBIDE.vbext_DisconnectMode, _
Custom () as Variant)
MsgBox "Add-in is now disconnected"
End Sub

Private Sub IDTExtensibility_OnStartupComplete _
(custom() As Variant)
' Comment to prevent procedure from being
' deleted on compilation.
End Sub

Private Sub IDTExtensibility_OnAddInsUpdate _
(custom() As Variant)
' Comment to prevent procedure from being
' deleted on compilation.
End Sub
On the Project menu, click Project1 Properties, then enter AddInProject in the Project Name box. Click OK.
On the File menu, click Save Project to save the project files. Name them as shown in the following table. Visual Basic will provide the indicated extensions automatically.
File
File name
Extension
Basic module
AddIn
.bas
Class module
AddInClass
.cls
Project
AddInProject
.vbp
To test the AddInProject add-in
Click the File menu, then click Make AddInProject.dll. In the Make Project dialog box, click OK.
This will register the add-in in the system registry.
In the Immediate window, enter AddToINI and press RETURN. You get a message box that says "Add-in is now entered in VBADDIN.INI file."
On the File menu, click New Project to open the New Project dialog box. (This will close AddInProject.vbp; you will be prompted to save any changes.) Double-click the Standard EXE icon to create a new project.
Click the Add-Ins menu, then click Add-In Manager. Notice that a new entry, "AddInProject.AddInClass," appears in the list.
Select AddInProject.AddInClass check box, then click OK.
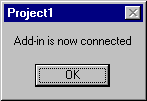
At this point, you should get the following dialog box:
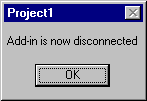
Click OK. Clear the AddInProject.AddInClass check box, then click OK.
You should get the following dialog box:
What Just Happened?
The purpose of this add-in is to demonstrate the components and behavior of an essential component of an add-in — its Class module. Let's go through each of the previous steps and discuss what it did, and more importantly, how and why it was done the way it was.
The AddToINI procedure has only one purpose in life: to add an entry for your new add-in to a file in the Windows directory called Vbaddin.ini. Why do this? So that it is recognized by Visual Basic as an available add-in. You can add this entry any way you like, but the Windows WritePrivateProfileString API function call works well for this.
This brings up an important point: When you distribute an add-in to other users, either you or they must run this function (or use some alternative method) on their machines to update the Vbaddin.ini file before they'll be able to use your add-in. If you don't do this, Visual Basic won't know that the add-in is available, and the add-in won't appear in the list of add-ins in the Add-In Manager.
You can put such a procedure in a basic module (as was done here) and instruct the user to run the function, but a more elegant solution is to do it for the user in a setup program that you supply to install the add-in.
Alternatively, you can use the Add-In designer to create a reference to your add-in. For detailed instructions about how to do this, see "Referencing Add-Ins" in Chapter 4, "Connecting and Exposing Add-Ins".
The Class module is the heart of an add-in. It is the place where the add-in responds to events. In this example, it admittedly doesn't do very much — it just puts up message boxes when you connect and disconnect the add-in — but you could design an add-in that responded to literally hundreds of events!
Although the main Class module is useful, it's best not to put all of the code in it, unless it's brief. You can put other code in basic modules or other Class modules and call the procedures from the main Class module. Just follow your normal procedural programming guidelines.
The act of compiling the DLL registers it in the system registry.
Running the AddToINI procedure in the Immediate window creates an .ini file entry for the add-in in Vbaddin.ini. For more information on how to add this reference, see "Adding an Add-In Reference to the Vbaddin.Ini File" in "Connecting and Exposing Add-Ins."
The rest of the steps show how you can now activate the add-in in another project as well as demonstrate how it appears and behaves in the Add-In Manager. Also, they show how selecting and clearing the add-in entries in the Add-In Manager triggers the OnConnection and OnDisconnection events.