With Visual Basic, one of the easiest effects to achieve is moving a control at run time. You can either directly change the properties that define the position of a control or use the Move method.
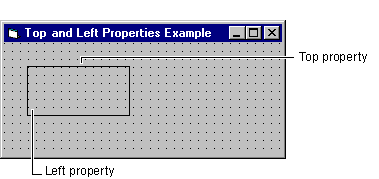
The Left property is the distance between the upper-left corner of the control and the left side of the form. The Top property is the distance between the upper-left corner of the control and the top of the form. Figure 12.10 shows the Left and Top properties of a control.
Figure 12.10 The Left and Top properties

You can move a control by changing the settings of its Left and Top properties with statements such as these:
txtField1.Left = txtField1.Left + 200
txtField1.Top = txtField1.Top Ė 300
As mentioned previously, line controls donít have Left or Top properties. Instead, you use special properties to control the position of line controls on a form. The following table lists these properties and how they determine the position of a line control.
| Property | Description |
| X1 | The x-coordinate of the start of the line. The coordinate is given in current scale units. The start of the line is the end created when you start drawing. |
| Y1 | The y-coordinate of the start of the line. |
| X2 | The x-coordinate of the end of the line. The end of the line is the end created when you stop drawing. |
| Y2 | The y-coordinate of the end of the line. |
The Jumpy Line demo of the Blanker application randomly changes the position of a line control on the DemoForm using these statements:
' Set random X position for 1st line end.
linLineCtl.X1 = Int(DemoForm.Width * Rnd)
' Set random Y position for 1st line end.
linLineCtl.Y1 = Int(DemoForm.Height * Rnd)
' Set random X position for 2nd line end.
linLineCtl.X2 = Int(DemoForm.Width * Rnd)
' Set random Y position for 2nd line end.
linLineCtl.Y2 = Int(DemoForm.Height * Rnd)
' Clear stray pixels from moving line.
Cls
' Pause display briefly before next move.
Delay
Changing the Left and Top or X and Y properties produces a jerky effect as the control first moves horizontally and then vertically. The Move method produces a smoother diagonal movement.
The syntax for the Move method is:
[object.]Move left [, top[, width[, height] ] ]
The object is the form or control to be moved. If object is omitted, the current form moves. The left and top arguments are the new settings for the Left and Top properties of object, while width and height are new settings for its Width and Height properties. Only left is required, but to specify other arguments, you must include all arguments that appear in the argument list before the argument you want to specify.
Absolute movement occurs when you move an object to specific coordinates in its container. The following statement uses absolute movement to move a control named txtField1 to the coordinates (100, 200):
txtField1.Move 100, 200
Relative movement occurs when you move an object by specifying the distance it should move from its current position. The following statement uses relative movement to move txtField1 to a position 100 twips down and to the right of its current position:
txtField1.Move txtField1.Left + 100, txtField1.Top _
   + 100
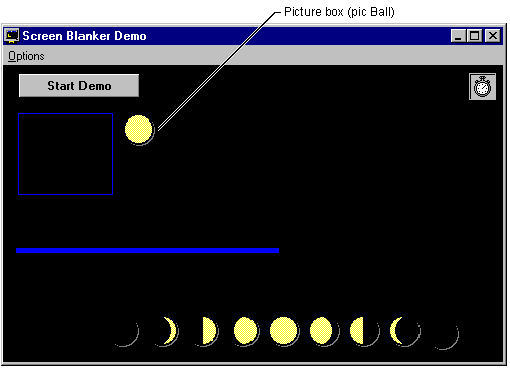
This section shows control movement in the Blanker sample application. The Rebound demo moves a picture box diagonally around the form, so the picture box appears to "bounce" off the sides of the form. This demo uses a picture box instead of an image control because the image control flickers as the movement causes it to repaint.
Figure 12.11 shows the main form of the Blanker application (DemoForm) and the picture box used in this example.
Figure 12.11 Picture box (picBall) in the Blanker application

The name of the picture box is picBall. This control begins moving around the form after you choose the Rebound command from the Options menu and then click the Start Demo button. The event procedure for this command button then calls the CtlMoveDemo procedure.
The CtlMoveDemo procedure randomly selects a starting direction from one of these four possibilities:
The picBall picture box moves along the chosen direction until the control reaches one of the four edges of the form. Then the picture box changes direction away from the edge it has reached; the variable Motion controls the direction. For example, when the picture box is moving left and up, this portion of the procedure changes the value of Motion and directs the code to move picBall in another direction.
The following statements come from the CtlMoveDemo procedure in the Blanker application:
Select Case Motion
Case 1
   ' If motion is left and up, move the control
   '   20 twips.
   picBall.Move picBall.Left - 20, picBall.Top - 20
   ' If control touches left edge, change motion
   '   to right and up.
   If picBall.Left <= 0 Then
      Motion = 2
   ' If control touches top edge, change motion to
   '   left and down.
   ElseIf picBall.Top <= 0 Then
      Motion = 4
   End If
Notice that the line of code that moves picBall subtracts 20 twips from the current values of its Left and Top properties to establish the new location of the control. This ensures that the control always moves relative to its current position.
The speed and smoothness of the controlís movement depend on the number of twips (or other units) used in the Move method. Increasing the number of twips increases the speed but decreases the smoothness of motion. Decreasing the number of twips decreases the speed but improves the smoothness of the controlís motion.
For More Information For additional information on the Move method, see "Move Method" in the Language Reference.