Sorting and Merging Data in the Hierarchical FlexGrid

In this scenario, you can sort and merge data in the Hierarchical FlexGrid. In most cases, you access data by downloading from a database into your Hierarchical FlexGrid. However, here you enter sample data using the Code Editor window to populate the columns and rows of your Hierarchical FlexGrid.

To create this data display

  1. Set the properties of the Hierarchical FlexGrid.

  2. Create the data.

  3. Define the routines to calculate an index and do a sort.

  4. Define the routine to enter the data (from step 2) into the Hierarchical FlexGrid.

  5. Allow the control to switch data organization views.

To complete the scenario, follow the procedures in this section in the order shown.

Setting the Properties of the Control

Use the settings in the following table for the number of columns and rows, the font information, and to create the column headings of your Hierarchical FlexGrid.

MSHFlexGrid control

Property Setting
Name Fg1
Cols 4
Rows 20
MergeCells 2 – Restrict Rows
FormatString <Region |<Product |<Employees |>Sales
FontName Arial

Sorting and Merging the Data

Use the following procedures to complete the scenario of sorting and merging data in your Hierarchical FlexGrid.

To sort and merge the data

  1. Create an array to store the sample data. To do this, insert the following routine in the Form_Load event of your Code Editor window:
    Sub Form_Load ()
       Dim I As Integer
       ' Create array.
       For i = Fg1.FixedRows To Fg1.Rows - 1
          ' Region.
          Fg1.TextArray(fgi(i, 0)) = RandomString(0)
          ' Product.
          Fg1.TextArray(fgi(i, 1)) = RandomString(1)
          ' Employee.
          Fg1.TextArray(fgi(i, 2)) = RandomString(2)
          Fg1.TextArray(fgi(i, 3)) = _
          Format(Rnd * 10000, "#.00")
       Next
    
       ' Set up merging.
       Fg1.MergeCol(0) = True
       Fg1.MergeCol(1) = True
       Fg1.MergeCol(2) = True
    
       ' Sort to see the effects.
       DoSort
    
       ' Format Grid
       Fg1.ColWidth(0) = 1000
       Fg1.ColWidth(1) = 1000
       Fg1.ColWidth(2) = 1000
       Fg1.ColWidth(3) = 1000
    
    End Sub
    
  2. Calculate an index and complete a sort. To do this, define a routine to calculate an index and do a sort. The index is used with the TextArray property to sort the data. Insert the following routine to calculate an index:
    Function Fgi (r As Integer, c As Integer) As Integer
       Fgi = c + Fg1.Cols * r
    End Function
    
    Sub DoSort ()
       Fg1.Col = 0
       Fg1.ColSel = Fg1.Cols - 1
       Fg1.Sort = 1   ' Generic ascending.
    End Sub
    
  3. Enter data into your Hierarchical FlexGrid. To do this, define a routine that populates the Hierarchical FlexGrid with the sample data:
    Function RandomString (kind As Integer)
       Dim s As String
       Select Case kind
    
          Case 0   ' Region.
             Select Case (Rnd * 1000) Mod 5
                Case 0: s = "1. Northwest"
                Case 1: s = "2. Southwest"
                Case 2: s = "3. Midwest"
                Case 3: s = "4. East"
                Case Else: s = "5. Overseas"
             End Select
    
          Case 1   ' Product.
             Select Case (Rnd * 1000) Mod 5
                Case 0: s = "1. Chai"
                Case 1: s = "2. Peppermint"
                Case 2: s = "3. Chamomile"
                Case Else: s = "4. Oolong"
             End Select
    
          Case 2   ' Employee.
             Select Case (Rnd * 1000) Mod 4
                Case 0: s = "Clare"
                Case 1: s = "Tiffany"
                Case 2: s = "Sally"
                Case Else: s = "Lori"
             End Select
       End Select
       RandomString = s
    End Function
    

    If you run the project at this point, it should look something like this:
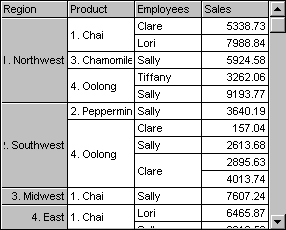
    Next, you need to allow the user to reorganize the data. That is, you must allow the Hierarchical FlexGrid to switch data organization views.

  4. Reorganize the data by adding the following routine, which will drag columns to new positions. This routine uses the Tag property to save the column number when the user presses the mouse button, triggering the MouseDown event.
    Sub Fg1_MouseDown (Button As Integer, _
    Shift As Integer, X As Single, Y As Single)
       Fg1.Tag = ""
       If Fg1.MouseRow <> 0 Then Exit Sub
       Fg1.Tag = Str(Fg1.MouseCol)
       MousePointer = vbSizeWE
    End Sub
    
  5. Add the following routine to readjust the columns and sort the data when the user releases the mouse button, triggering the MouseUp event.
    Sub Fg1_MouseUp (Button As Integer, Shift As _
    Integer, X As Single, Y As Single)
       MousePointer = vbDefault
       If Fg1.Tag = "" Then Exit Sub
       Fg1.Redraw = False
       Fg1.ColPosition(Val(Fg1.Tag)) = Fg1.MouseCol
       DoSort
       Fg1.Redraw = True
    End Sub
    

    Once the procedures in this scenario are complete, the data automatically reorganizes whenever you drag a column to a new position at run time. For example, if you drag the Employee column to the left, it would appear as follows: