When youíre working with only a few tables in a database diagram, itís usually helpful to view as much column information as possible. Such a view not only gives you more information, but it also enables you to edit the column definitions.
When youíre working with a large number of tables, however, itís usually preferable to view only the column names, or only the table name, so that you can see more of the tables in your diagram at once.
In a database diagram, you can expand the tables you want to edit as needed and then collapse them again to save space on the diagram.
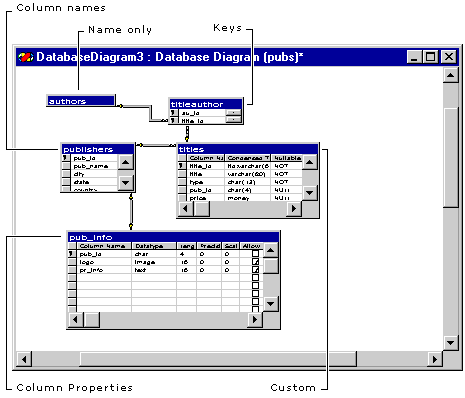
Each table in a database diagram can be displayed in one of five views.

 Shows a grid of all the table columns, column properties, and property settings. You can edit the column properties directly by typing in a cell or using the Cut, Copy, and Paste commands. You can also move and delete entire column definitions. You can configure the grid to show a subset of all the available properties for the columns in a table.
When you insert a new table into a diagram, it is shown in this view so that you can begin defining each column.
 Shows the names of all the columns in the table listed by name. You can rename the column names in this view. When you add an existing table to a diagram, it is shown in this view.
 Shows the names of all the columns in the table that are primary keys or foreign keys or that have unique constraints. You can rename the columns in this view.
 Represents a table in its minimized state and shows only the table name.
 Displays only the columns you choose. This gives you the flexibility to display only the information you want. This view is also useful for printing the database diagrams, because you can display more tables on one page, and won't normally see horizontal scroll bars on the tables. For more information, see Printing and Previewing Database Diagrams.
The default set of columns for the Custom view includes Column Name, Condensed Datatype, and Nullable.
| Column | Setting |
| Column Name | The name of the field in the table. |
| Condensed Datatype | Information about the field's data type, in the same format as the SQL Create Table statement. For example, a field containing a variable-length string with a maximum length of 20 characters would be represented as varchar(20). |
| Nullable | Null (the field can contain a Null value) or Not Null (the field must contain a non-null value). |
To change a table view
-or-
Click the corresponding button on the toolbar to change the view of the selected tables:
| Click this button | Button name | To |
 |
Column Properties | Add, rename, or delete columns, create relationships to other tables, edit column properties |
 |
Column Names | Add, rename, or delete columns, create relationships to other tables |
 |
Keys | Add, rename, or delete key columns, create relationships to other tables |
 |
Name Only | Minimize tables |
 |
Custom | Add, rename, or delete the property columns you've chosen to display in the property grid, create relationships to other tables, edit column properties for the columns you've chosen to display |
When you finish editing a table, you can change it to a different view or resize it to create more space on the diagram.
To modify the Custom view
Note To add a column, highlight the column in the Available columns box and click the > button. The column will then be listed in the Selected columns box. To display all columns, click the >> button. To remove a column from the Selected columns box, highlight the column and click the < button.
Note If the Save as default box is not selected, the columns listed in the Selected columns box will be displayed for all the database tables displayed in Custom view on the current diagram. However, this setting will not be saved and is not applied to other diagrams when you choose the Custom view command.
The selected table is redrawn to display the columns chosen in the dialog box.